Showing posts with label 2012 Ride 135. Show all posts
Saturday, January 28, 2012
Another DIY Kayak Cart - Work in Progress
Since the original PKF DIY kayak cart instructions went over so well, I decided to up the ante and construct an improved cart with a rigid metal frame. The 2012 Ride 135 has a unique pontoon-style hull which makes it difficult to find a commercially available cart that fits it well.
To start, the cart needed to be extremely rugged. While I have not had any failures with the PVC cart linked above, I wanted to focus on increasing rigidity and strength. Low weight and aesthetics were also high on the list. The parts used in the build also needed to be available locally to make it easier for other folks to replicate the design. Lastly, the cart had to be easy to assemble and break down. While I am still working on a few more tweaks, this build is almost finished.
Here is a preview -full instructions should be up this week. Have a great weekend!
Monday, November 21, 2011
Quick release DIY kayak anchor system + bottle opener
Whether you prefer the store bought variation or some other form of anchor, having the ability to quickly disconnect from it is crucial when kayak fishing. Although not recommended, I often anchor in river current to get close to the fish I am targeting. Using this simple setup in conjunction with an anchor trolley, I can deploy as well as release my anchor in seconds.
The blaze orange dog training dummy from Remington is a cost effective, durable float that makes anchor retrieval a cinch. Nite Ize’s stainless steel “S-Biner AHHH…” carabineer serves as a sturdy anchor line holder and doubles as a bottle opener back at camp. If experience has taught me anything, it is that you can never have enough bottle openers.
Key Components:
Velcro Strip – I recommend and use Velcro’s “One Wrap” 7/8”X 23” straps as they work well even when soaked. A 3 Pack is around $4 at HardwareandTools.com and they are also available at select hardware stores and Walmart.
10’-14' section of cord, preferably a different color than the anchor line. Home Depot and Lowe’s sell 75’ length packs of 5/32” diameter cord for less than $3.
Length of anchor line and anchor of your choice.
Take the 10’ - 14' length of cord and make a small loop in one end that will fit over the “S-Biner AHHH…” Attach and position the cord against the dummy as pictured and secure it with one of the Velcro straps at the top. This setup allows the pressure exerted from the anchor line to pass around the vinyl dummy instead of through it.
Tie the end of the anchor line to the 10’ length of cord as pictured and tuck the knot under the Velcro.
Wind the anchor line around the dummy to take up the slack. Use one of the extra strips of Velcro to keep the wrapped anchor line secure on the dummy.
Lastly, clip the “Figure 9 Carabiner” to the side handle of the kayak or similar location that is out of the way yet easy to reach. On the setup on my 2012 Ride 135, I use this carabineer to control the anchor trolley line and keep it from riding up. It can be easily removed in seconds for full front-to-back operation of the anchor trolley if desired. 95% of the time I have the anchor trolley in the forward position anyway.
To use this setup, slide the blue cord through the ring of the anchor trolley.
Leave a foot or so of excess line free on the tag end and secure it to the “Figure 9 Carabiner” as noted in the manufacturer’s instructions. This allows the anchor trolley to be placed in the desired position before the anchor is deployed.
Unwind the anchor line from the dummy and drop the anchor over the side. When the desired length of line has been let out, simply wrap the anchor line around the “S-Biner AHHH…” carabineer 4 times - two wraps between each opening as pictured.
It only takes a couple of seconds to accomplish and creates a non-slip, yet easy to remove connection. Toss the dummy into the water and get ready to fish. The location of vinyl dummy in can be adjusted by simply taking up or letting the slack out of the “Figure 9 Carabiner” line.
To come off the anchor, simply yank the tag end of the line connected to the “Figure 9 Carabiner”. The line will slide right out of the entire assembly. The blaze orange Remington float will be easy to spot when you return to retrieve your anchor. Tight lines - Paul
Note: If you need a beefier setup, upgrade to Remington's 3" x 12" training dummy that runs $6.99. Switch out the small “Figure 9 Carabiner” for the larger sized one that costs around $6. These substitutions will allow for much larger diameter ropes and a heavy duty setup if needed.
Tuesday, September 6, 2011
Homemade Wilderness Systems SlideTrax Hardware and Acessories Plates - 2012 Ride 135
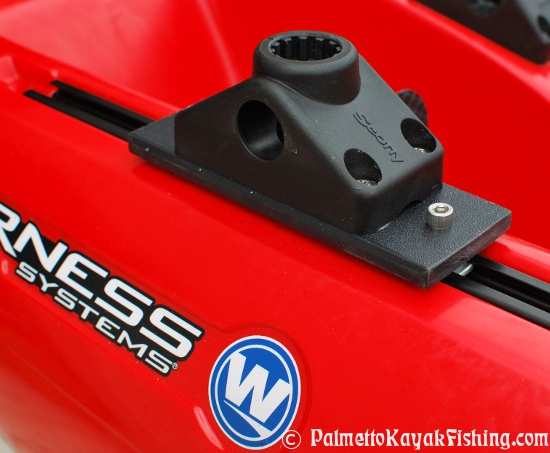
Wilderness Systems’ “SlideTrax”, available on many newer-model fishing kayaks, opens up an assortment of accessory mounting options for the kayak angler. If you are not familiar with the SlideTrax system, it is basically a metal rail that is molded into the deck of many WS kayaks and allows users to have a movable (and removable) mounting point for all kinds of accessories. After dropping a significant amount of cash on a new kayak, many paddlers don’t want to spend a lot of money on accessories. The cost of commercially available SlideTrax bolts, nuts and platforms can soar quickly. So to stay true with my DIY roots, I set out to fabricate my own setup.
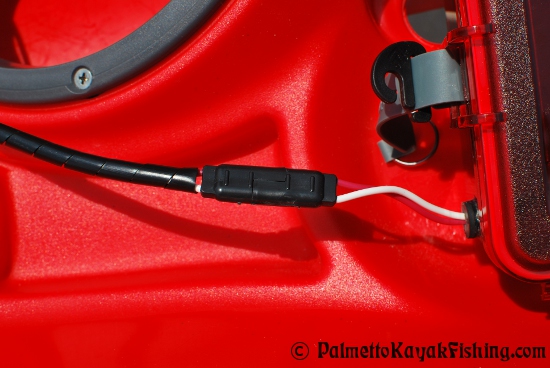
When I first purchased Rachael’s Tarpon 140 with the SlideTrax system a few years back, I opted for the popular 
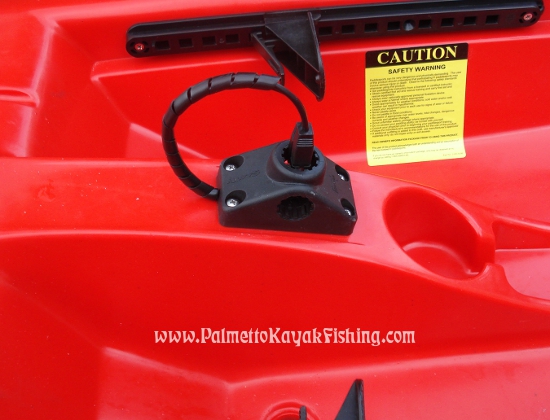
Toilet-to-Floor bolts method (Lowe's part number PP23517) to add accessories like Scotty rod holders.
One $2 package of brass bolts cut down to size and a couple of wing nuts are the main components. This option gets the job done and requires very few tools other than a hacksaw to cut the bolt down to size. The bolt has a rounded rectangular head that fits into the SlideTrax, leaving the threads pointing up through the holes in the cutting board. The only downside is that the toilet-to-floor bolt may spin ever so slightly in the track when tightening or loosening up the wing nut.
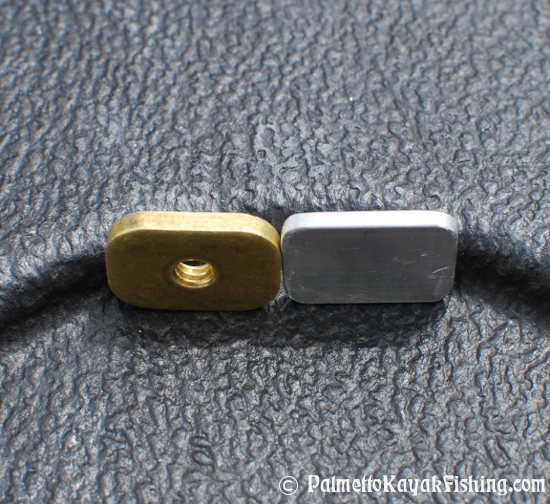
This time around I wanted to fabricate something that closer resembled the OEM hardware for the 2012 Ride 135 SlideTrax. OEM brass SlideTrax nuts are available online but the price is around $12 before shipping for a package of 4 nuts.
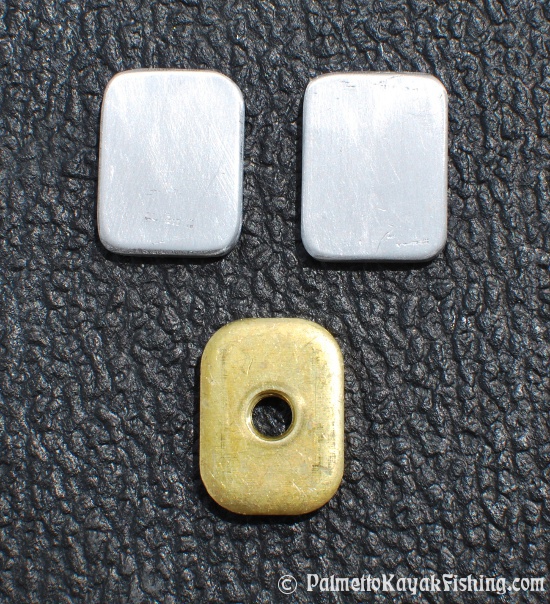
Using one of the OEM SlideTrax nuts from the Tarpon as a guide, I cut down blanks out of the leftover 1/8 x 3/4 x 3 aluminum flat stock (Lowe's part number 24403) from the rear transducer arm build. I rounded off the edges of the aluminum with a sander to match the curvature of the original hardware.
A 1/4"-20NC Tap and #7 Drill set that costs around $6 (Lowes Item #: 232572 or Home Depot Item # 1765538) produced the threads in the aluminum. I used a center punch in the middle of the aluminum blanks so my drill bit would stay in place.
Next, I put the hand drill on the slowest setting, using the tap bit to produce the threads. To make the accessory bases, I cut and shaped pieces of black cutting board (again, left over from the Transducer arm build).
One tip to make the cut edges of the board look super clean is to first use sandpaper to smooth the edges down. Follow up by using fine grade steel wool. When enough pressure is applied, the steel wool will make the edges “shine” and look like a custom molded piece of plastic instead of a chopped cutting board. This step really makes the accessory plate look very clean.
Mounting Hardware: (Home Depot is significantly cheaper than Lowe' on these items - for this build, I recommend buying all the components at HD vs. Lowe's if you want to make one stop.)
1 – package of Stainless Steel 1/4 in.-20 x 3/4 in. Button Head Socket Cap Screw (Home Depot part # 71918) includes 2 bolts
2 – packages of Nylon Spacers: .358 in. x 13/64 in. x 3/4 in. (Home Depot part # 87348)
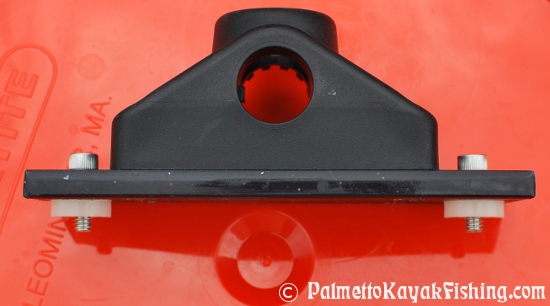
Various SS bolts or screws for mounting accessories to the cutting board mounting base.
The nylon spacers were epoxied to the bottom of the accessory plate. This gives a smooth, raised surface for the accessory plate to glide on top of the SlideTrax. I keep an allen wrench in a pocket in my PDF in case I want to adjust the placement of the accessory plates or remove them all together.
The aluminum plates are very strong and lightweight. The tapped threads have not deteriorated in the least bit over the last month of use and I am confident that this setup is just as secure as the commercially available options.
Thursday, September 1, 2011
Kayak Battery Box for the 2012 Ride 135
While there are a lot of different power options for running a fish finder or other electronics on a kayak, I chose to stick with what has worked for me in the past. I went with a small sealed lead acid battery (SLA) available locally at Batteries Plus due to its long run time between charges and durability. There are a couple of different options and sizes available, but I specifically chose Werker’s 12v 7ah (part number: WKA12-7F2).
In my previous rig – the Ocean Kayak Prowler Big Game – there was a built in battery shelf inside the hull designed to house one of these SLA batteries. I must say that this option was well thought out and allowed me to leave the battery inside the kayak at all times much like a traditional fishing boat. Since the Ride 135 is a little different, an easy to build battery box works just fine.
For this build, I picked up a large Outdoor branded dry box from Walmart and test fitted it inside the center hatch of the 2012 Ride 135. Not only is it a perfect fit, it wedges securely into position either forward or back once on the floor inside the hull.
I prefer to keep it in the forward position because I like to stand in my Ride 135 and think that the floor may flex ever so slightly and possibly put unneeded pressure on the battery box if it were kept in the rear position.
To make the connection to the fish finder removable I purchased a Hopkins 12 in. 2 pole flat set connector from Autozone for around $2 (part number: 47965). In addition to being inexpensive and offering a watertight connection, this setup allows me to charge my battery without having to remove it from the box (see picture).
I simply cut the connector in two and soldered one end to the fish finder’s connections and the other end to the battery box leads. A few extra parts including battery terminal hardware, an inline fuse, marine heat shrink and extra wire were used for making the electrical connections from the battery to one end of the cut Hopkins connector.
Here is a tip on drilling into the dry box. Use a small drill bit to make a pilot hole into the plastic. Next, attach the larger drill bit that will bore the hole large enough to pass the wires through with the addition of the rubber stopper. REVERSE the drive of the drill so that the large bit spins counterclockwise. The reason for doing this is that it prevents the bit from digging into the rigid plastic too fast which can cause the box to crack. By using the large bit in reverse in a high speed drill, the friction and heat do most of the drilling instead of the cutting edge of the drill bit.
I passed the wires through the hole, modified a rubber stopper from Lowe's and added marine Goop to make a sealed port. Foam tubes cut to size house the battery inside the box and keep it from sliding around. I added one additional small piece of foam between the battery and the hinged door. It works great!
Related Past Posts: DIY Fish Finder Install
DIY Transducer Arm Fabrication
Related Past Posts: DIY Fish Finder Install
DIY Transducer Arm Fabrication
Wednesday, August 17, 2011
DIY Kayak Fish Finder Install - 2012 Wilderness Systems Ride 135
Last week I published details on how I built a pivoting transducer arm that makes use of the existing rudder screw holes in the rear of the 2012 Ride 135. Since then, I have received quite a few requests for a write-up on how I completed the entire fish finder install. These instructions are pretty universal so no matter what you are paddling, the fundamentals are pretty much the same.
Since I already had a few extra Scotty 241 bases left over, I decided to save some money and build a mounting post with some items I had laying around in the garage. The main components total around $3-$4 and include:
I chose a basic waterproof fish finder – Humminbird’s Piranhamax 170 – that can be purchased for around $100. What I like about the Piranhamax 170 is that it is simple, accurate, boasts a digital temperature gauge and has a vibrant LED backlight for low light/no light conditions. It utilizes dual beam sonar (60°& 20°) which produces great results in both the shallow and deep water that I regularly fish. My only gripe is that I wish the unit had a digital voltage display like my old Eagle Cuda.
Since I already had a few extra Scotty 241 bases left over, I decided to save some money and build a mounting post with some items I had laying around in the garage. The main components total around $3-$4 and include:
1 - 4.00" Round Plastic Electrical Box Cover – Lowes Item # 81585 (LINK)
1 - 1½” long, ¼’ diameter bolts (or something similar)
1 – Stop Nut to fit bolt
1 – ½” Schedule 40 PVC Coupling – Lowes Item # 23849 (LINK)
1 – ½” Schedule 40 PVC Pressure Plug - Lowes Item # 22679 (LINK)
1 length of schedule 40 PVC cut to 2-3/8”
Fish Finder Mounting Base
Drill a hole in the center of the round electrical box cover and one through the center of the PVC pressure plug. Slide the bolt and nut into place as pictured and tighten up the whole assemble. Using PVC glue, attach the PVC coupling to the end of the PVC pressure plug. Take the 2-3/8” section of PVC and glue it inside the coupling. The exposed length of ½” PVC pipe is what will hold the unit firmly inside the standard Scotty mount. I drilled an additional hole at the bottom of the PVC so that when the unit is inside the Scotty mount, I can slide a bolt or pin through it for added security.
(***To dress it up a little, I sprayed it with a can of “Truck Bed Liner” left over from another project. If you go this route, be sure to mask off the bottom section of exposed PVC so that it will still be able to fit inside the Scotty Mount.)
I used the stainless steel screws that came with the fish finder to mount it to the plate. Once in position, I smoothed off the points of screws so that they were flush with the round plate using a Dremel tool.
Installing the Unit
I used the Dremel tool to bore out the underside of the Scotty mount to make more space for the transducer and power cords (see picture). Once this was completed, I placed the Scotty mount in position on the deck and drilled out 4 holes for the mounting screws. Next, I selected a drill bit that would create a hole large enough in the center area of the 4 mounting screw holes to allow the wires and plugs to pass through the kayak deck.
Using a rubber stopper - 3/4 x 9/16 x 1 Lowes Item # 139548 (LINK) – I drilled, shaped and cut the rubber as pictured. Again, there are commercially available marine accessories that accomplish the same thing, but I had an extra rubber stopper from the transducer arm install so I decided to put it to use.
Leave 12” of slack in both wires from the rubber stopper to the end of the wire plugs. Remove the rubber stopper while holding the wires in position to maintain the 12” of slack. Generously coat the entire rubber stopper and both wires with Marine Goop. Push everything back into position and add a small amount of goop to the 4 mounting holes as pictured. Carefully mount the Scotty mount to the deck ensuring that there is enough space for the wires to pass through without any pinching.
| Click for Transducer Arm DIY instructions |
| Click for Transducer Arm DIY instructions |
The next blog post will feature a DIY removable battery box setup that I use to power this unit. Have fun out there! - Paul
Subscribe to:
Posts (Atom)


