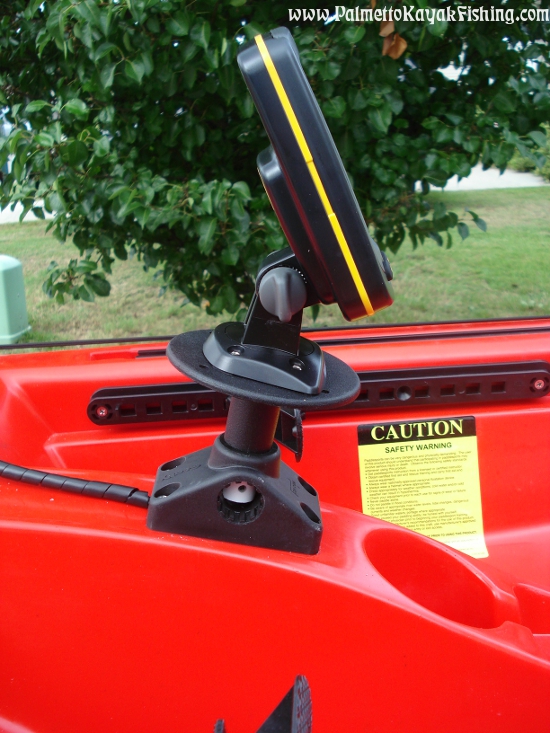
I chose a basic waterproof fish finder – Humminbird’s Piranhamax 170 – that can be purchased for around $100. What I like about the Piranhamax 170 is that it is simple, accurate, boasts a digital temperature gauge and has a vibrant LED backlight for low light/no light conditions. It utilizes dual beam sonar (60°& 20°) which produces great results in both the shallow and deep water that I regularly fish. My only gripe is that I wish the unit had a digital voltage display like my old Eagle Cuda.
Since I already had a few extra Scotty 241 bases left over, I decided to save some money and build a mounting post with some items I had laying around in the garage. The main components total around $3-$4 and include:
1 - 4.00" Round Plastic Electrical Box Cover – Lowes Item # 81585 (LINK)
1 - 1½” long, ¼’ diameter bolts (or something similar)
1 – Stop Nut to fit bolt
1 – ½” Schedule 40 PVC Coupling – Lowes Item # 23849 (LINK)
1 – ½” Schedule 40 PVC Pressure Plug - Lowes Item # 22679 (LINK)
1 length of schedule 40 PVC cut to 2-3/8”
Fish Finder Mounting Base
Drill a hole in the center of the round electrical box cover and one through the center of the PVC pressure plug. Slide the bolt and nut into place as pictured and tighten up the whole assemble. Using PVC glue, attach the PVC coupling to the end of the PVC pressure plug. Take the 2-3/8” section of PVC and glue it inside the coupling. The exposed length of ½” PVC pipe is what will hold the unit firmly inside the standard Scotty mount. I drilled an additional hole at the bottom of the PVC so that when the unit is inside the Scotty mount, I can slide a bolt or pin through it for added security.
(***To dress it up a little, I sprayed it with a can of “Truck Bed Liner” left over from another project. If you go this route, be sure to mask off the bottom section of exposed PVC so that it will still be able to fit inside the Scotty Mount.)
I used the stainless steel screws that came with the fish finder to mount it to the plate. Once in position, I smoothed off the points of screws so that they were flush with the round plate using a Dremel tool.
Installing the Unit
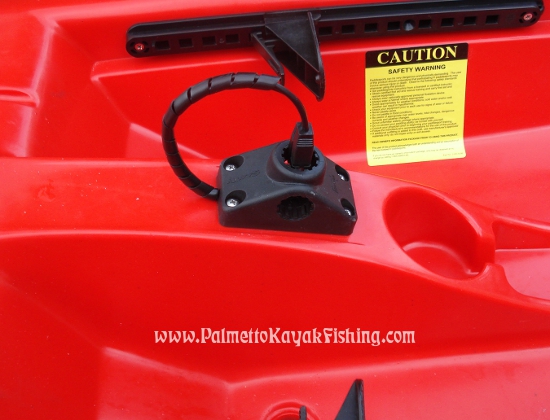
I used the Dremel tool to bore out the underside of the Scotty mount to make more space for the transducer and power cords (see picture). Once this was completed, I placed the Scotty mount in position on the deck and drilled out 4 holes for the mounting screws. Next, I selected a drill bit that would create a hole large enough in the center area of the 4 mounting screw holes to allow the wires and plugs to pass through the kayak deck.
Using a rubber stopper - 3/4 x 9/16 x 1 Lowes Item # 139548 (LINK) – I drilled, shaped and cut the rubber as pictured. Again, there are commercially available marine accessories that accomplish the same thing, but I had an extra rubber stopper from the transducer arm install so I decided to put it to use.
Leave 12” of slack in both wires from the rubber stopper to the end of the wire plugs. Remove the rubber stopper while holding the wires in position to maintain the 12” of slack. Generously coat the entire rubber stopper and both wires with Marine Goop. Push everything back into position and add a small amount of goop to the 4 mounting holes as pictured. Carefully mount the Scotty mount to the deck ensuring that there is enough space for the wires to pass through without any pinching.
 |
| Click for Transducer Arm DIY instructions |
 |
| Click for Transducer Arm DIY instructions |
The next blog post will feature a DIY removable battery box setup that I use to power this unit. Have fun out there! - Paul


Excellent! Thank you for sharing.
ReplyDeleteGlad you enjoyed it!
ReplyDeleteLooks like such a wonderful and fun day! your blog is great!
ReplyDeleteHave you done a DYI on the battery box ? What kind of battery do you use?
ReplyDeletethanks, this is a really good setup guide, when i first saw the hole under the scotty mount i got nervous for your kayak! but you really optimised the setup, i like it.
ReplyDeleteamazing product for fishing. Thanks for sharing with us.
ReplyDeletemarine seats | Kayaks Accessories | http://www.discountskitubesandgear.com.au/
Awesome post !!! Thanks for spending the time to discuss this..Thanks for sharing this post...
ReplyDeleteRaymarine Dragonfly Fishfinder
Quite nice post thanks for share.........
ReplyDeleteFish finder
This is nice post which I was awaiting for such an article and I have gained some useful information from this site. fısh fınder
ReplyDeleteThis is cool, I've never tried installing fish finder in a kayak. :) Is it helpful? How was your experience?
ReplyDeleteBest overview of Kayak fishing with perfect guideline. Fishing is the hobby that gives more enjoy. I have described some secret tips on fishing at Best Fish Finder here. To choose a fishfinder my review would be great. Don’t forget to read the tips.
ReplyDeleteGreat job. I admire all your hard work. Just the work posting makes me tired and you were great to share all your knowledge. Truly looks professional.
ReplyDeleteThanks for the website. I think we can get all the information about fly fishing, trip reports. I love fishing. According to me Kenai river fishing is one of the best places for fishing. I love it & took help from this website.
One of the perfect article about fish finder,.
ReplyDeleteI like it,.
Thanks for sharing this post, looking for more portable fish finder for kayak and small boat here: http://fishfinderselect.com/best-portable-fish-finder-reviews-for-2015-2016-ultimate-guide/
ReplyDeleteGreat write-up, thanks. For all your readers - head over to fishfinders.info to find out which fishfinder is currently the highest rated device.
ReplyDeleteGreat write-up, thanks. For all your readers - head over to fishfinders.info to find out which fishfinder is currently the highest rated device.
ReplyDeleteA fishfinder or sounder (Australia) is an instrument used to locate fish underwater by detecting reflected pulses of sound energy, as in sonar.That is really a great job to have fun with big and small fishes that is really enjoyable moment while you do catch fishes. Fly Fishing is an ancient art. Its roots go back to ancient kings in far away lands. Today it is common to see this style of angling in many areas of the world, and it is one of the world's fastest work.
ReplyDeleteInformative post . You shared details about DIY Kayak Fish Finder Install . Your snap shot is more better.
ReplyDeleteGreat step by step. Pictures are so helpful.
ReplyDeleteWow. I thought your last post was detailed. This is high quality work, with great pictures. Do you have a youtube channel? One of the best blogs out there for sure!
ReplyDeleteI do not even know how I ended up here, but I thought this post was good. I do not know who you are but definitely you’re going to a famous blogger if you aren’t already Cheers!
ReplyDeleteMy blog: Best Fish Finder
Amazing blog post.. Thanks...
ReplyDeleteRegards,
Really amazing blog post..
Regards,
Brad
I have enjoyed your blog post and I have learned new things from it.
ReplyDeletebest fish finder
portable fish finder
It's amazing fish finder. Thanks for sharing this fishing gear.
ReplyDeleteGreat Post! Thank you for sharing with us
ReplyDeleteAh! What a beautiful idea. This is the way our mind desires. We can think a lot of these in our blog as well. Thank you for promoting tips and wonderful inspirations!
ReplyDeleteThanks a lot for this share….
Marcel recently posted...KAYAK DUCK HUNTING
Thanks for your post. I’ve been thinking about writing a very comparable post over the last couple of weeks, I’ll probably keep it short and sweet and link to this instead if thats cool. Thanks.fish finder sunglasses
ReplyDeleteIt's been a great article about kayak. Kayak fish finder, an important device for kayak fishing. we absolutely must use a portable fish finder. We must read fish finder reviews before buying a fish finder.
ReplyDeleteThank you for sharing; I am sure that you are experienced enough to choose and use a good fish finder. Please do not forget to share something new soon. However, I have read an article on fish finders here. I am personally like the information shared and you might like this too
ReplyDeleteThank you for sharing with us this great post
ReplyDeleteToday i got here some beneficial idea, thanks dear owner,
ReplyDeleteYour website is very beautiful or Articles. I love it thank you for sharing for everyone. Fish Mounts for Sale
ReplyDeleteWow, cool post. I’d like to write like this too – taking time and real hard work to make a great article… but I put things off too much and never seem to get started. Thanks though.
ReplyDeleteBest Kayak Roof Racks
Dear, your post has one thing that caught my attention! Its information is more useful than many other articles on this topic.
ReplyDeletebest resources place from this good idea, thanks a lot
ReplyDeletea great idea that you shared here details, thanks a lot
ReplyDeleteIt’s a great and useful piece of info. I’m happy that you just shared this useful info with us. Please stay informed like this. Thank you for sharing. Here’s another informative content. Humminbird Helix vs Solix Fish Finders You may find more details here.
ReplyDeleteHey Thanks for sharing this blog its very helpful to implement in our work
ReplyDeleteRegards
LANDSCAPE COMPANY IN MUMBAI,MAHARASHTRA
I recently went on a fishing trip with the Fishing Master boat rental from Sunnyside Marina, and it exceeded my expectations. The boat was well-maintained and had all the necessary equipment for a successful fishing adventure. I caught some impressive fish and enjoyed the peacefulness of Lake Tahoe. If you're a fishing enthusiast, this rental is a must-try! North Tahoe boat rentals
ReplyDeleteBookkeepers Eye: Trusted in accounting, bookkeeping, and financial success. Let us architect your journey with precision and expertise for lasting prosperity.
ReplyDeleteAwesome DIY install! The fish finder fits perfectly on the 2012 Wilderness Systems Ride. Love how clean and organized the setup looks. This guide makes it seem so simple to do. Definitely inspired to try this on my kayak. Thanks for sharing these helpful tips and step-by-step instructions! Air Fryer
ReplyDelete