Showing posts with label kayak anchor. Show all posts

Monday, February 27, 2012

DIY No Drill Kayak Anchor Trolley Connection Points


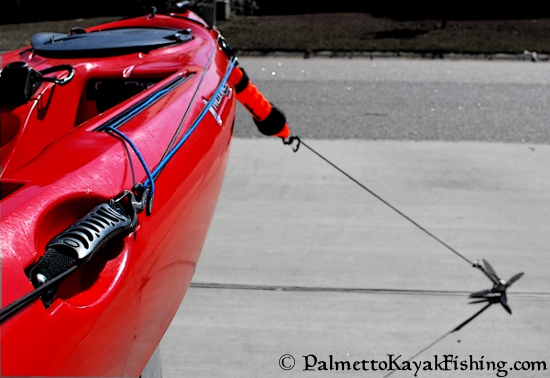
Over the past couple of months I have received a few questions on how I set up the front and rear connection points for the anchor trolley on the 2012 Ride 135.  Youtube and forums like KayakBassFishing.com are of excellent resources for learning about a basic anchor trolley setup.  Instead of going through the whole process, consider this the Cliffs Notes version that focuses on the connection points - especially the rear one.

Since I don't use a rudder, I took advantage of the factory installed hardware to set up a functional trolley without having to drill additional holes into the kayak.  Many of the Wilderness Systems kayaks have these bolts preinstalled from the factory.  The key to this entire build is the use of 550 paracord because it flattens out making it ideal for the rear connection point.

These pictures were taken some time ago and I no longer use the zinc plated pulleys.  I highly recommend Harken's H224 micro blocks.  They can be purchased online at Austin Kayak HERE or locally at West Marine.  They are well worth the investment and won't corrode.


Knot a loop of paracord and attach it directly to the pulley or use a snap as pictured.  I like using the brass snaps so I can remove the rear portion of the trolley.  This comes in handy in shallow spots where I can disconnect the rear of the trolley and use it as tow rope.  This allows me to drag my kayak behind me as I move upstream and alleviates the need for separate tow line.


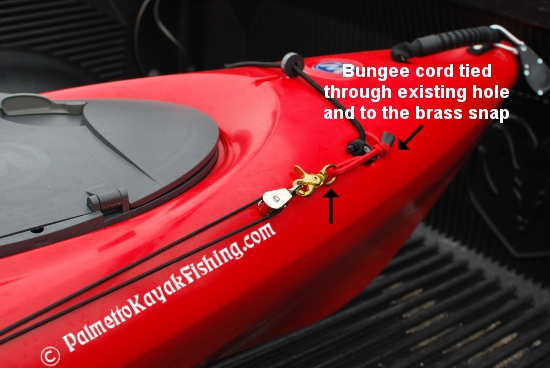
The install is simple.  Use a phillips head screwdriver to back out one of the factory bolts found at various points on the rear of the kayak.  Place the paracord loop around the bolt and retighten.  The paracord will flatten considerably.


The woven portion on top of the paracord loop is just for looks.  It is very easy to make a "King Cobra" weave with with a little practice.


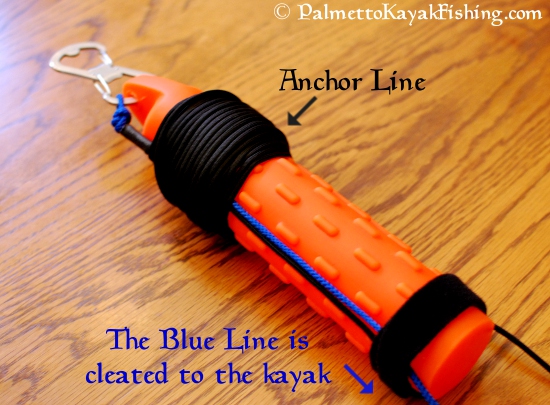
 Check out the DIY anchor system instructions by clicking on the picture below.


Monday, November 21, 2011

Quick release DIY kayak anchor system + bottle opener


Whether you prefer the store bought variation or some other form of anchor, having the ability to quickly disconnect from it is crucial when kayak fishing.  Although not recommended, I often anchor in river current to get close to the fish I am targeting.  Using this simple setup in conjunction with an anchor trolley, I can deploy as well as release my anchor in seconds.


The blaze orange dog training dummy from Remington is a cost effective, durable float that makes anchor retrieval a cinch.  Nite Ize’s stainless steel “S-Biner AHHH…” carabineer serves as a sturdy anchor line holder and doubles as a bottle opener back at camp.  If experience has taught me anything, it is that you can never have enough bottle openers.


Key Components:


Remington 2” x 11” Vinyl Dummies - $4.99 each or a 3pk for $12.99 Academy Sports


Nite Ize “Figure 9 Carabiner” small size - $3.99 Sportsman’s Warehouse


Nite Ize “S-Biner AHHH…” in stainless steel - $3.99 Sportsman’s Warehouse


Velcro Strip – I recommend and use Velcro’s “One Wrap” 7/8”X 23” straps as they work well even when soaked.  A 3 Pack is around $4 at HardwareandTools.com  and they are also available at select hardware stores and Walmart. 

10’-14' section of cord, preferably a different color than the anchor line.  Home Depot and Lowe’s sell 75’ length packs of 5/32” diameter cord for less than $3.

Length of anchor line and anchor of your choice.


Start off by securing the “S-Biner AHHH…” to the vinyl dummy as pictured.


Take the 10’ - 14' length of cord and make a small loop in one end that will fit over the “S-Biner AHHH…” Attach and position the cord against the dummy as pictured and secure it with one of the Velcro straps at the top.  This setup allows the pressure exerted from the anchor line to pass around the vinyl dummy instead of through it.


Tie the end of the anchor line to the 10’ length of cord as pictured and tuck the knot under the Velcro.


Wind the anchor line around the dummy to take up the slack.  Use one of the extra strips of Velcro to keep the wrapped anchor line secure on the dummy.


Lastly, clip the “Figure 9 Carabiner” to the side handle of the kayak or similar location that is out of the way yet easy to reach.   On the setup on my 2012 Ride 135, I use this carabineer to control the anchor trolley line and keep it from riding up.  It can be easily removed in seconds for full front-to-back operation of the anchor trolley if desired.  95% of the time I have the anchor trolley in the forward position anyway.


To use this setup, slide the blue cord through the ring of the anchor trolley.


Leave a foot or so of excess line free on the tag end and secure it to the “Figure 9 Carabiner” as noted in the manufacturer’s instructions.  This allows the anchor trolley to be placed in the desired position before the anchor is deployed.

Unwind the anchor line from the dummy and drop the anchor over the side.  When the desired length of line has been let out, simply wrap the anchor line around the “S-Biner AHHH…” carabineer 4 times - two wraps between each opening as pictured.


It only takes a couple of seconds to accomplish and creates a non-slip, yet easy to remove connection.   Toss the dummy into the water and get ready to fish.  The location of vinyl dummy in can be adjusted by simply taking up or letting the slack out of the “Figure 9 Carabiner” line.

To come off the anchor, simply yank the tag end of the line connected to the “Figure 9 Carabiner”.  The line will slide right out of the entire assembly.   The blaze orange Remington float will be easy to spot when you return to retrieve your anchor.  Tight lines - Paul


Note:  If you need a beefier setup, upgrade to Remington's 3" x 12" training dummy that runs $6.99.  Switch out the small “Figure 9 Carabiner” for the larger sized one that costs around $6.  These substitutions will allow for much larger diameter ropes and a heavy duty setup if needed.