Monday, February 27, 2012

DIY No Drill Kayak Anchor Trolley Connection Points


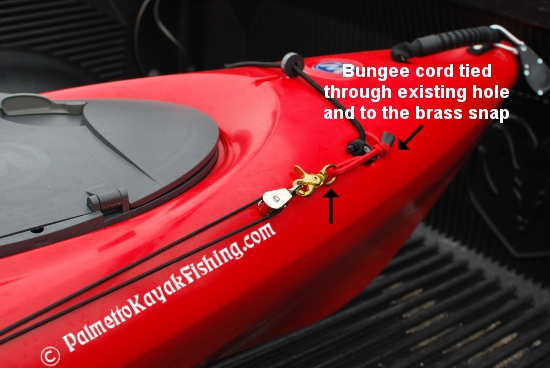
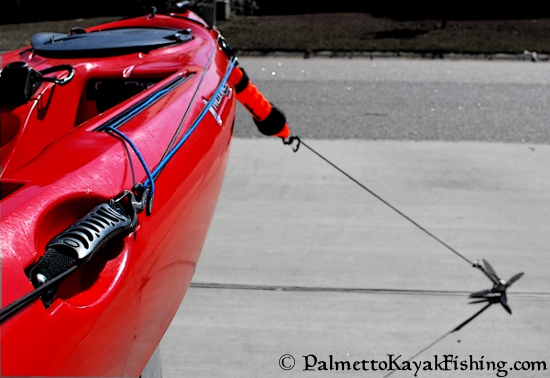
Over the past couple of months I have received a few questions on how I set up the front and rear connection points for the anchor trolley on the 2012 Ride 135.  Youtube and forums like KayakBassFishing.com are of excellent resources for learning about a basic anchor trolley setup.  Instead of going through the whole process, consider this the Cliffs Notes version that focuses on the connection points - especially the rear one.

Since I don't use a rudder, I took advantage of the factory installed hardware to set up a functional trolley without having to drill additional holes into the kayak.  Many of the Wilderness Systems kayaks have these bolts preinstalled from the factory.  The key to this entire build is the use of 550 paracord because it flattens out making it ideal for the rear connection point.

These pictures were taken some time ago and I no longer use the zinc plated pulleys.  I highly recommend Harken's H224 micro blocks.  They can be purchased online at Austin Kayak HERE or locally at West Marine.  They are well worth the investment and won't corrode.


Knot a loop of paracord and attach it directly to the pulley or use a snap as pictured.  I like using the brass snaps so I can remove the rear portion of the trolley.  This comes in handy in shallow spots where I can disconnect the rear of the trolley and use it as tow rope.  This allows me to drag my kayak behind me as I move upstream and alleviates the need for separate tow line.


The install is simple.  Use a phillips head screwdriver to back out one of the factory bolts found at various points on the rear of the kayak.  Place the paracord loop around the bolt and retighten.  The paracord will flatten considerably.


The woven portion on top of the paracord loop is just for looks.  It is very easy to make a "King Cobra" weave with with a little practice.


 Check out the DIY anchor system instructions by clicking on the picture below.


Monday, February 13, 2012

Kayak Fishing Monopod Conversion for GoPro and other Cameras - DIY kayak camera mount

After several requests, I decided to put the kayak camera monopod conversion on the blog.  It is still available for free download in PDF form on the "Downloads" section of the Palmetto Kayak Fishing website.  Here is the direct link if you prefer to download the instructions. - Paul

I’ve built quite a few different camera mounting poles over the years and thought I would share a very simple
design that doesn’t cost much to make. It will fit any 1½” commercial or PVC rod holder. An aluminum
Targus telescoping monopod is the main component of the build; specifically, the TG-MP6710 model that can be found at Walmart ($15) or Radio Shack ($12.99). Target sells one as well – the TG-MP7010 ($13.79) – that is silver in color and almost identical except for a narrower foam grip.


1. Targus TG-MP6710 Monopod ($12.99-$15.00)   
 

2. Hacksaw (or Dremel Tool)                                
 
3. Phillips Head Screwdriver       

4.  9/32” Drill Bit

5. 1” Rubber Chair Tip (Ace Hardware, $0.83)

6. PKF decal available on the website (j/k-optional)


The beauty of this whole build is that you don’t need to purchase a bunch of different parts. Assuming you
have all the basic tools pictured, all that is needed is the monopod and the 1” rubber chair end cap.


STEP 1: Remove the lanyard and set aside. Slide the foam grip to uncover the 3 screws that hold the camera mounting base in place. Unscrew each of these 3 screws to remove the camera base from the pole.


STEP 2: On the opposite end of the pole, unscrew the rubber foot until it will go no further. Using a hacksaw
or Dremel tool, cut the threaded post as pictured leaving approximately 3/8” exposed. If you are using a
Dremel tool, it is easier to cut away the rubber foot and then cut the post. Discard the rubber foot as it is not
needed.


STEP 3: Flip the camera mounting head over and locate the center hole. Use a 9/32” drill bit, and bore the
existing hole out by hand approximately 1/8” deep. This will allow you to easily thread the mounting base onto the post you just cut at the opposite end of the monopod.


The material feels like graphite and the camera head will self-thread very securely to the post using this method.  For extra security, add marine epoxy to the threads although this step is not necessarily needed.


STEP 4: Slide the 1” rubber chair tip cap onto the opposite end of the post.


Additional notes: I use this setup with a GoPro HD camera that has its own adjustable mount, eliminating the need for any sort of directional adjustment. If you are using another style of camera and/or need to add more adjustment capabilities, simply purchase a “mini tripod ball head”. This component is designed screw into the ¼“ bolt on the monopod and will allow you to adjust the angle of any camera. They cost around $10.


Get creative with it and add a screw in mount for your kayak light...one pole, multiple functions!


Enjoy! - Paul

Monday, February 6, 2012

Build a strong DIY kayak cart instructions + VIDEO


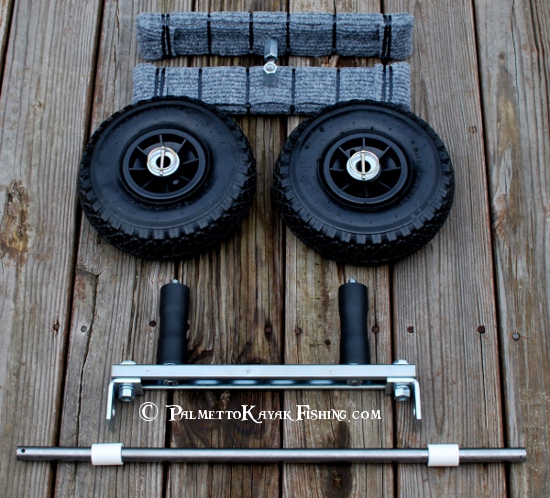
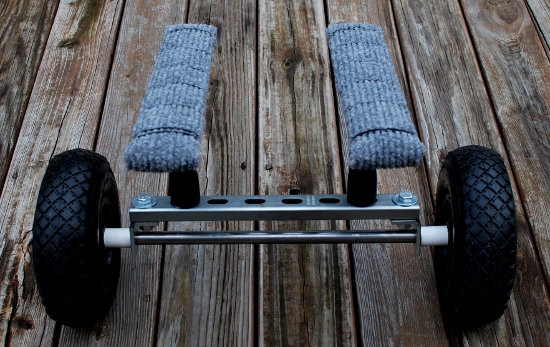
After forever and a day, the metal cart writeup is finished.  My goal was to design a very rugged, bolt together cart that would work well with the 2012 Ride 135's pontoon style hull.  This design carries my fully loaded kayak (100+ lbs) with ease. The previous Palmetto Kayak Fishing PVC cart works great, but I wanted to design and build a cart that better mimicked some of the commercially available options.  The new model had to be super strong, lightweight, easy to disassemble/reassemble and somewhat aesthetically pleasing.    


Let me start by saying this project is a little on the expensive side as compared to some of the other PKF builds due to the initial cost of a few items.  For example, the SuperStrut metal framing channel costs around $15 for a 10' section, but the build only requires 15.5 inches of material.  Same goes for the thick $10 professional dense poly cutting board from Sam's Club.  One board is large enough to make 3 pairs of the bunks that the kayak rides on.  The build also requires drilling out thick metal and two flat washers to accommodate the 3/4" axle.  Many machine shops will drill the required holes on the cheap if you don't have a step bit available. 

With all this being said, take one look at similar commercially available offerings that cost north of $150 and in the grand scheme of things, this cart isn't so bad on the wallet.  Most importantly, it fits my Ride 135 like a glove and can handle many different types of terrain with a heavy payload.  The cart weighs in right at 11 pounds - that is just one pound heavier than the popular C-tug cart.


For me, it's not always about the destination, but more about the journey getting there.  I find these DIY projects to be very fulfilling and enjoy sharing the process.  Round up a friend or 3 that are interested pursuing this project and the per-cart costs go down significantly.  Lastly, for the steel axle, call a metal or scrap shop that will sell you a small section of the 3/4in. x 1/16in. in plain steel tube and pay less than HD's price of $10.  If you can find a stainless steel tube in the same size, even better.


Parts List: (click red text for links and pictures)

10' SuperStrut metal framing channel - (only 15.5" is needed per cart), Home Depot - $15.57

 3/4in. x 1/16in. in plain steel tube - cut to 25.5", holes drilled in each end to accept the linch pins, Home Depot - $9.32

Bakers & Chefs Commercial Cutting Board 1/2" thick, 15" x 20" - cut two 3" x 15" sections per cart  (1 board is enough to build 3 carts) Sam's Club $11  

2 - 10" Low Speed Tires - Northern Tool - $9.99 each.

NOTE: I chose these over the cheaper Harbor Freight wheels b/c of the reduction of weight and simplicity of design.  They look very similar - if not the same - to the wheels that come on Hobie's Universal Kayak Cart or the pneumatic C-Tug wheels.

2 - Superstrut 2-Hole 90-Degree Angle Brackets - $1.34 each

1 package of Crown Bolt Inc. 1/2" Create-A-Bolt - Home Depot - $3

2 - Crown Bolt Zinc Plated 1/2 in.-13 x 1-3/4 in. Rod Coupling Nut (the only link is for a 25 pack, HD sells them in single bags, HD part no. 030699191567, at  $1.31 each) - Home Depot - $1.31

2 - Crown Bolt 3/16 in. x 1-1/2 in. Zinc Plated Linch Pins - Home Depot, $1.73 each

2 - Crown Bolt Zinc Plated 1/2 in. - 13 x 1-1/2 in. (the only link is for a 50 pack, HD sells them individually)- Home Depot, >$1 for two

2 - Crown Bolt Zinc Plated 5/8 in. Flat Washers & 2 additional 1/2" Flat Washers (the only link is for a 65 pack, HD sells them individually) - Bore out the center hole of the 5/8" washer to 3/4" to fit over axle - this size is modified b/c the outside diameter fits the wheel profile perfectly, Home Depot, >$1 for two.  The additional 1/2" washers do not need to be modified.

1 Crown Bolt 1/2 in. x 12 in. Zinc Threaded Rod - Cut into two 6" sections, Home Depot, $1.57

2 - 1/2" stop nuts

6 - 1/2" PVC couplings

2 - 3" sections of 1/2" PVC

Outdoor Carpet scraps and padding of choice to cover the cutting board bunks

11" zip ties

Loctite thread locker

Lashing strap to hold the cart to the kayak

OPTIONAL PARTS:

Foam tubing to cover the vertical PVC arms.

U bolt and 1/2" PVC parts to fabricate a tube to accommodate a push pole of some sort to get the cart in place under the kayak (see video).  I use a stake out pole for this, but just about any rigid tube will do.

Automotive 15 oz. Truck Bed Coating - Home Depot, $8

Detailed VIDEO


The Build:

The video pretty much explains the process but here are some tips.  I cut the SuperStrut to 15.5" for my application, leaving 8 of the oval cutouts. If the build is for a different model kayak, adjust the length of the SuperStut, axle and kayak bunk placement for a custom fit.  Make sure to measure and cut the axle at the end of the entire processes to ensure proper fitment.   


Enjoy!  -  Paul

Saturday, January 28, 2012

Another DIY Kayak Cart - Work in Progress


Since the original PKF DIY kayak cart instructions went over so well, I decided to up the ante and construct an improved cart with a rigid metal frame.  The 2012 Ride 135 has a unique pontoon-style hull which makes it difficult to find a commercially available cart that fits it well.

To start, the cart needed to be extremely rugged.  While I have not had any failures with the PVC cart linked above, I wanted to focus on increasing rigidity and strength.  Low weight and aesthetics were also high on the list.  The parts used in the build also needed to be available locally to make it easier for other folks to replicate the design.  Lastly, the cart had to be easy to assemble and break down.  While I am still working on a few more tweaks, this build is almost finished.   

Here is a preview -full instructions should be up this week.  Have a great weekend!