Be sure to visit our online store at www.PalmettoKayakFishing.com
A friend of mine asked me to help him come up with a rod holder adapter that would fit into the vertical/angled flush mounted holders that came on his Grady White. When down-lining live herring, you want to be able to put out a lot of rods and have them situated perpendicular to the water, not pointing towards the sky. I know of a few manufacturers that make flush mount adapters like this complete package from Cabela’s but at $40 a pop plus shipping, it quickly gets expensive for 4 sets.
While test fitting some parts to come up with an option for Casey, I realized that I could use something like this on my kayak. When I am trolling, I typically put two rods in my flush mounted rod holders that are behind me. They face to the rear of the kayak at an angle. I can’t tell you how many nice stripers I have watched pop off the hook 100 yards back because I didn't immediately notice the strike; it is enough to make a preacher cuss.
Moving on, maybe I was a plumber in my past life, I don’t know, but I build just about everything out of PVC. It’s cheap, strong, easy to work with and readily available at almost every hardware store. I’ve built racks, carts, potato guns and even a portable beer pong table out of the stuff. Someone once told me that PVC parts are like grown man lincoln logs – that is about right I suppose.
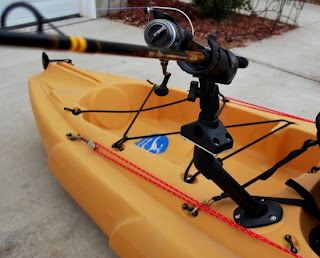
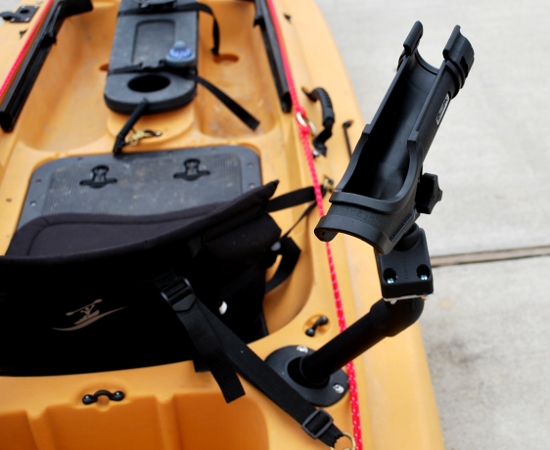
So here is what I came up with for my kayak. This design could be slightly modified to work on just about any boat with flush mounted rod holders. When you buy the Scotty rod holders, they come with the non-flush base that is pictured. I have a drawer full of these because I like the aftermarket flush bases that allow for a cleaner install on the deck of the yak. These work perfectly for this build and I am glad I found a use for them. The kicker to building this extension is that it gets everything up and out of the way of the paddle stroke area yet still allows for easy rod access and visibility.
You’ll need a few parts from Lowes. If you are like me, you might have some of the stuff lying around in your shop. Here is a shopping list:
1” PVC pipe cut to size (mine design utilized 2 lengths of 7.5”)
1 – 1” PVC coupling
1 – 1” PVC 45 degree elbow
1 – 1” PVC plug
1 – 1” PVC cap
Package of Toilet-to-Floor bolts 5/16” (see picture, $1.97 at Lowes)
1 – 5/16” stop nut and 1 lock washer
1 – section of aluminum plate or wood to mount Scotty base to
4 - Mounting bolts, washers and nuts to attach Scotty mount to plate (I used 1” 10-32 bolts)
PVC glue
Paint or Rhino Liner Spray (optional)
Make the slit wide enough to fit over the gimbal pin inside of your flush mounted rod holder. This will allow the extension to “lock in” and not pivot under a load. Start by cutting 2 notches into the PVC cap with a hack saw. Use a drill bit on the opposing sides of the cap where the saw lines end to remove the center piece of the PVC (see picture).
Assemble the PVC sections together as seen in the picture below. Slide this PVC unit into the rod holder making sure the slit in the cap fits over the gimbal pin inside the flush mounted rod holder. Rotate the assembly until the top plug is parallel to the deck of the kayak. Glue all the PVC pieces together, with the exception of the plug.
Cut a plate out of 2” wide aluminum (thin hardwood will work too) that will act as the pedestal to which the plastic Scotty base will attach to. Drill a hole big enough in the center of this plate to allow the toilet-to-floor bolt to pass through. The reason this type of bolt is used is because the head is flat enough to still allow the Scotty rod holder to fit into its base (see photos).
 Drill another hole in the PVC plug and put the washer, lock washer and stop nut in place. Tighten the plate to the plug and use a hack saw to trim the end of the bolt if necessary (see picture to the left). Glue the plug into the rest of the PVC assembly making sure everything is flush and pointing in the proper direction.
Drill four holes in the aluminum pedestal and mount the Scotty base to it with the proper hardware. As noted before I used 1” 10-32 bolts with matching lock washers and nuts. I “Rhino Lined” my extension because I had some of the product in my shop – this is purely optional, but it looks great! I will report on how well this stuff holds up on PVC at a later date, but as of now I have had no issues with it. I am super pleased with how well this project turned out and will be building another assembly for the other rod holder. Tight lines.
- Paul
More Pictures
Be sure to visit our online store at www.PalmettoKayakFishing.com


