Monday, June 27, 2011

DIY Telescoping Kayak Camera Pole


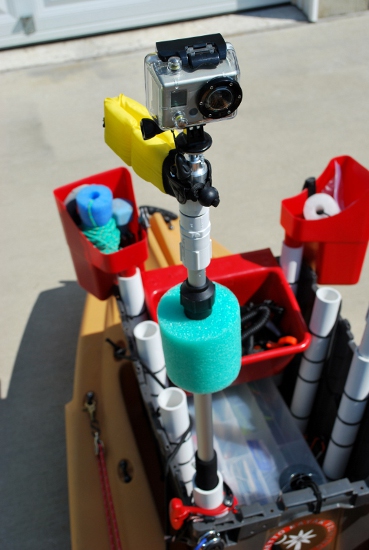
For less than $25, you can build your own telescoping aluminum camera pole that is strong, lightweight and functional.  I have been using this design since December 2010 when I purchased my GoPro HD camera.  The fact that this pole is infinitely adjustable from the closed position up to 5’ in height really makes it very versatile and allows easy access to my camera while the pole is secured in the 1¼” PVC rod holder in my kayak crate.  I usually set the camera at a height where all I have to do is reach up and press the power button to start filming (instant on filming – excellent idea by GoPro!)  Using this pole in conjunction with a camera like the GoPro HD, you can create some spectacular overhead photos/videos.  I have also had great results with a handful of other waterproof cameras as well.  With a little ingenuity, this design can be slightly modified to fit just about any application and angle.  Lastly, the marine friendly components make this DIY project a great choice for kayak fishermen.  


There really isn’t too much involved in building one of these poles.   As with most of my DIY builds, you can usually purchase all the items you need locally:


1)  LOWE'S - NeatHome by Unger Flow Through Water Pole ($12.98) 

2)  RADIO SHACK - Targus Table Top Tripod Targus Model # TGT-CT7 ($7.99)

3)  LOWE'S - ½” PVC Cap - slip ($0.27)

4)  LOWE'S - short length of ½” PVC for joining the two pieces together

5)  LOWE'S - ½" PVC Threaded Male Adapter ($0.33)

6)  DOLLAR STORE - Pool Noodle ($1.00)

7)  LOWE'S - 7/8 -1" Rubber Chair Tips ($2.28 for 4)

8)  LOWE'S - ½” PVC Double Threaded Female Coupling ($0.46) - *Pictured below*


I utilized the adjustable camera ball head from an aluminum Targus Table Top Tripod (Targus Model # TGT-CT7) that can be picked up at Radio Shack for $7.99.  A quick Google search shows that they are also available at Kmart for the same price.  Using a phillips head screwdriver, remove the bolt that secures the tripod to the ball head.  Save the bolt and the rubber gasket.


Step 1

Drill a hole in the center ½ inch PVC cap that will allow the bolt to pass through.  Try and get this hole as close to center as possible for a clean, level install.  The rounded shape of the PVC cap works perfectly to seat the ball head and allows for use of  the original mounting bolt.  Slide the bolt through the hole, add the rubber O-ring and put some Loctite or Epoxy on the bolt threads.  Tighten everything up.


Step 2


Using the short piece of ½” PVC pipe, join and glue the following pieces together.  


Step 3

Brush on some PVC Transition glue to the black threads of the pictured aluminum rod.  Screw on the double threaded ½” coupling.  The narrow threads of the PVC coupling will “rethread” the black plastic threads on the pole and the result is a tight, secure fit – especially with the addition of the transition glue.  Now you have a pole that can be interchanged with various accessories using cheap PVC parts (SEE OPTIONAL ACCESSORIES at the end of this write up).  As pictured, the camera mount portion can now affixed to the telescoping rod.


Step 4

Remove the hose connector at the end of the aluminum pole.  The easiest way to do this is to tighten the black hose connector in a vice and twist the aluminum pole.  


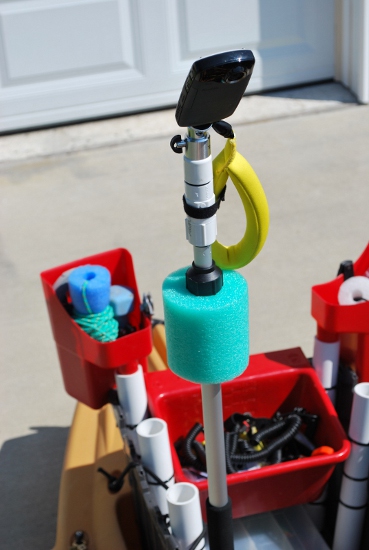
Liberally apply gel hand sanitizer to the aluminum pole and the undersides of the black foam rubber grips.  This will allow you to move the grips around until the sanitizer evaporates.  Slide both grips off then thread the pool noodle onto the pole.  Position one grip on the pole and roll up the other one as pictured.  


Slide it back on the pole until it is flush with the other grip and unroll the foam so the two pieces overlap.  This will ensure a tight fit inside of a 1 ¼” diameter PVC pipe rod holder.   Slide on the rubber chair Tip.


Pretty easy right?  Like I noted before, once the basic pole is built, it is easy to interchange all kinds of accessories.   


For less than .50 cents, pick up another ½” screw-to-slip PVC adapter and a short length of PVC pipe.  Palmetto Kayak Fishing sells Waterproof 5 LED Nano Spotter marker Lights with (or without) a custom molded base in the parts department.  If you order the light with the base, simply glue the assembly together as pictured and screw it onto the pole instead of the camera.  Or get creative, add a PVC  “T” adaptor and mount both your camera and a light at the same time - the possibilities are endless.   Enjoy - Paul


Parts Department - Nano Spotter Waterproof Light with custom base - $15.99 + S/H


Wednesday, June 22, 2011

May 2011 - Striper Fishing the Congaree/Saluda Rivers in Columbia


It was a good run this spring on the rivers in Columbia as far a striper fishing goes!  Here is a short video from the last trip I made in May.  Striper fishing on the rivers is over until after September 30th - even for catch and release.  For more information, check out SCDNR's website.

Hmm...what to do next?  Smallmouth fishing on the rivers, largemouth and stripers on the lake?  You'll just have to check back and see.  - Paul

Friday, June 17, 2011

DIY Portable Fishfinder For Your Kayak


I have been asked quite a few times recently about my fish finder setups and what I would recommend as far as units and mounting are concerned.  When I wrote for Examiner.com I published a basic “how to” article on making a removable system.  Instead of linking back to Examiner, I decided to park the write-up here with a few updates.

Backlight on the Humminbird Piranhamax

As far as units go, I have a Cuda 242 permanently mounted on one of my Big Game’s and a Piranhamax 160 on a removable setup that I use on my girlfriend’s tarpon 140.  Whenever I head to Virginia, I take the removable unit and use it on my Big Game that I keep at my family’s house.  Both are great basic fishfinders, but the Piranhamax has a better LED backlight system if you plan on fishing at night.  If I ever have to replace either unit, I will probably take a hard look at some of the higher end color units that have more features.  But if you want a great fishfinder at an exceptional price, the Cuda series from Eagle and the Piranhamax line from Humminbird are excellent contenders in the sub $100 range.

The technology housed in the most basic sonar unit can be a real asset to the kayak fisherman. Modern units are waterproof, energy efficient and can be powered by a variety of different battery options. This write up will focus on the basic guidelines used in the construction of a removable, all in one, portable assembly that even a novice do-it-yourselfer can put together in a few hours. 

The unit pictured in this article, the Humminbird Piranhamax 160, retailed for $89 at the West Marine in July of 2010.   The newer Piranhamax 170 is currently available for $79 at a number of different retailers local and online. Aside from the basic sonar functions, this model includes a water temperature sensor and a 5 stage adjustable backlight setting. I called Humminbird and was reassured the unit operates on a power input range of 10 to 20 volts.  This is nice because it gives a lot of flexibility when considering how to power the unit.  Since portability is the objective, 12 NiMH rechargeable “AA” batteries wired in a series (diagram can be seen HERE) were chosen to power the unit. Each of the rechargeable “AA” batteries supplies 1.2 volts (as opposed to standard, non rechargeable “AA”s that deliver 1.5 volts) for a total of 14.4 volts when wired in a series. The 12 rechargeable batteries will power the unit for more than 8 hours of continuous use.


The basics components of the mounting assembly are listed below:

Lowes:

A length of ½” schedule 40 PVC pipe


(2) - ½” “T” PVC slip fittings

(1) - ½” 90 degree elbow PVC fitting

(2) – ½” PVC plug (flat portion to which the round black cover is bolted to the PVC assembly)

Package of Velcro One Wraps 23" x 7/8" each (located at the end of aisles at Lowes)

(1) – 18 inch length of flat aluminum bar (bolt and screw aisle)

Various mounting nuts, bolts and screws – all stainless steel.

1 ½” diameter ABS black plastic tube, cap & screw on fitting (for battery housing, located in the PVC aisle)

(1) – small jar of PVC glue 
(1) – tube of silicone sealant
(1) – tube of Loctite thread locker

Radio Shack:


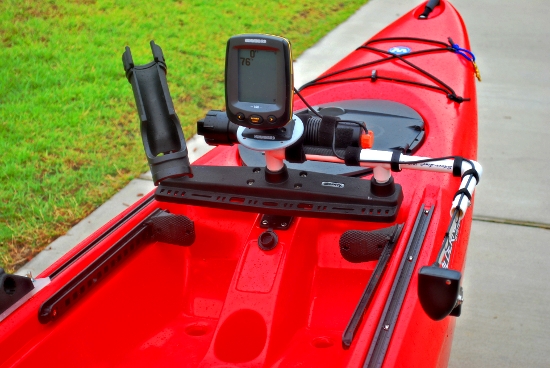
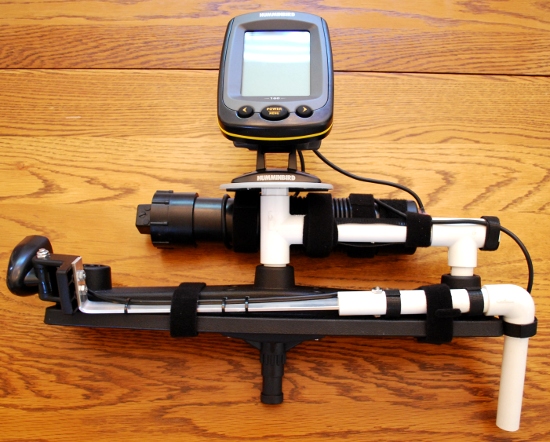
Since each application is different, use the pictures as a guide to construct your own setup. I selected a Scotty Triple Rod holder for the base of the mount, but a standard single Scotty mount receptacle will work just fine too with a little creativity. The triple mount provides a very solid platform to mount all of the components and leaves one mounting hole open for other accessories. All the white PVC parts are glued together except for the horizontal piece that slides into the 90 degree fitting. Leaving one end of the arm unglued allows the transducer arm to swivel up and out of the way in shallow water.  Glue the flat PVC cap into the "T" fitting and drill a hole through the center of the gray round plastic disk and the end cap. Attach the two pieces with a large bolt and nut (use Loctite on the threads).  Using the included hardware, attach the fishfinder to the gray plate as pictured above.  Cut two small lengths of PVC tubing and glue them into the down ends of the "T" fittings.  These pieces fit snuggly into two holes of the Scotty triple mount and lock the whole assembly in place.

The picture above gives a clearer illustration of how to wire up the unit. The positive (+) wire from one holder is soldered to the negative (-) wire on the next battery holder.  When all three holders are wired in a series, solder the remaining positive and negative wires to the power cord supplied with the fishfinder.  Each battery assembly slides into the black ABS plastic tube. Apply silicone sealant around the power wire where it exits through the battery tube to ensure a watertight assembly.

Bend the end of the aluminum bar at a 90 degree angle and mount the transducer to it using stainless steel nuts and bolts. Be sure to apply Loctite to the threads to ensure a semi-permanent bond. Slide the other end of the bar inside the vertical portion of the PVC pipe, drill a hole through both sections and bolt into place. Attach the transducer wire to the arm with Velcro and wrap the excess transducer cord around the black ABS battery tube. Secure the wrapped wire to the battery tube with 2 Velcro straps. Lastly, attach the battery tube to the horizontal PVC arm with the remaining straps until a solid connection is made.


I have been using this setup for just about a year now and it still works great.  If I were to change anything, it would be to add a cotter pin or something similar to the PVC arm that swivels up and down.  It still works just fine as-is, but the cotter pin would allow for it to lock in an upward position a little more securely.


Thursday, June 16, 2011

DIY - Transporting Rods on a Kayak Rack


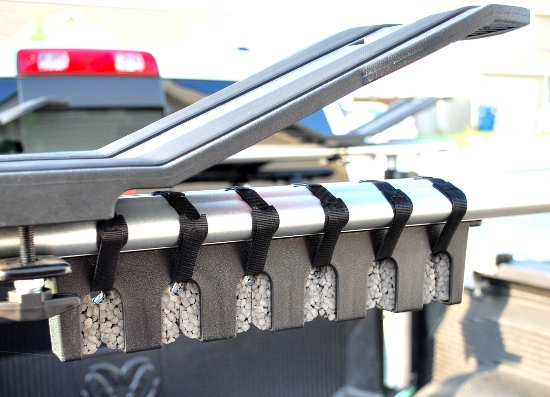
If you have a truck rack similar to the Thule Xsporter, there is a cheap and easy way to transport your fishing rods.  I got tired of carrying them in the cab of my truck all the time so I came up with this method.  I chose Berkley’s HR1 Horizontal Rod Holder based on the fact that it does a great job of protecting the rods tips and holds up well in the South Carolina sun. 


The fact that they are $10 for a set at your local Walmart doesn’t hurt either.  One set “could” hold up to hold 12 rods on the rack, but I prefer to space the reels a little bit apart to ensure no rubbing takes place.   If I stagger the rods, I can carry 8 combos without any issue. 


Using Velcro’s 15 inch reusable ties (comes in a package of 30) from Lowe’s, secure the rod holders to the back bar of the rack upside down as pictured.  Lowe’s sells two lengths of these ties so make sure you purchase the 15” model.   


Once in position, the HR1’s will not move.   If you have more unused space on the rack you could mount them right side up and have the rods rest on top of the bar instead of having them hang.  I chose to mount them under the bar so that I can have both kayaks on the rack and also strap in my rods.  Just remember to remove your rods first prior to removing the kayaks when you get to your destination.   


Purchase these Task Force 12” bungees from Lowe’s.  They will need to be shortened a little based on your specific application.  To do this, simply push the knot end of the bungee through the back of the blue ball, retie and cut the excess bungee off.  I believe mine are around 7” now which allows for easy installation while keeping the butt end of the rod very secure against the crossbar of the rack. 


The rubber strip mounted under the Xsporter rack acts as a cushion and prevents any scratching of the rods when under tension from the tarp bungees.  If you are using a different rack, pipe insulation foam rubber or something similar will function in the same manner.   


That is pretty much it.  To load the rods on the rack, secure the butt ends with the bungee cord first then pop the rod tips into the HR1 holder.  It takes almost no time to load up and take down a handful of rods.  This system has been mounted on my rack for over 3 months and shows no damage from use or the elements.  I couldn’t be happier with the results.