Monday, February 27, 2012

DIY No Drill Kayak Anchor Trolley Connection Points


Over the past couple of months I have received a few questions on how I set up the front and rear connection points for the anchor trolley on the 2012 Ride 135.  Youtube and forums like KayakBassFishing.com are of excellent resources for learning about a basic anchor trolley setup.  Instead of going through the whole process, consider this the Cliffs Notes version that focuses on the connection points - especially the rear one.

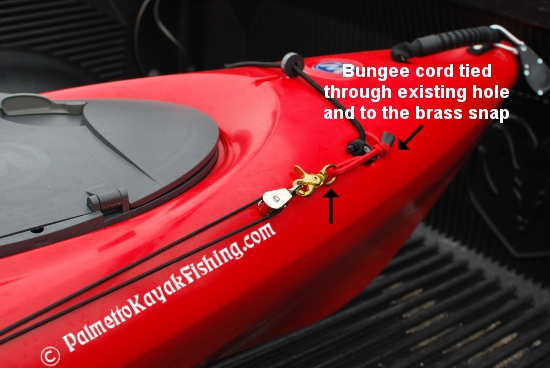
Since I don't use a rudder, I took advantage of the factory installed hardware to set up a functional trolley without having to drill additional holes into the kayak.  Many of the Wilderness Systems kayaks have these bolts preinstalled from the factory.  The key to this entire build is the use of 550 paracord because it flattens out making it ideal for the rear connection point.

These pictures were taken some time ago and I no longer use the zinc plated pulleys.  I highly recommend Harken's H224 micro blocks.  They can be purchased online at Austin Kayak HERE or locally at West Marine.  They are well worth the investment and won't corrode.


Knot a loop of paracord and attach it directly to the pulley or use a snap as pictured.  I like using the brass snaps so I can remove the rear portion of the trolley.  This comes in handy in shallow spots where I can disconnect the rear of the trolley and use it as tow rope.  This allows me to drag my kayak behind me as I move upstream and alleviates the need for separate tow line.


The install is simple.  Use a phillips head screwdriver to back out one of the factory bolts found at various points on the rear of the kayak.  Place the paracord loop around the bolt and retighten.  The paracord will flatten considerably.


The woven portion on top of the paracord loop is just for looks.  It is very easy to make a "King Cobra" weave with with a little practice.


 Check out the DIY anchor system instructions by clicking on the picture below.


Monday, February 13, 2012

Kayak Fishing Monopod Conversion for GoPro and other Cameras - DIY kayak camera mount

After several requests, I decided to put the kayak camera monopod conversion on the blog.  It is still available for free download in PDF form on the "Downloads" section of the Palmetto Kayak Fishing website.  Here is the direct link if you prefer to download the instructions. - Paul

I’ve built quite a few different camera mounting poles over the years and thought I would share a very simple
design that doesn’t cost much to make. It will fit any 1½” commercial or PVC rod holder. An aluminum
Targus telescoping monopod is the main component of the build; specifically, the TG-MP6710 model that can be found at Walmart ($15) or Radio Shack ($12.99). Target sells one as well – the TG-MP7010 ($13.79) – that is silver in color and almost identical except for a narrower foam grip.


1. Targus TG-MP6710 Monopod ($12.99-$15.00)   
 

2. Hacksaw (or Dremel Tool)                                
 
3. Phillips Head Screwdriver       

4.  9/32” Drill Bit

5. 1” Rubber Chair Tip (Ace Hardware, $0.83)

6. PKF decal available on the website (j/k-optional)


The beauty of this whole build is that you don’t need to purchase a bunch of different parts. Assuming you
have all the basic tools pictured, all that is needed is the monopod and the 1” rubber chair end cap.


STEP 1: Remove the lanyard and set aside. Slide the foam grip to uncover the 3 screws that hold the camera mounting base in place. Unscrew each of these 3 screws to remove the camera base from the pole.


STEP 2: On the opposite end of the pole, unscrew the rubber foot until it will go no further. Using a hacksaw
or Dremel tool, cut the threaded post as pictured leaving approximately 3/8” exposed. If you are using a
Dremel tool, it is easier to cut away the rubber foot and then cut the post. Discard the rubber foot as it is not
needed.


STEP 3: Flip the camera mounting head over and locate the center hole. Use a 9/32” drill bit, and bore the
existing hole out by hand approximately 1/8” deep. This will allow you to easily thread the mounting base onto the post you just cut at the opposite end of the monopod.


The material feels like graphite and the camera head will self-thread very securely to the post using this method.  For extra security, add marine epoxy to the threads although this step is not necessarily needed.


STEP 4: Slide the 1” rubber chair tip cap onto the opposite end of the post.


Additional notes: I use this setup with a GoPro HD camera that has its own adjustable mount, eliminating the need for any sort of directional adjustment. If you are using another style of camera and/or need to add more adjustment capabilities, simply purchase a “mini tripod ball head”. This component is designed screw into the ¼“ bolt on the monopod and will allow you to adjust the angle of any camera. They cost around $10.


Get creative with it and add a screw in mount for your kayak light...one pole, multiple functions!


Enjoy! - Paul

Monday, February 6, 2012

Build a strong DIY kayak cart instructions + VIDEO


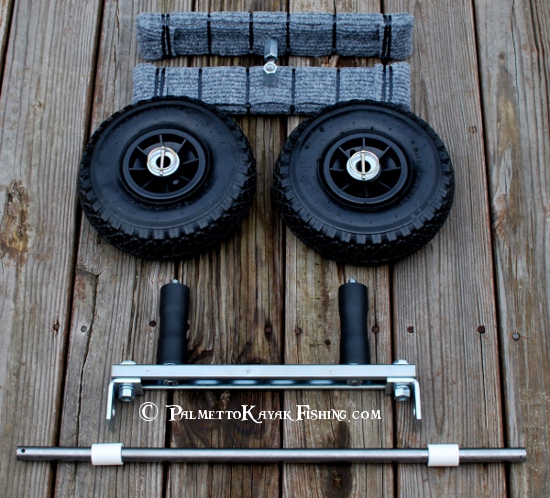
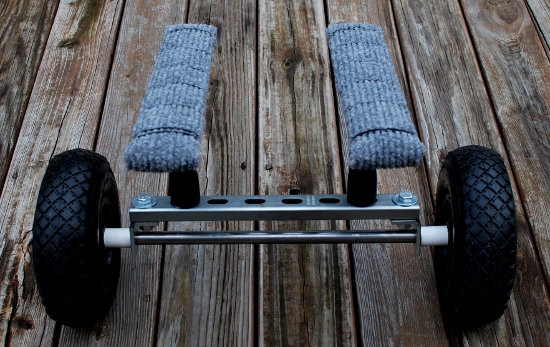
After forever and a day, the metal cart writeup is finished.  My goal was to design a very rugged, bolt together cart that would work well with the 2012 Ride 135's pontoon style hull.  This design carries my fully loaded kayak (100+ lbs) with ease. The previous Palmetto Kayak Fishing PVC cart works great, but I wanted to design and build a cart that better mimicked some of the commercially available options.  The new model had to be super strong, lightweight, easy to disassemble/reassemble and somewhat aesthetically pleasing.    


Let me start by saying this project is a little on the expensive side as compared to some of the other PKF builds due to the initial cost of a few items.  For example, the SuperStrut metal framing channel costs around $15 for a 10' section, but the build only requires 15.5 inches of material.  Same goes for the thick $10 professional dense poly cutting board from Sam's Club.  One board is large enough to make 3 pairs of the bunks that the kayak rides on.  The build also requires drilling out thick metal and two flat washers to accommodate the 3/4" axle.  Many machine shops will drill the required holes on the cheap if you don't have a step bit available. 

With all this being said, take one look at similar commercially available offerings that cost north of $150 and in the grand scheme of things, this cart isn't so bad on the wallet.  Most importantly, it fits my Ride 135 like a glove and can handle many different types of terrain with a heavy payload.  The cart weighs in right at 11 pounds - that is just one pound heavier than the popular C-tug cart.


For me, it's not always about the destination, but more about the journey getting there.  I find these DIY projects to be very fulfilling and enjoy sharing the process.  Round up a friend or 3 that are interested pursuing this project and the per-cart costs go down significantly.  Lastly, for the steel axle, call a metal or scrap shop that will sell you a small section of the 3/4in. x 1/16in. in plain steel tube and pay less than HD's price of $10.  If you can find a stainless steel tube in the same size, even better.


Parts List: (click red text for links and pictures)

10' SuperStrut metal framing channel - (only 15.5" is needed per cart), Home Depot - $15.57

 3/4in. x 1/16in. in plain steel tube - cut to 25.5", holes drilled in each end to accept the linch pins, Home Depot - $9.32

Bakers & Chefs Commercial Cutting Board 1/2" thick, 15" x 20" - cut two 3" x 15" sections per cart  (1 board is enough to build 3 carts) Sam's Club $11  

2 - 10" Low Speed Tires - Northern Tool - $9.99 each.

NOTE: I chose these over the cheaper Harbor Freight wheels b/c of the reduction of weight and simplicity of design.  They look very similar - if not the same - to the wheels that come on Hobie's Universal Kayak Cart or the pneumatic C-Tug wheels.

2 - Superstrut 2-Hole 90-Degree Angle Brackets - $1.34 each

1 package of Crown Bolt Inc. 1/2" Create-A-Bolt - Home Depot - $3

2 - Crown Bolt Zinc Plated 1/2 in.-13 x 1-3/4 in. Rod Coupling Nut (the only link is for a 25 pack, HD sells them in single bags, HD part no. 030699191567, at  $1.31 each) - Home Depot - $1.31

2 - Crown Bolt 3/16 in. x 1-1/2 in. Zinc Plated Linch Pins - Home Depot, $1.73 each

2 - Crown Bolt Zinc Plated 1/2 in. - 13 x 1-1/2 in. (the only link is for a 50 pack, HD sells them individually)- Home Depot, >$1 for two

2 - Crown Bolt Zinc Plated 5/8 in. Flat Washers & 2 additional 1/2" Flat Washers (the only link is for a 65 pack, HD sells them individually) - Bore out the center hole of the 5/8" washer to 3/4" to fit over axle - this size is modified b/c the outside diameter fits the wheel profile perfectly, Home Depot, >$1 for two.  The additional 1/2" washers do not need to be modified.

1 Crown Bolt 1/2 in. x 12 in. Zinc Threaded Rod - Cut into two 6" sections, Home Depot, $1.57

2 - 1/2" stop nuts

6 - 1/2" PVC couplings

2 - 3" sections of 1/2" PVC

Outdoor Carpet scraps and padding of choice to cover the cutting board bunks

11" zip ties

Loctite thread locker

Lashing strap to hold the cart to the kayak

OPTIONAL PARTS:

Foam tubing to cover the vertical PVC arms.

U bolt and 1/2" PVC parts to fabricate a tube to accommodate a push pole of some sort to get the cart in place under the kayak (see video).  I use a stake out pole for this, but just about any rigid tube will do.

Automotive 15 oz. Truck Bed Coating - Home Depot, $8

Detailed VIDEO


The Build:

The video pretty much explains the process but here are some tips.  I cut the SuperStrut to 15.5" for my application, leaving 8 of the oval cutouts. If the build is for a different model kayak, adjust the length of the SuperStut, axle and kayak bunk placement for a custom fit.  Make sure to measure and cut the axle at the end of the entire processes to ensure proper fitment.   


Enjoy!  -  Paul

Saturday, January 28, 2012

Another DIY Kayak Cart - Work in Progress


Since the original PKF DIY kayak cart instructions went over so well, I decided to up the ante and construct an improved cart with a rigid metal frame.  The 2012 Ride 135 has a unique pontoon-style hull which makes it difficult to find a commercially available cart that fits it well.

To start, the cart needed to be extremely rugged.  While I have not had any failures with the PVC cart linked above, I wanted to focus on increasing rigidity and strength.  Low weight and aesthetics were also high on the list.  The parts used in the build also needed to be available locally to make it easier for other folks to replicate the design.  Lastly, the cart had to be easy to assemble and break down.  While I am still working on a few more tweaks, this build is almost finished.   

Here is a preview -full instructions should be up this week.  Have a great weekend!

Sunday, December 18, 2011

DIY Scotty backing plates and install video


The video explains the whole process, but in classic PKF style, I supplied the part numbers and the retailers that sell the components used in this build.  I built four of these round plates and the unit cost per disk comes out to be around a $1.30 each.  With that being said, I did order my nuts and bolts in bulk so the breakdown was .18 cents per SS flange nut and .21 cents per SS pan head bolt after shipping.  You can probably find these SS flange nuts at a more specialized hardware store to avoid ordering in bulk.

I was not able to find the 10-24 size of stainless steel flange nuts locally at any of the "big box" hardware stores so I ordered them through McMaster-Carr.  They sell all kinds of bolts, screws, nuts, spring steel - you name it, they probably have it.  Every time I have ordered anything from them, my package arrives on my doorstep the next day.   

If you order online, shipping costs will not be calculated before you checkout.  Just call them before ordering and they can give you a general idea of what will be charged to your credit card for shipping.  My shipping costs have always been around $5 which is downright amazing considering the low retail prices and turnaround speed.

And just in case you were curious, I recently fabricated and installed rectangular backing plates for Scotty 244 flush mounts on a different kayak using the same method with equal success. 

Fabricated Disk Parts:

8.5" x 11' Poly Cutting Board - $2.16, Walmart (Product page LINK)

Part Number 93776A391 Stainless Steel Serrated-Flange Hex Locknut, 10-24 thread size, 3/8" Width, 7/32 overall height,  PACK OF 50 pieces - $6.55, McMaster-Carr (Product page LINK)

Other Parts:

Part Number 91772A249 Stainless Steel Pan Head Phillips Machine Screw, 10-24 Thread, 1-1/4" Length, PACK OF 50 pieces - $7.92, McMaster-Carr (Product page LINK)

Scotty 344 Round Flush Deck Mount Brackets - $9.99, Austin Kayak (Product page LINK)

Plumbers Goop  - $4.57, Home Depot (Product page LINK)


Side note:
  The install procedure will probably also work with non-flush Scotty mounts where no large center hole will be drilled into the kayak.  In this case, only the four mounting holes for the bolts will be drilled.  To bypass this issue, attach a length of spring steel, bailing wire or something similar to both of the tag ends of the line with tape.   Anything that has some weight to it (preferably magnetic) that can be taped to the line and will still pass through the mounting holes should work fine.  Each end should look similar to a threaded needle, only the line is taped into place instead of passing through an eye hole.  In the same manner as displayed in the video, pass the spring steel "needle" through the drilled bolt holes in the kayak deck.  Only this time, just let the spring steel fall into the hull of the kayak.  Attach a strong magnet to the end of a length of PVC and slide it through an open hatch toward the lines.  The magnet will "grab" the spring steel and the lines can be fed through the kayak.  Alternatively, use a piece of PVC with a hook attached to it to grab the ends of the string.  The rest of the install process is the same.

Sony Vegas Movie Studio HD 11

After reading this blog post over at SaltyShores.com, I decided it was time to throw down some cash and purchase a better video editing program.  Until now, all of my videos have been pieced together using Windows Movie Maker (yikes!) or a comparable program that came free with my Kodak PlaySport.  While they both "worked", countless crashes and limited control of...well...everything, made these programs about as functional as using a hammer to chop down a tree. 

When I discovered that Sam Root (unlike me, he is a pro) at SaltyShores.com was using Sony Vegas Movie Studio HD 11, I decided to go ahead and order the software.  The $65 price tag makes Movie Studio HD very accessible to an amateur like me in a market riddled with video editing software north of $500.

The video below is the first project that I have pieced together using Movie Studio HD.  The learning curve is surprisingly fast with this software and it is actually enjoyable to use.  Most of the processes are intuitive and I have yet to run into any crashes or other hurdles that I encountered with the previous programs.  While I have only scratched the surface with what Vegas Movie Studio HD can do, I highly recommend it to other kayak anglers that like to mess around with video.  Now I just need to find some bigger fish.


Monday, November 21, 2011

Quick release DIY kayak anchor system + bottle opener


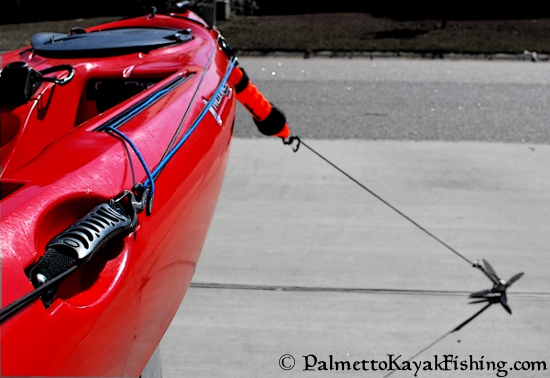
Whether you prefer the store bought variation or some other form of anchor, having the ability to quickly disconnect from it is crucial when kayak fishing.  Although not recommended, I often anchor in river current to get close to the fish I am targeting.  Using this simple setup in conjunction with an anchor trolley, I can deploy as well as release my anchor in seconds.


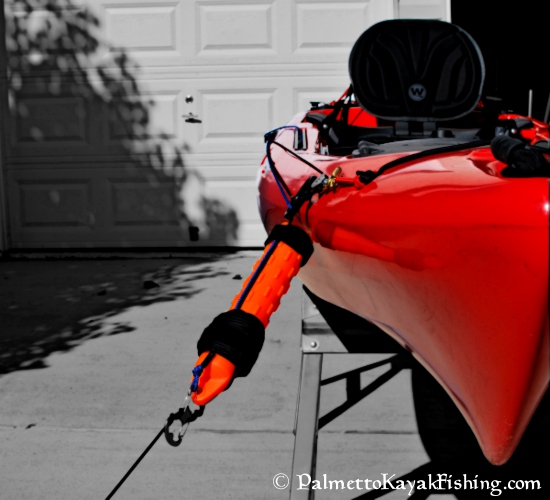
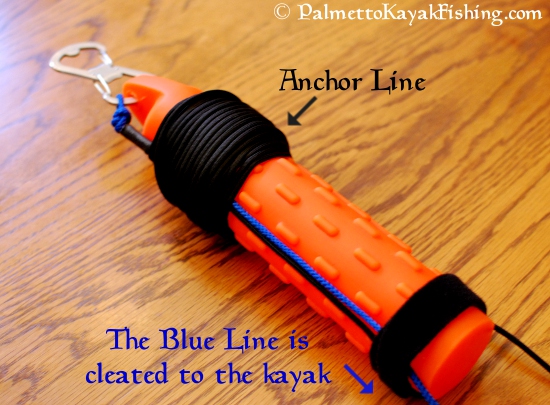
The blaze orange dog training dummy from Remington is a cost effective, durable float that makes anchor retrieval a cinch.  Nite Ize’s stainless steel “S-Biner AHHH…” carabineer serves as a sturdy anchor line holder and doubles as a bottle opener back at camp.  If experience has taught me anything, it is that you can never have enough bottle openers.


Key Components:


Remington 2” x 11” Vinyl Dummies - $4.99 each or a 3pk for $12.99 Academy Sports


Nite Ize “Figure 9 Carabiner” small size - $3.99 Sportsman’s Warehouse


Nite Ize “S-Biner AHHH…” in stainless steel - $3.99 Sportsman’s Warehouse


Velcro Strip – I recommend and use Velcro’s “One Wrap” 7/8”X 23” straps as they work well even when soaked.  A 3 Pack is around $4 at HardwareandTools.com  and they are also available at select hardware stores and Walmart. 

10’-14' section of cord, preferably a different color than the anchor line.  Home Depot and Lowe’s sell 75’ length packs of 5/32” diameter cord for less than $3.

Length of anchor line and anchor of your choice.


Start off by securing the “S-Biner AHHH…” to the vinyl dummy as pictured.


Take the 10’ - 14' length of cord and make a small loop in one end that will fit over the “S-Biner AHHH…” Attach and position the cord against the dummy as pictured and secure it with one of the Velcro straps at the top.  This setup allows the pressure exerted from the anchor line to pass around the vinyl dummy instead of through it.


Tie the end of the anchor line to the 10’ length of cord as pictured and tuck the knot under the Velcro.


Wind the anchor line around the dummy to take up the slack.  Use one of the extra strips of Velcro to keep the wrapped anchor line secure on the dummy.


Lastly, clip the “Figure 9 Carabiner” to the side handle of the kayak or similar location that is out of the way yet easy to reach.   On the setup on my 2012 Ride 135, I use this carabineer to control the anchor trolley line and keep it from riding up.  It can be easily removed in seconds for full front-to-back operation of the anchor trolley if desired.  95% of the time I have the anchor trolley in the forward position anyway.


To use this setup, slide the blue cord through the ring of the anchor trolley.


Leave a foot or so of excess line free on the tag end and secure it to the “Figure 9 Carabiner” as noted in the manufacturer’s instructions.  This allows the anchor trolley to be placed in the desired position before the anchor is deployed.

Unwind the anchor line from the dummy and drop the anchor over the side.  When the desired length of line has been let out, simply wrap the anchor line around the “S-Biner AHHH…” carabineer 4 times - two wraps between each opening as pictured.


It only takes a couple of seconds to accomplish and creates a non-slip, yet easy to remove connection.   Toss the dummy into the water and get ready to fish.  The location of vinyl dummy in can be adjusted by simply taking up or letting the slack out of the “Figure 9 Carabiner” line.

To come off the anchor, simply yank the tag end of the line connected to the “Figure 9 Carabiner”.  The line will slide right out of the entire assembly.   The blaze orange Remington float will be easy to spot when you return to retrieve your anchor.  Tight lines - Paul


Note:  If you need a beefier setup, upgrade to Remington's 3" x 12" training dummy that runs $6.99.  Switch out the small “Figure 9 Carabiner” for the larger sized one that costs around $6.  These substitutions will allow for much larger diameter ropes and a heavy duty setup if needed.