
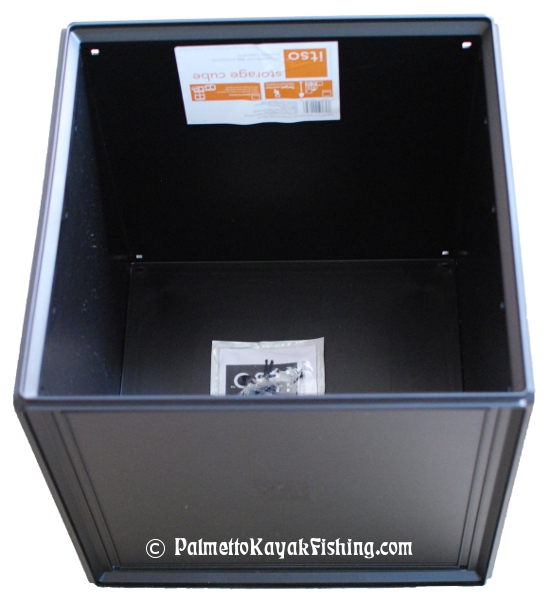
The kayak crate. It is probably one of the most coveted pieces of equipment a kayak fisherman can own and for good reason. While most anglers use a standard plastic milk crate, I tend to make mine out of inexpensive and readily available store-bought containers. When I first got into the sport, I used file crates for storage. The problem with these is that the plastic is thin and the crate tends to flex. Zip tie a couple of rod holders to these units and over a short period of time, the plastic crate will deform. After designing my first DIY LARGE KAYAK CRATE, I found that there are some great, heavy duty containers just waiting to be modified for this application.

The first step is to cut six 15.5" segments of 1.25" diameter PVC for rod holders. Although I don't usually carry 6 rods with me at one time, I use the holders for my DIY Telescoping Camera Pole for the GoPro HD and other accessories. I also built a removable carrying handle that utilizes the center rod holders and allows for one-handed portability - more on that later.

Once the PVC segments are cut, use Brillo soap pads and some water to remove the lettering from the PVC. My dad taught me this trick about 17 years ago when he would make furniture-grade rod holders out of various hardwoods and use the cleaned up PVC for the inserts.

If you don't own a heat gun or are not comfortable using one, simply sand the inside edge of the PVC pipes so that they don't bite into the rod handles. If you decide to go the heat gun route, do this OUTSIDE and wear proper safety gear including a respirator mask, eye protection and thick leather gloves.

I like to keep the heat gun stationary and rotate the PVC by hand as this method ensures even heating. I use a Modelo bottle for this next step for a handful of reasons. Most importantly, the glass is thick which is crucial for proper safety. I also really like the beer and the shape of the neck makes a perfect and uniform mold for the PVC every time.


Once the PVC is up to temperature, slide it over the Modello bottle until it stops on the notch below the neck as pictured. The PVC should easily slide into place. If it doesn't expand smoothly with little pressure, it is not hot enough. Leave it on the bottle for a few seconds and slide it back off. Repeat this sliding-on-and-off process as it cools. DO NOT leave the PVC on the bottle for an extended period of time. As the PVC cools it shrinks. If it is left on the bottle, this could lead to obvious safety issues. I keep a cold bucket of water next to me to dip the warm molded PVC (of course, without the bottle attached) in order to speed up the cooling process and set the PVC to shape.
Attach the PVC rod holders to the inside of the crate using large zip ties as depicted in the photos. For the middle rod holders that aren't on a corner, I ran two zip ties through the top hole and attached a brass claw style clip to serve as an anchoring point when the crate is used in the tankwell of the kayak (see photo).

One extra step I took was to drill a hole in the bottom of each PVC pipe and 2 more holes, side by side, in the bottom of the crate. One zip tie attached through the floor of the crate and through the PVC gives the rod holder that much more stability and keeps it from twisting or pulling out of the crate.
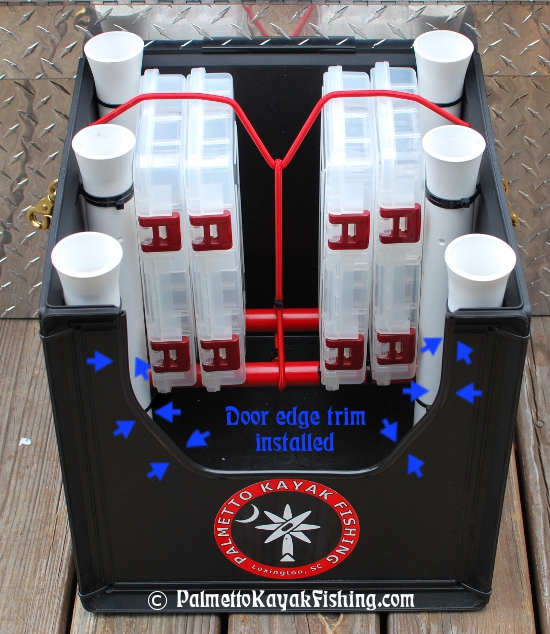
Using masking tape, mark out a section on the front of the crate that will be cut out. This "door" makes it very easy to access items in the crate. Use a hacksaw blade to carefully cut out the pattern. I installed Cowles Products - Door Edge Trim (Part #T3802 - O'Reilly Auto Parts LINK) to cover the rough edges and to dress the crate up a bit. This trim has strong adhesive housed inside the U-channel and only costs a couple of bucks.
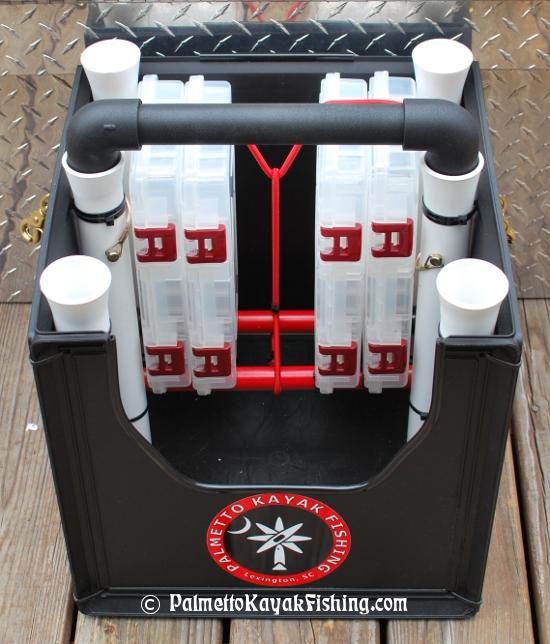
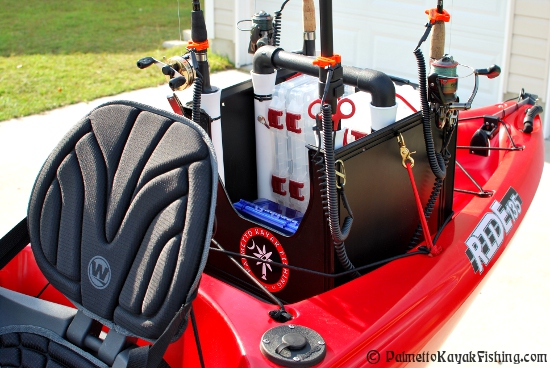
You could stop here and have a really nice setup. I decided to go further with it and make things a little more organized. I took some scrap 7/8" fiberglass rods (1" PVC could be substituted), added rubber chair tip protectors to the ends and zip tied them to the PVC rod holders in the back of the crate as pictured. This provides a shelf for my Plano boxes and makes them easy to reach.
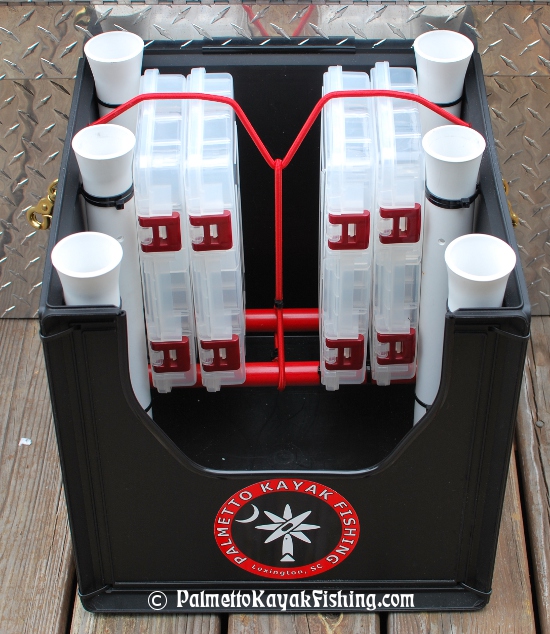

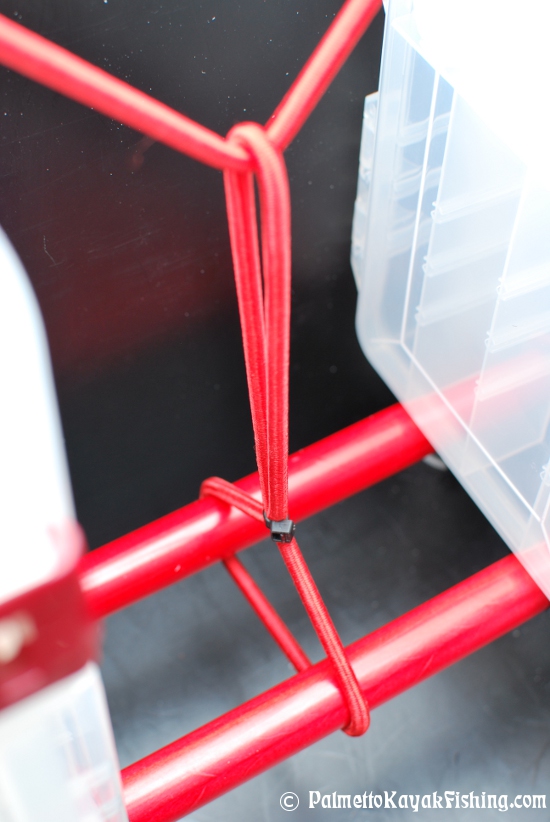

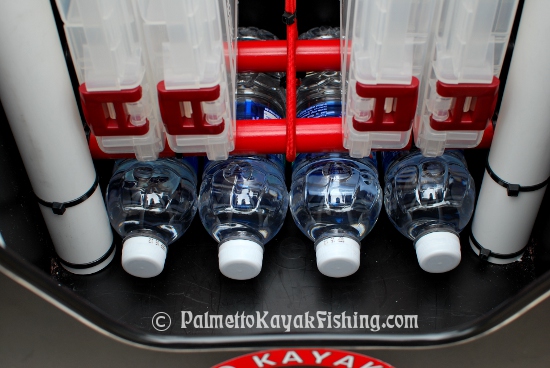
I ran a section of bungee cord through 2 of the existing holes in the top of the cube and knotted the ends. I made another loop of bungee cord and passed it over the horizontal bungee and around the two fiberglass rod supports (see photo). The tension that the combination of these two bungees creates holds the boxes in place, whether it be as many as 5 boxes or as few as 2. I left enough room under the bottom of the shelf to store my water bottles. There is still a lot of storage space left over in the front of the cube for other items.
Lastly, I built a handle out of a 10.5" length of 1" diameter PVC, two 6" sections of 1" diameter PVC and two 90 degree couplings. I can't tell you how nice it is to be able to throw 3 or 4 rods and my camera in my loaded crate and carry it one handed like a suitcase.


The top portion of the handle was sprayed with truck bed liner. I drilled two holes at an angle through both the rod holders and the vertical legs of the handle for an attachment point. PTO pins, available in this well-priced assortment available at Harbor Freight, make quick work of attaching and detaching the handle.
Enjoy! - Paul
MORE PICTURES BELOW


Nice looking crate guys!
ReplyDeleteNice job!!
ReplyDeleteDo you mind if I try to copy the idea? Not sure if I can but I'd like to give it a try!
ReplyDeleteIt's not too hard to build and it works great. I know of at least 8 people that said they were going to/are in the process of building one of these. - Paul
ReplyDeleteshesamaniyak.com, That's why MacGuyver..... Ahem, Paul does these things. So people can copy and make something to help them out on the water.
ReplyDeleteGreat job, Paul. Keep it up!!!
Very creative, functional leashes and crate.
ReplyDeletedo you sell this product for people who do have all the tools you use in this piece.
ReplyDeleteOnce again, you have blown it out of the water (pun intended). Very nice work indeed.
ReplyDeleteGreat idea. Where did you purchase the coiled cable connected to the Cable Cuffs?
ReplyDeletehttp://palmettokayakfishing.blogspot.com/2011/09/build-rod-leash-for-kayak-fishing.html
DeleteFreekin sweet!!
ReplyDeleteWhere did you get the foam inserts for the bottom of the GoPro mount? Thanks a lot!
ReplyDeleteAre you referring to the foam? This may help you out http://palmettokayakfishing.blogspot.com/2012/02/kayak-fishing-monopod-conversion-for.html
DeleteDid you just use a zip tie to attach the brass clip on the side?
ReplyDeleteThanks,
Dom
Sure did. I use the 11" zip ties that are black from Harbor Freight as they don't break down in the sun and are quite strong and cheap - $1.99 for 100 of them.
DeleteI would like to try and build one of these if you don't mind??
ReplyDeleteBeth
Hey Beth, have fun with the build. I publish all these instructions so other folks can build these items. Good luck!
DeletePaul, thank you for the great crate. I just finished mine and although not the same as yours, my family says it is a close second. Once again thanks, and I will be ordering the sticker to put on and give you credit. Mike
ReplyDeleteSorry for the late reply Mike. You are welcome and glad the build worked out for you.
Deletenice crate did you use a 1-1/4 for all rod holder even the one with the monopod in it
ReplyDelete1-1/4" PVC was used for all the rod holders.
DeleteI took this challenge on and built me my first kayak crate based on your design, while mine didn't turn out as pretty as yours definitely will be a great add on to my kayak. I am a kayak newbie and have to say your website is the best kayak site I have found and love your gear you profile and how easy you make the efforts, even putting the item links for the hardware. Thanks for the great website and I look forward to my next items to be your rod leashes. LOL.
ReplyDeleteThanks Jeff - glad it worked out for you. Whenever I can find some time, I have a few more builds that I will post. Have a great weekend.
DeleteWas at Sports Authority tonight browsing the Kayak/Ski shelve when I spotted 1/4 20 X 3/4" knobs used for Ski Bindings, best was they were on sale for $0.47 for a pack of four. I bought 2 packs. I now can adjust my rodholder and accessories without a wrench.
DeletePhil
These are some great ideas, you are one creative yakker! I went out today and bought the stuff for the crate, the new camera mount using the monopod and the rod leashes. That should keep me busy for a few hours! Thanks for the great ideas!
ReplyDeleteBought the crate today at Target, will be building mine tomorrow
ReplyDeleteThank you for your time and effort in creating this blog and posting step by step instructions with great detail. I was googling for DIY milkcrates and stumbled to your posting. Awesome crate. Will try to build one.
ReplyDeleteHow and where did u attach the bungie for holding the boxes?
ReplyDeleteThanks ,
Jeff
Nice post, its really knowledgebale and valuable, this post helps me alot thanks for sharing with us.
ReplyDeleteDiscountskitubesandgear | Discountskitubesandgear | http://www.discountskitubesandgear.com.au/
What model plano box did you use?
ReplyDeleteCant find the itso box anymore, looks like they discontinued them :(!
ReplyDeleteLook for the white itso box on targets site, they seem to be much easier to find than the black one.
ReplyDeletePaul, I too am a newbie who just purchased my fishing yak to hit the Texas costal area and have been over numerous sites on DIY opportunities. Jeff (Sept 10, 2012) posted earlier that this was the best site and I have to full agree- amazing, simplified explanations of all your DIY projects!! I found my Itso box at Target today (in white >=[ ) and have my list of everything else to pick up tomorrow at the local hardware store! I just wanted to thank you so much for everything and hope to see more projects soon!
ReplyDeleteUnable to locate the ITSO box at target and on target.com. Noooooo!
ReplyDeletecan i get someone to make me one????
ReplyDeleteNice invention using pvc pipes!
ReplyDeleteAny idea where I can find the storage cube like yours????
ReplyDeleteFor those of you looking for this crate Target no longer carries them. I contacted the company to find where I could get one. They are only sold at homedepot.com in a 2pk. The internet item #:205559523. B+IN 14.8 in x 14.8 in Black Storage Cube. Hope that helps
ReplyDeleteWhat size Plano boxes are pictured? I currently using 3700 series thinking of switching to 3600 for kayaking
ReplyDeleteI used a standard milk crate for the project and it worked great. The only issue was the handle tubes seemed to wiggle in the zip ties. I ended up notching the tubes to lock in the ties and putting a screw near the bottom to stop the wiggle.
ReplyDeleteFYI, the ITSO products are back at Target this summer (2015).
ReplyDeleteI've never seen this before; beautiful weather and open water in February here in New Brunswick! Last year at this time you could have safely walked across sturgeon alley, or even driven across in snowmobiles, but this year the alley is wide open.
ReplyDeleteThanks !
Awesome post!if you want to get into Kayak Fishing- great! Kayak Fishing is a fun and unique way to fish, and is a great alternative for those not looking to invest in a powerboat.
ReplyDeleteHaving the right kayak fishing accessories can make your fishing experience much more enjoyable and successful. Many accessories make kayak fishing easier and more efficient, while others really aren't worth the extra money. Thanks!
ReplyDeleteNow at Bed Bath and Beyond $9 (7/2016)
ReplyDeleteWonderful article, thanks for putting this together! This is obviously one great post. Thanks for the valuable information and insights you have so provided here.
ReplyDeleteGet More Information , Visit Here :Best Fishing Kayaks
Well done....genius and your sourcing along with how to is one of the I’ve seen on line
ReplyDeleteKUDOS Dude
Great post. Definitely this one of the informative and useful posts to me. Thanks for the share. fish rod holder and Top Boat accessories with the best quality of stainless steel. If you want to buy fish rod holder and boat accessories with great quality then click the
ReplyDeleteclamp on rod holders
The same is the case with our Corrugated Boxes Wholesale as we offer wholesale discounts and deals. If you order our custom boxes in bulk or mass amount, we will offer amazing discounts and offs. Custom Corrugated boxes are made up of bio-degradable materials and natural resources that is why they do not harm the environment. This sort of material is 100% eco-accommodating hence is a great option to utilize as packaging material. As corrugated boxes are the desired ones for shipping and transportation due to their strength, so it is obvious that these Custom Printed Boxes are in higher demand by industries and brands.
ReplyDeleteIf you are looking for a bulk quantity of product packaging within an affordable range then PackagingNinjas is the best destination. Bath Bomb Packaging is manufactured at the best prices and it proved cost-effective and saves your time and money too. To adopt the option of custom bath bomb boxes wholesale is an excellent option for bulk orders of boxes manufacturing.
ReplyDeleteFrench Fry Boxes
Nail Polish Boxes
pencil boxes are used for multi-purpose tasks. You can use these boxes to keep your different things safe and protect from damage.
ReplyDeletecustom boxes
custom candle boxes
custom pencil boxes
Custom pen Boxes
Our the purpose is to share the reviews about the latest Jackets,Coats and Vests also share the related Movies,Gaming, Casual,Faux Leather and Leather materials available SD Padres Jacket
ReplyDeleteHey the box looks great I like to build stuff that is practical and this is wonderful even for someone fishing from the bank and it doesn't cost an arm and a leg
ReplyDeleteBest Inflatable Kayaks, If you have decided you want a kayak, in particular a very portable one that is easy to store anywhere then an ...
ReplyDeleteThis comment has been removed by the author.
ReplyDeleteI am very much pleased with the contents you have mentioned. I wanted to thank you for this great article. Marty Mcfly Denim Jacket
ReplyDeleteOur the purpose is to share the reviews about the latest Jackets,Coats and Vests also share the related Movies,Gaming, Casual,Faux Leather and Leather materials available. Dune Coat
ReplyDeleteHi, I do believe this is a great site. I stumbledupon it 😉 I will revisit
ReplyDeleteyet again since I book-marked it. Money and freedom is the greatest way to change, maylakers jacket starter
you be rich and continue to help others.
This comment has been removed by the author.
ReplyDeleteThis comment has been removed by the author.
ReplyDeleteI need information about free Training and Learning Program in London to Write My Research Paper and I would like to join these kinds of free classes. Love Milo Coat
ReplyDeleteThanks for such a valuable post. I am waiting for your next post, I have enjoyed a lot reading this post keep it up. Celebrity Leather Jackets
ReplyDeleteNice article. Trace mobile number India Can be used to track mobile number online
ReplyDeleteI'm astonished by this blog, to say the least. I hope you'll keep posting blogs like this. Jimmy Hurdstrom Red Hoodie
ReplyDeleteThank You for sharing the interesting information with us. I am eagerly waiting for your next blog. If you are interested in astrology please do visit the website now for. Beth Dutton Blue Jacket
ReplyDeleteThank you for sharing this information with us. Its very useful for me and also for my friends. Jimmy Hurdstrom Red Jacket
ReplyDeleteThank you for sharing informative content… Beth Dutton Blue Poncho
ReplyDeleteThanks for sharing such a valuable post. Please keep us updated for future posts.
ReplyDeleteYour article is such an informative article. It is glad to read such those articles thanks for sharing Finestkind 2023 Jenna Ortega Denim Jacket
ReplyDeleteThanks for sharing such a beautiful write-up. I really liked it. I will definitely bookmark this site for more articles like this. Fast X Ramsey Leather Jacket
ReplyDeleteThis was a very informative article, thank you for writing it. https://www.thetodayguide.com/effects-of-underbilling-on-the-construction-industry/
ReplyDeleteKamagra 100 is a pharmaceutical product with the active ingredient sildenafil citrate 100mg.
ReplyDeleteSildenafil Citrate 100
Tadalafil 20mg
ReplyDeleteis a Medicine to treat ED. ED is a condition where a man is unable to sustain a penile erection for satisfying intercourse.
Thanks for your supportreckless driving virginia 85 mph
ReplyDeleteThanking the reader for their valuable contributions to improving the article. Kill Em With Comedy Hoodie
ReplyDeleteAppreciation for the reviewer's expertise and knowledge. Kill Em With Comedy Hoodie
ReplyDeleteExpressing gratitude for the time and effort spent in evaluating the content. Kill Em With Comedy Hoodie
ReplyDeleteRecognizing the recipient's commitment to delivering a comprehensive review. Kill Em With Comedy Hoodie
ReplyDelete"Embrace the chilly days with the cozy elegance of the Penny Benjamin Jacket Stay warm, stay stylish."
ReplyDeleteThanks for sharing such interesting and wonderful information with us.
ReplyDeletemen's shearling leather vest
Your tips and advice are always practical and actionable. Thanks for making complex topics easy to understand.
ReplyDeleteÉ bom, me ajudou muito, porém tenho que lembrar que felinos não é só gato. Vi que você retratou sobre 서귀포출장샵outros animais, mas foi bem pouco.. Mesmo assim parabéns!
ReplyDeleteYour fashion guides always give me confidence about choosing a new fashion because they are trendy and easy to do. Christmas Collection
ReplyDeleteIn the dynamic world of sports fashion, one question that's been gaining traction is: Why is the Damar Superbowl Jacket a must-have for sports enthusiasts?
ReplyDeleteFaridabad's taxi service offers convenient transportation with reliable drivers, timely pickups, and competitive fares. Whether for daily commutes or special occasions, it ensures efficient travel across the city. cabs in faridabad
ReplyDeleteFaridabad cabs provide hassle-free rides with courteous drivers, clean vehicles, and easy booking options. Offering prompt service and competitive rates, they're the go-to choice for comfortable and convenient transportation in Faridabad.
ReplyDeleteDehradun's taxi service offers reliable transportation solutions with professional drivers, comfortable vehicles, and flexible booking options. Whether for local travel or outstation trips, it ensures safe and convenient journeys across the city and beyond. Dehradun Taxi
ReplyDeleteI recently purchased the Spencer Dutton Hat, and I must say, it has exceeded all my expectations. The ordering process was smooth, and the hat arrived promptly. The packaging was secure, ensuring that the product reached me in pristine condition.
ReplyDeleteWow, I didn’t realize there were so many factors to consider. Thanks for the detailed explanation[https://leatherloom.com/]
ReplyDeleteThank you for breaking this down in such a clear way. I always found this topic confusing, but now it makes so much sense[https://mready.co/]
ReplyDeleteI found this post on mental health awareness so important. What’s the best way to approach a loved one who might be struggling but hasn’t opened up yet?[https://theleatherstore.us/]
ReplyDeleteYour insights always resonate with me. Thank you for sharing your wisdom!
ReplyDeleteBeth Dutton Yellowstone Trench Coat
I'm definitely book marking this for the future when I rebrand! A really helpful post thank you!
ReplyDeletei have bestbedding sets
ReplyDeleteGreat insights—keep them coming
ReplyDeleteThis is a must-read for everyone.
ReplyDeleteGreat blog! Thanks for generously sharing such valuable information. Keep up the fantastic work!
ReplyDeleteThank you for sharing such valuable information! Your articles are truly insightful and engaging.
ReplyDeleteFinding the Invoice tracking software best invoicing software for architects is essential for managing project-based billing, tracking time, and maintaining professionalism in client interactions. Architects often work with complex fee structures, including hourly rates, fixed fees, and milestone payments, which makes it important to have a system tailored to their workflow.
ReplyDeleteWriting a Book? let Arkham House turn your words into a bestseller!
ReplyDeleteIt was totally not the ideal outing we've observed against him this year, with his management rocky off the hop, nonetheless he fixed later on into the recreation Riley Greene Jersey. Tommy Kahnle was out of the Tigers' pen, and he obtained 3 out within McDaniels arrived out for the 9th, making an attempt in the direction of continue to keep the Tigers constrained. He walked Colt Keith. He sophisticated towards minute upon a groundout, and then Andy Ibanez singled, making it possible for Keith towards rating.
ReplyDeleteIdea as soon as 10:30 p.m. ETInjuriesNic Claxton overlooked previous night time's activity with instantly hamstring tightness. We'll watch if he's again tonight. Night time 2 of a back again-in direction of-again therefore we'll perspective who sits. We unquestionably comprehend Cam Thomas, Bojan Bogdanovic, Maxwell Lewis, Trendon Watford https://www.libertyteamstore.com, or DeAnthony Melton. And it's most likely Ben Simmons will be upon the bench as Tucker is not with the personnel as they are making an attempt in the direction of exchange him in other gameThroughout this thirty day period, California is made up of been working with really serious fires.
ReplyDeleteThank you for this insightful article! I learned a lot from it. Tyrese Robinson Jersey.
ReplyDeleteFantastic post.Thanks Again. Really Great. Veronica Burton Jersey.
ReplyDeleteHi, I read your blogs like every week. Your humoristic style is awesome, keep up the good work! Julie Vanloo Jersey
ReplyDeleteJust call him the outfield whisperer. Kevin Kiermaier is back.Just months after capping his 12-year MLB career by winning a World Series ring with the Dodgers, Kiermaier, one of the greatest defensive outfielders this game has seen, is joining the Blue Jays as a special assistant. May 2 is City Connect Bassitt-Ball Replica Jersey Giveaway: Get your tickets now!This has been buzzing in the back of Kiermaier's mind for years now. Even last July, when Kiermaier first shared that the 2024 season would be his last, he was already hinting at the future. He'd originally planned to take �25 as a full year off completely retired but his life has been set to baseball's clock."I'd always make a joke with the guys about being a special assistant," Kiermaier said. "I'd say, ou guys are going to miss me, but I'll be a special assistant one day and you'll love having me around.' It's funny how it came to fruition. I am just thrilled https://www.shopteambluejays.com/239-Orelvis_Martinez_Jersey.
ReplyDeleteShow off your Cubs pride with the Script Tail 2025 Chicago Cubs Classic Rib Jacket a must-have for true fans and fashion-forward collectors. Featuring the iconic script tail design and bold ribbed accents, this Chicago Cubs jacket blends timeless team spirit with modern street style. script tail cubs classic rib jacket Perfect for game days at Wrigley Field or casual nights out, this piece is a standout in any wardrobe. Whether you're searching for MLB-inspired outerwear or trending celebrity jackets, this Chicago Cubs classic is a winning choice. Don’t miss adding this collector’s gem to your lineup!
ReplyDeleteGreat breakdown of how a solid kayak crate can make all the difference on the water switching from flimsy file crates to durable containers is a game-changer for any angler. Smart gear choices really boost efficiency and comfort. And if you ever plan fishing events, meetups, or outdoor gatherings, Party Rentals Milton by Meadowvale Party Rentals can help with reliable tents, tables, and equipment to keep everything running smoothly.
ReplyDeleteWow, cool post. I’d like to write like this too – taking time and real hard work to make a great article… but I put things off too much and never seem to get started. Thanks though. Check Sephora Gift Card Balance
ReplyDeleteThanks for sharing such thoughtful content. Looking forward to more inspiring posts from you! [url=https://webnetic.tech/website-development-in-delhi/]website developer in delhi[/url]
ReplyDeleteThanks for sharing such thoughtful content. Looking forward to more inspiring posts from you! web development company in delhi
ReplyDeleteThis valuable appearances totally proper. Each one of minimal details have decided thanks to large number with practical experience simple awareness. I'm just excited them just as before significantly. article submission sites
ReplyDeleteThis is something I want to see a lot more of. Thanks for giving the information! Your blog is now saved because I found some very useful information on it. social bookmarking sites list
ReplyDeleteThank you for your posts and all the best with your work and blog. Looking forward to reading new entries. directory submission site list
ReplyDeleteI’m happy to see some great post on your site. It’s interesting to read. Many thanks for sharing it, keep sharing. free image submission sites
ReplyDeleteThank you for posting when you’ve got the opportunity, Guess I’ll just book mark this site. Best astrologer in Bangalore
ReplyDeleteAwesome DIY kayak crate! Practical design, smart storage, and perfect for kayak fishing adventures. Palmetto Kayak Fishing delivers a useful, well-explained setup that inspires anglers to customize their gear.
ReplyDeleteAvcılar Hurdacı firmamız Uray Hurdacılık tarafından her çeşit metal hurda alımı yapılır
ReplyDeleteThe Chrome Hearts Hoodie truly represents premium streetwear with its bold design and high-quality fabric. It’s a perfect choice for anyone looking to combine comfort with luxury fashion and a standout style.
ReplyDeleteI really appreciate this post. I have been looking all over for this! Thank goodness I found it on Bing. You have made my day! Thank you again. Material Management System
ReplyDeleteAwesome DIY kayak crate!
ReplyDeleteNice article, This is very good information and very useful Thanks for sharing the information with us. website development cost in india
ReplyDeleteThis DIY guide is detailed, practical, and easy to follow, making it useful for enthusiasts who enjoy hands-on projects. Step-by-step learning adds real value. That approach mirrors professional programs like Guidewire Training in Delhi, where practical implementation and real scenarios help learners build confidence and usable skills. Guidewire Training
ReplyDeleteThis DIY kayak crate tutorial contains practical steps and tips for building a storage solution that fits outdoor needs. Articles like this are great for people looking to customize their gear and learn from detailed, hands on approaches. https://learnguidewire.com/guidewire-training-in-delhi/
ReplyDeleteclear instructions and practical tips that make building a custom kayak crate feel totally achievable.
ReplyDeleteI like how everything is presented in a clear and straightforward way. Easy to understand and access.https://ee88.cat/
ReplyDeleteThis is a nice blog and I love to read these types of content. Thanks for sharing this type of content for us. Best of luck for your next post. Lotus 365 game
ReplyDeleteGreat point the kayak crate really is one of those simple but essential upgrades for kayak anglers. A well-organized crate can make a huge difference for storing tackle, tools, and gear while keeping everything within easy reach on the water.
ReplyDeleteAt MPR Landscapes Canada, we appreciate that same practical approac smart organization and thoughtful design always make any setup more efficient.
HH
ReplyDeleteCreative DIY projects like this kayak crate build inspire hands‑on problem solving. Using practical materials and clear instructions helps paddlers organize gear and enhance storage efficiency on water trips. Ngorongoro Crater -
ReplyDeleteThank you for maintaining such a quality and informative blog. Your hard work can clearly be seen and truly appreciated. good hotels in dehradun
ReplyDeleteThis is a very practical and well-detailed DIY setup that shows how simple materials can be turned into a highly functional kayak storage system. The focus on durability, organization, and customization makes it especially useful for improving efficiency on the water. coaching centre in kolkata
ReplyDeleteGreat DIY idea! Using a sturdier crate instead of a milk crate is a smart move for better durability. The custom PVC rod holders and front access design make it much more practical and user-friendly on the water. Really helpful and well-explained build! property in greater noida
ReplyDeleteThis DIY kayak crate setup is both practical and efficient. Custom storage solutions like this improve organization on the water and help anglers keep essential gear easily accessible during trips. Cricket ID
ReplyDeleteGreat DIY guide with practical steps and useful customization ideas. Projects like this show how creativity and simple materials can enhance functionality while keeping costs manageable for outdoor enthusiasts. Teen Patti Master Old
ReplyDeleteDIY kayak storage solutions demonstrate how anglers optimize gear organization for fishing trips. Custom crates improve accessibility, balance, and practicality while enhancing overall on-water experience and efficiency. janki mahal trust ayodhya
ReplyDeleteThis DIY kayak crate guide is very practical and creative. The step-by-step approach and customization ideas make it easier for enthusiasts to build functional storage solutions efficiently. check target gift card balance
ReplyDeleteVery creative and practical idea for kayak storage. It’s impressive how simple DIY solutions can significantly improve organization and convenience, especially for outdoor enthusiasts looking to customize their setup without spending too much. Guidewire software
ReplyDeleteFor reliable and professional service in Canada, check out MPR Movers for an easy and hassle-free relocation.
ReplyDeleteA creative DIY approach that is both practical and cost-effective. Sharing detailed steps and ideas like this helps enthusiasts customize their setup while improving functionality on the water. watch terabox without app
ReplyDeleteproperty in greater noida
ReplyDeleteSobha Rivana
very nice post, i undoubtedly really like this excellent website, carry on it
ReplyDeleteslot gacor777 link alternatif
I must say, the Journal Blog is a fantastic addition to an already outstanding theme.
ReplyDeleteKeep up the good work guy
slot gacor777 link alternatif
Thank you for sharing such valuable information, it really helped me understand the topic better. real estate consultants in noida
ReplyDeleteGreat post! Thanks for the detailed explanation and useful insights. property in noida , real estate company in noida
ReplyDeleteYour blog is one of a kind, i love the way you organize the topics
ReplyDeleteslot gacor777 link alternatif
Love to read it,Waiting For More new Update and I Already Read your Recent Post its Great Thanks.
ReplyDeleteslot gacor777 link alternatif
ReplyDeleteNoodlemagazine is a very impressive platform with a smooth interface, fast loading speed, and an overall user-friendly experience that makes browsing simple and enjoyable. noodlemagazine
Creative DIY setups like this show how customization can improve functionality. Practical storage solutions make kayaking more organized while enhancing convenience during longer fishing trips. FN7
ReplyDeleteReally enjoyed this detailed DIY kayak crate guide. The step-by-step approach and practical tips make it easy to follow. Great insights for anglers looking to organize gear efficiently on the water.tourist visa for usa from india
ReplyDeletevisa consultation services
This is a well-explained and practical DIY setup. The crate design looks sturdy and functional, especially for organizing fishing gear. Simple ideas like these really enhance the overall kayaking experience. global visa services
ReplyDeleteGreat DIY kayak crate setup with practical storage ideas. The step-by-step explanation makes it easy to replicate, and the focus on organization really helps improve efficiency and convenience during fishing trips.
ReplyDeleteproperty in greater noida
real estate company in noida
Really useful guide for building a functional kayak crate. The design looks durable and well-organized, making it easier to manage gear on the water while keeping everything accessible and secure.property dealers in noida
ReplyDeleteDIY kayak crates enhance fishing efficiency by organizing rods, tackle, and tools within easy reach. Such setups improve stability, customization, and accessibility, making kayak fishing more practical and enjoyable on water. Dental implant in Shivajinagar
ReplyDeleteThis DIY kayak crate project is both creative and practical. The detailed setup and thoughtful organization ideas make it very useful for kayaking enthusiasts looking to improve storage efficiency. emergency alert system Newfoundland
ReplyDeleteThe DIY setup shared here is both practical and creative for kayak enthusiasts. Well-explained modifications like these can improve storage, convenience, and the overall fishing experience. M77 Game App
ReplyDeleteThis DIY project demonstrates how creativity and practical design can improve kayak organization. The detailed modifications and storage solutions make it easier for anglers to keep essential gear secure and accessible.Helpdesk Management System
ReplyDeletesolutions can greatly improve convenience on the water while keeping essential fishing gear secure and accessible. Event Management Software
ReplyDelete