
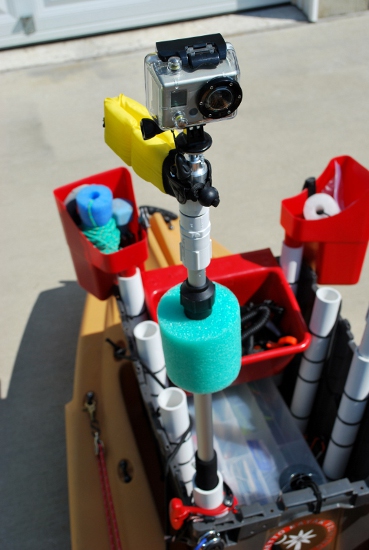
For less than $25, you can build your own telescoping aluminum camera pole that is strong, lightweight and functional. I have been using this design since December 2010 when I purchased my GoPro HD camera. The fact that this pole is infinitely adjustable from the closed position up to 5’ in height really makes it very versatile and allows easy access to my camera while the pole is secured in the 1¼” PVC rod holder in my kayak crate. I usually set the camera at a height where all I have to do is reach up and press the power button to start filming (instant on filming – excellent idea by GoPro!) Using this pole in conjunction with a camera like the GoPro HD, you can create some spectacular overhead photos/videos. I have also had great results with a handful of other waterproof cameras as well. With a little ingenuity, this design can be slightly modified to fit just about any application and angle. Lastly, the marine friendly components make this DIY project a great choice for kayak fishermen.
There really isn’t too much involved in building one of these poles. As with most of my DIY builds, you can usually purchase all the items you need locally:


1) LOWE'S - NeatHome by Unger Flow Through Water Pole ($12.98)
2) RADIO SHACK - Targus Table Top Tripod Targus Model # TGT-CT7 ($7.99)
3) LOWE'S - ½” PVC Cap - slip ($0.27)
4) LOWE'S - short length of ½” PVC for joining the two pieces together
5) LOWE'S - ½" PVC Threaded Male Adapter ($0.33)
6) DOLLAR STORE - Pool Noodle ($1.00)
7) LOWE'S - 7/8 -1" Rubber Chair Tips ($2.28 for 4)
8) LOWE'S - ½” PVC Double Threaded Female Coupling ($0.46) - *Pictured below*

8) LOWE'S - ½” PVC Double Threaded Female Coupling ($0.46) - *Pictured below*

I utilized the adjustable camera ball head from an aluminum Targus Table Top Tripod (Targus Model # TGT-CT7) that can be picked up at Radio Shack for $7.99. A quick Google search shows that they are also available at Kmart for the same price. Using a phillips head screwdriver, remove the bolt that secures the tripod to the ball head. Save the bolt and the rubber gasket.

Step 1
Drill a hole in the center ½ inch PVC cap that will allow the bolt to pass through. Try and get this hole as close to center as possible for a clean, level install. The rounded shape of the PVC cap works perfectly to seat the ball head and allows for use of the original mounting bolt. Slide the bolt through the hole, add the rubber O-ring and put some Loctite or Epoxy on the bolt threads. Tighten everything up.


Step 2


Brush on some PVC Transition glue to the black threads of the pictured aluminum rod. Screw on the double threaded ½” coupling. The narrow threads of the PVC coupling will “rethread” the black plastic threads on the pole and the result is a tight, secure fit – especially with the addition of the transition glue. Now you have a pole that can be interchanged with various accessories using cheap PVC parts (SEE OPTIONAL ACCESSORIES at the end of this write up). As pictured, the camera mount portion can now affixed to the telescoping rod.

Step 4
Remove the hose connector at the end of the aluminum pole. The easiest way to do this is to tighten the black hose connector in a vice and twist the aluminum pole.

Liberally apply gel hand sanitizer to the aluminum pole and the undersides of the black foam rubber grips. This will allow you to move the grips around until the sanitizer evaporates. Slide both grips off then thread the pool noodle onto the pole. Position one grip on the pole and roll up the other one as pictured.


Slide it back on the pole until it is flush with the other grip and unroll the foam so the two pieces overlap. This will ensure a tight fit inside of a 1 ¼” diameter PVC pipe rod holder. Slide on the rubber chair Tip.

Liberally apply gel hand sanitizer to the aluminum pole and the undersides of the black foam rubber grips. This will allow you to move the grips around until the sanitizer evaporates. Slide both grips off then thread the pool noodle onto the pole. Position one grip on the pole and roll up the other one as pictured.
Slide it back on the pole until it is flush with the other grip and unroll the foam so the two pieces overlap. This will ensure a tight fit inside of a 1 ¼” diameter PVC pipe rod holder. Slide on the rubber chair Tip.
Pretty easy right? Like I noted before, once the basic pole is built, it is easy to interchange all kinds of accessories.


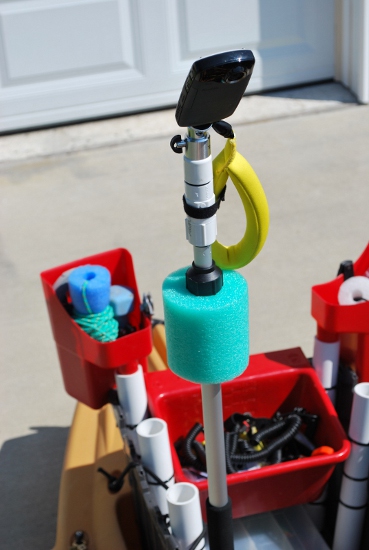


For less than .50 cents, pick up another ½” screw-to-slip PVC adapter and a short length of PVC pipe. Palmetto Kayak Fishing sells Waterproof 5 LED Nano Spotter marker Lights with (or without) a custom molded base in the parts department. If you order the light with the base, simply glue the assembly together as pictured and screw it onto the pole instead of the camera. Or get creative, add a PVC “T” adaptor and mount both your camera and a light at the same time - the possibilities are endless. Enjoy - Paul


For less than .50 cents, pick up another ½” screw-to-slip PVC adapter and a short length of PVC pipe. Palmetto Kayak Fishing sells Waterproof 5 LED Nano Spotter marker Lights with (or without) a custom molded base in the parts department. If you order the light with the base, simply glue the assembly together as pictured and screw it onto the pole instead of the camera. Or get creative, add a PVC “T” adaptor and mount both your camera and a light at the same time - the possibilities are endless. Enjoy - Paul
 | |
| Parts Department - Nano Spotter Waterproof Light with custom base - $15.99 + S/H |
Awesome. Worked great! Thanks for sharing!
ReplyDeleteNo problem, glad you enjoyed it.
ReplyDeleteGreat DIY! Thank you for this. But could I use any other pole? All the Lowes around me don't sell the NeatHome by Unger Flow Through Water Pole. Was so excited to make this too!
ReplyDeleteExcellent post! Thanks you so much guys for sharing on your knowledge about this field.
ReplyDeleteFishing rod holders for boats
Thanks for sharing such informative post. With this tactical telescoping surveillance camera tool you will be able to safely peer into the darkest,most dangerous and most remote places in your operating environment. .
ReplyDeleteThermal Imaging Camera
I was looking for such blog from a long time, thanks for sharing.
ReplyDeleteThermal Imaging Camera
Excellent post! Thanks you so much guys for sharing on your knowledge about this field. camera pole
ReplyDeleteA wood phone case, like the Kerf Select Figured Myrtle, effortlessly combines elegance with practicality, making it a standout accessory for any fashion-forward individual. The natural wood grain not only offers a unique aesthetic but also provides superior durability and protection. This blend of style and function ensures that a phone remains safe while complementing any look. For those who appreciate fashion and functionality, a Wood phone case is an ideal choice, adding a touch of nature to everyday life.
ReplyDeleteThis comment has been removed by the author.
ReplyDeleteWow, this DIY kayak camera pole idea is fantastic! It’s super practical for capturing those epic fishing moments on the water. I’ve been looking for something like this for ages! By the way, if anyone’s into exploring creative projects like this or needs tools, you can also find Adjustable Telescopic Props on rent in ahmedabad, which might come in handy for similar setups. Great work on this post—really inspiring!
ReplyDeleteGreat DIY project! This telescoping kayak camera pole looks like a fantastic and cost-effective solution for capturing awesome footage on the water. The versatility and ease of use are impressive. For those in Gujarat looking for additional options, consider exploring Adjustable Telescopic Props on hire in gujarat, which can offer similar functionality for various outdoor adventures. Thanks for sharing such an informative post
ReplyDelete