Wednesday, June 15, 2011

Malone Seawing Review

Until recently only two companies came to mind for quality kayak roof racks and accessories: Thule and Yakima.  Both offer outstanding products but I have found one more worthy contender to add to the list– Malone Auto Racks


I recently purchased a set of Malone Seawing kayak saddles from Austin Canoe & Kayak in Texas for my Thule Xsporter rack.  ACK by the way has exceptional prices, fast shipping and world class customer service.  I can’t recommend them enough.  Sign up for their newsletter and “like” their Facebook page to receive exceptional coupon codes you can use on the majority of the items on their site. 

Installation of the Seawings is straightforward.  Malone includes all the required hardware to mount the kayak saddle to just about any size and shaped crossbar.  For my application on the Xsporter, I used the longer of the two sets of supplied mounting bolts.  Five minutes of work and the cradles were securely fitted to my rack using the hand tightened knob bolts.


I elected to add stop nuts to each of the mounting bolts to make it harder for someone to just unscrew the bolts by hand and walk away with the racks.  At .62 cents for a package of 4 stop nuts, this was a no-brainer decision that adds a little more security.


Loading and unloading a kayak on this rack is easy if you use a little common sense.  The top of the rack that contacts the hull of the kayak is covered in a high density rubber that is designed to grip the kayak during transport.   


To make it easier to load and unload the kayaks, I utilize a soft padded fold-up stadium seat and place it over the back portion of the rack.  


The stadium seat provides a slick platform that makes sliding the kayak into position on the rack easily achievable.   I rest the nose of the kayak on the pad-covered Seawing and walk to the back of the yak up onto the rack. 


This method alleviates any real heavy lifting at all.  It couldn’t be simpler.  Once in position it is easy to strap down the kayak with the supplied cinch straps and front/rear tethering lines.  I pre-cut the tethering lines and added a couple of clips so that I don’t have any knots to tie once the kayak is in position.  This method saves a lot of time.

The Seawings work flawlessly under city and highway driving and I have yet to experience any issues with the saddles even at high speeds.  I do add an extra lashing strap that fastens over the kayak and directly to the Thule Xsporter Rack just for added security, but it probably isn’t really needed.   Within one week of using my first set of Seawings I ordered a second pair for my girlfriend’s kayak.  Malone’s Seawings are a great value and are very easy to install and use. - Paul

Tuesday, June 14, 2011

Thule Xsporter Truck Rack Review

If you have followed my addiction to kayak fishing over the past few years, you’ve probably seen at least one of my homemade transport racks.  There was the PVC model that I built just so I could get my first kayak home from the store.  It was re-engineered over time and worked well on my short bed Tacoma.  After moving up to a full sized truck, I went back to the drawing board and came up with a steel, no-welding-required configuration that utilized inexpensive yet strong bed extenders from Harbor Freight and some simple parts from Home Depot.  I used this for the better part of a year.
     
While both of these rigs worked well, I wanted something that was “permanently” mounted on my truck and ready to go at a moment’s notice.  After all, one of the things that I love most about kayak fishing is the convenience of being able to load up my gear and be gone within minutes.   Excessive time spent in the driveway equated to less time on the water.  I needed a change.

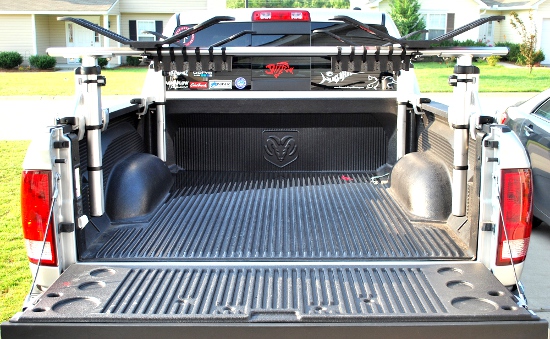
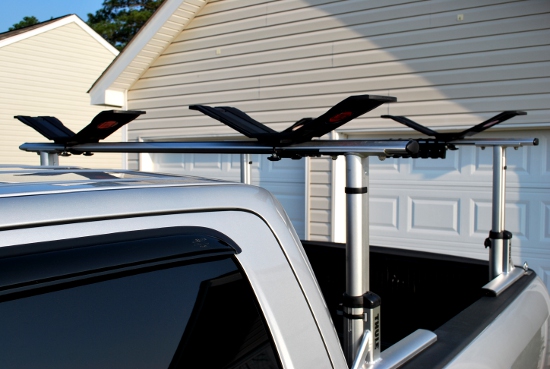
Enter the Thule Xsporter.  This aluminum rack bolts to the truck bedrails and utilizes an ingenious telescoping design.  When not in use it can be arranged in a lowered position to reduce wind resistance while driving.  With gas prices currently hovering around $3.30 a gallon in South Carolina, every little bit counts.   


When it is time to load up, it literally takes seconds to lock the rack in the upright position and loading can commence.  I can’t begin to explain how functional this option is.  Although it took a month or so of scouring the internet, I was lucky enough to find my barely used Xsporter on Craigslist for $300.  For an extra $20 the seller threw in a pair of Thule J cradles – my man.  

Before the release of the Xsporter  XT, Thule’s most recent, one-size-fits-all model,  there were two options to choose from.   The Xsporter 421 is designed for compact trucks and the 422 model is intended for most full sized applications.  The only difference between the two models is the top bar height when the rack is placed in the fully extended position. 

I did a little research on these racks (ok, a LOT of research) before I pulled the trigger and bought one.  I chose the 421 which sports a 23” top bar height.   This model clears the cab of my full size truck just fine.  The 422 model would have added almost 5.5 inches to the overall bar height of the rack.  In my opinion this would be entirely too tall for my application especially after adding any sort of kayak saddle like the Malone Seawing cradle – more on that product later.

In summary, the Xsporter is versatile, rugged and well-designed.   The high end craftsmanship from the components to the welds is apparent at first glance.  Even at full retail price, this rack is well worth the money.  I have been using the Xsporter for about 6 months and am overly pleased with its performance and styling.  I have yet to find anything major that I would change about this rack.


I would suggest two things to potential buyers or current owners.  First off, purchase a set of the Thule crossbar rubber strips that fill in any voids on the horizontal mounting bars.Without this rubber insert, this whistling that is generated from the wind flying over and under the top bars is enough to make a preacher cuss.   


Secondly, put some silicone spray lubricant or similar product on the vertical telescoping posts.  Aluminum-to-aluminum contact occurs between these posts so every time they are raised or lowered, the arms have the tendency to rub against each other.  Without some sort of lubricant, the square edges of the posts will actually dig into each other and scratch the opposing arms.  I’m not convinced that this is a product flaw with the rack, but rather the fact that the bedrails on the Dodge don’t allow for a perfect 90 degree straight up and down mounting point.  This may not be an issue on all trucks, but the bedrails on the Dodge flair out ever so slightly.  A little bit of oil easily corrects this issue of rubbing. 

-         - Paul

Thursday, May 5, 2011

Kayak Fishing the Congaree River - Video

April was a good month on the Congaree River in Columbia, SC even though I was only able to get out there 2 times.  The striper fishing is on fire right now and I would think that within the next week or so, the smallmouth bass bite is going to turn on as well from the Gervais St Bridge on up the river.  Get out there and take advantage of this time of year!

Friday, April 29, 2011

DIY Bulletproof Kayak Cart - Build Instructions + Pics


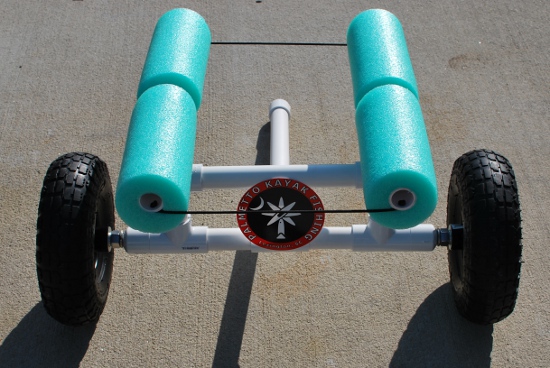
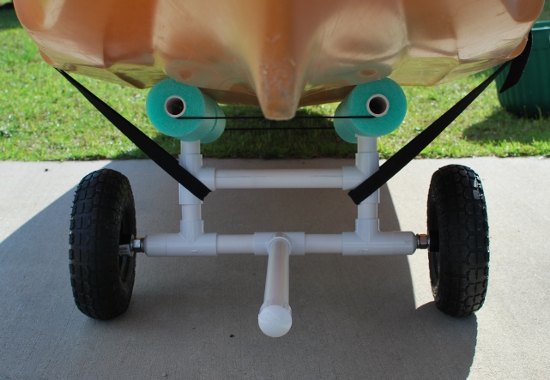
I carry quite a bit of gear when I go fishing and when one factors in the weight of my Ocean Kayak Prowler Big Game, the 12 volt Werker fish finder battery and various other gear, I’m at or above the 100 pound mark.  I have been using this cart design for over 2 years and it has yet to fail me or damage my kayak.  While some elements of this cart may look familiar, there are a few tweaks that I came up with that make it super strong and functional.  It is at home on rough terrain and really makes transporting a heavy kayak an easy process.  For the budget-minded kayak fisherman, this cart is relatively inexpensive and built to handle whatever you throw at it.  Here’s how I built it.    


SHOPPING LIST:
Home Depot or Lowes
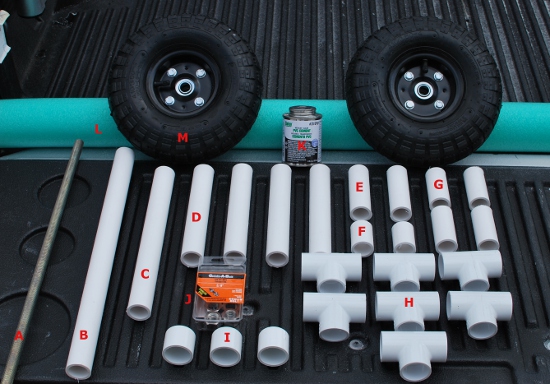
3 foot section of 5/8” threaded rod ($4 – item “A” in picture below) – NOTE: it will be cut down to 25.5”

10’ Section of 1” diameter Schedule 40 PVC pipe ($3)

PVC Glue ($3 – item “K”)

7 – 1” PVC Tee fittings ($3.50 total – items “H”)

3 – 1” PVC Caps ($1.20 total – items “I”)

5/8” “Create-A-Bolt” stainless steel nuts, washers and lock washers kit ($3.80 Home Depot Item “J”)

"5/8" Create-A-Bolt"


Walmart
JUMBO pool noodle  ($3.88 – item “L”)

Harbor Freight
2 – 10” pneumatic wheels/tires (LINK)– frequently on sale for $5.99, used a 20% off coupon always available HERE or in magazines & weekly mail fliers. (TOTAL for 2 tires $10 – Items “M”)

TOTAL COST = Around $33


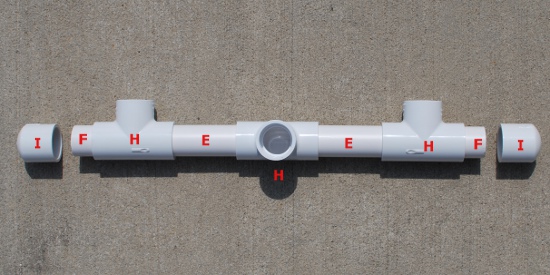
Step 1 – Cut the 10’ section of 1” PVC into the following lengths.  Your LAST cut should be the piece of PVC labeled as “C” in the picture above.  After the lower assembly is fitted together, double check the measurement to make sure that “C” which was 10.5” is the correct length.

(B) – 18”
(C) – 10.5”
(D) – cut four 8” pieces
(E) – cut two 4.5” pieces
(F) – cut two 1¾” pieces
(G) – cut four 3” pieces

Step 2 – Drill a 5/8” hole through two of the PVC end caps.


Assemble the lower unit pieces together as pictured below.  I don’t use any glue here because the way I attach the threaded rod holds the entire assembly together just fine.   Just to recap, “F” is 1¾” long and “E” is 4.5”.

No Glue Needed

Assembled

Side View
 
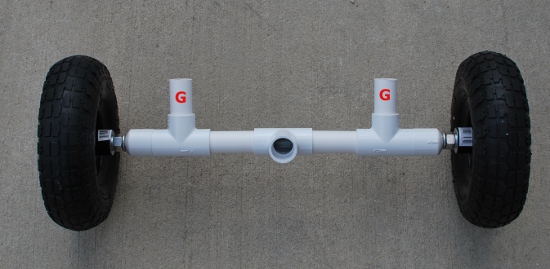
Step 3 – slide the threaded rod through the entire lower portion.  Test fit the lock washer and nuts as seen in the picture below, put the wheels on and screw the outer bolts on as well.  I cut the rod at 25.5”, but make sure this works for you before you cut.  Tighten the inner nuts and lock washers down and the PVC will not budge.


Step 4 – Assemble the following pieces as seen below and glue where noted.


Step 5 – Assemble and glue the top support sections that the pool noodles will be fitted to. 


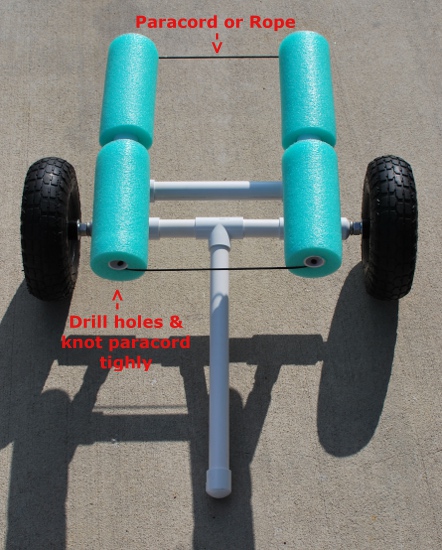
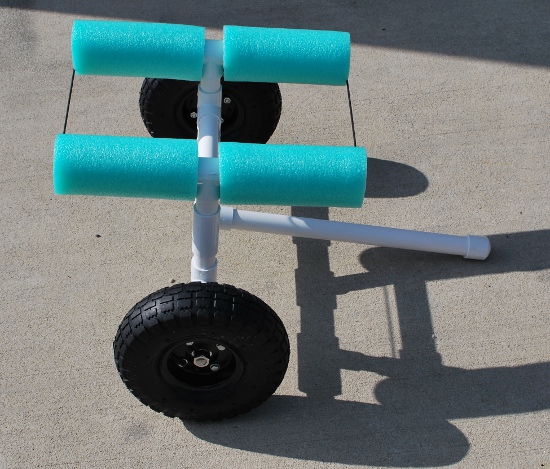
Step 6 – Glue the end cap to the handle section.  Before sliding on the pool noodles that are cut to fit over the supports, drill holes in each of the 4 ends of the supports as seen below.  Slide the pool noodle over the supports and then tie in the paracord or rope as pictured.  This is an important step as it will keep both supports facing the same way during the loading/unloading process.


That’s pretty much it.  I use the handle as a push rod to get the cart in position under the yak.  I use on hand to lift the back handle of the kayak and the other to slide the cart into place.  It can also be used as a “kickstand” and the yak can be placed on top of it.  A 13’ strap holds it in place nicely.


The whole assembly breaks down in seconds and fits nicely inside the front hatch.  I only have to remove one wheel and the pool noodle covered supports to make it fit.  Save some money and build one yourself!


 Thanks for reading and be sure to visit our online store at www.PalmettoKayakFishing.com