

I have been asked quite a few times recently about my fish finder setups and what I would recommend as far as units and mounting are concerned. When I wrote for Examiner.com I published a basic “how to” article on making a removable system. Instead of linking back to Examiner, I decided to park the write-up here with a few updates.
 |
| Backlight on the Humminbird Piranhamax |
As far as units go, I have a Cuda 242 permanently mounted on one of my Big Game’s and a Piranhamax 160 on a removable setup that I use on my girlfriend’s tarpon 140. Whenever I head to Virginia, I take the removable unit and use it on my Big Game that I keep at my family’s house. Both are great basic fishfinders, but the Piranhamax has a better LED backlight system if you plan on fishing at night. If I ever have to replace either unit, I will probably take a hard look at some of the higher end color units that have more features. But if you want a great fishfinder at an exceptional price, the Cuda series from Eagle and the Piranhamax line from Humminbird are excellent contenders in the sub $100 range.
The technology housed in the most basic sonar unit can be a real asset to the kayak fisherman. Modern units are waterproof, energy efficient and can be powered by a variety of different battery options. This write up will focus on the basic guidelines used in the construction of a removable, all in one, portable assembly that even a novice do-it-yourselfer can put together in a few hours.
The unit pictured in this article, the Humminbird Piranhamax 160, retailed for $89 at the West Marine in July of 2010. The newer Piranhamax 170 is currently available for $79 at a number of different retailers local and online. Aside from the basic sonar functions, this model includes a water temperature sensor and a 5 stage adjustable backlight setting. I called Humminbird and was reassured the unit operates on a power input range of 10 to 20 volts. This is nice because it gives a lot of flexibility when considering how to power the unit. Since portability is the objective, 12 NiMH rechargeable “AA” batteries wired in a series (diagram can be seen HERE) were chosen to power the unit. Each of the rechargeable “AA” batteries supplies 1.2 volts (as opposed to standard, non rechargeable “AA”s that deliver 1.5 volts) for a total of 14.4 volts when wired in a series. The 12 rechargeable batteries will power the unit for more than 8 hours of continuous use.

The basics components of the mounting assembly are listed below:
Lowes:
A length of ½” schedule 40 PVC pipe
(1) - Weatherproof Round Blank Plastic Cover (electrical aisle)
(2) - ½” “T” PVC slip fittings
(1) - ½” 90 degree elbow PVC fitting
(2) – ½” PVC plug (flat portion to which the round black cover is bolted to the PVC assembly)
Package of Velcro One Wraps 23" x 7/8" each (located at the end of aisles at Lowes)
(1) – 18 inch length of flat aluminum bar (bolt and screw aisle)
Various mounting nuts, bolts and screws – all stainless steel.
1 ½” diameter ABS black plastic tube, cap & screw on fitting (for battery housing, located in the PVC aisle)
(1) – small jar of PVC glue
(1) – tube of silicone sealant
(1) – tube of Loctite thread locker
(1) – tube of Loctite thread locker
Radio Shack:
(3)– 4 AA battery holder
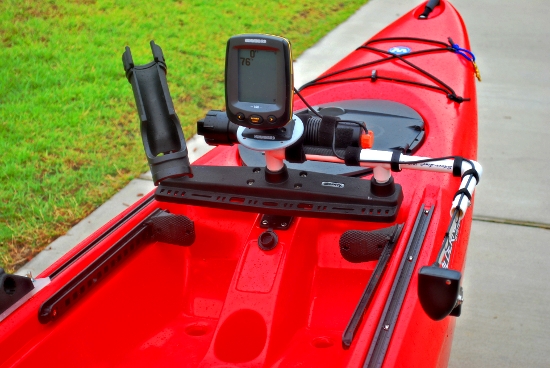
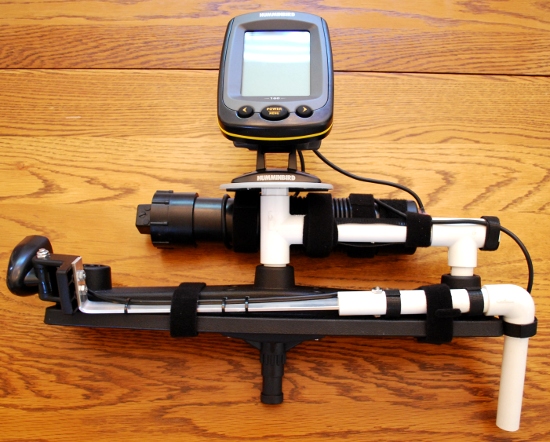
Since each application is different, use the pictures as a guide to construct your own setup. I selected a Scotty Triple Rod holder for the base of the mount, but a standard single Scotty mount receptacle will work just fine too with a little creativity. The triple mount provides a very solid platform to mount all of the components and leaves one mounting hole open for other accessories. All the white PVC parts are glued together except for the horizontal piece that slides into the 90 degree fitting. Leaving one end of the arm unglued allows the transducer arm to swivel up and out of the way in shallow water. Glue the flat PVC cap into the "T" fitting and drill a hole through the center of the gray round plastic disk and the end cap. Attach the two pieces with a large bolt and nut (use Loctite on the threads). Using the included hardware, attach the fishfinder to the gray plate as pictured above. Cut two small lengths of PVC tubing and glue them into the down ends of the "T" fittings. These pieces fit snuggly into two holes of the Scotty triple mount and lock the whole assembly in place.

The picture above gives a clearer illustration of how to wire up the unit. The positive (+) wire from one holder is soldered to the negative (-) wire on the next battery holder. When all three holders are wired in a series, solder the remaining positive and negative wires to the power cord supplied with the fishfinder. Each battery assembly slides into the black ABS plastic tube. Apply silicone sealant around the power wire where it exits through the battery tube to ensure a watertight assembly.

Bend the end of the aluminum bar at a 90 degree angle and mount the transducer to it using stainless steel nuts and bolts. Be sure to apply Loctite to the threads to ensure a semi-permanent bond. Slide the other end of the bar inside the vertical portion of the PVC pipe, drill a hole through both sections and bolt into place. Attach the transducer wire to the arm with Velcro and wrap the excess transducer cord around the black ABS battery tube. Secure the wrapped wire to the battery tube with 2 Velcro straps. Lastly, attach the battery tube to the horizontal PVC arm with the remaining straps until a solid connection is made.

I have been using this setup for just about a year now and it still works great. If I were to change anything, it would be to add a cotter pin or something similar to the PVC arm that swivels up and down. It still works just fine as-is, but the cotter pin would allow for it to lock in an upward position a little more securely.


Interesting set-up. However, do you have to remove all the batteries to charge/replace them? That is a bit of work it seems.
ReplyDeleteMost of the time I don’t make comments on websites, but I'd like to say that this article really forced me to do so. Really nice post! fishing underwater camera
DeletePortability and "all in one" were the focus of this build. I do have to unscrew, pull the batteries and charge them.
ReplyDeleteIf you want a more semi-permanent build with a 12v sealed battery box check out http://palmettokayakfishing.blogspot.com/2011/08/diy-kayak-fish-finder-install-2012.html and the battery box build http://palmettokayakfishing.blogspot.com/2011/09/kayak-battery-box-for-2012-ride-135.html
excellent, will do! thank you - this blog is most helpful, you are doing us a great service, keep it up!
ReplyDeleteHow far is your transducer in the water?
ReplyDeleteWow, this is absolutely amazing and I can't wait to try this out. Good thing, I read your blog, thanks for the tips and I hope that I will be successful in installing this in my kayak. ha ha
ReplyDeletenice article, it's old but still use good. Thanks!
ReplyDeleteWhen you want to buy a good fish finder you need to ensure about its quality. Many dual frequency transducers will come with both 20 and 60 degree cones.Frequencies also are a big factor in transducers. Most transducers will come with either 50, 83, 192 or 200 kHz frequencies, all in direct relation to the cone angle.
ReplyDeleteHigher frequencies, like 192 and 200 kHz work best in shallower water, while the low 50 kHz transducers work best for use in deep water, like for commercial usage and professionals.
i always like those fishing finder becouse of its response
ReplyDeleteI think this post is more about how to setup a portable fish finder on your kayak. The DIY setup instructions are beneficial indeed and I'm looking forward to give it a try. A best fish finder is always very effective to point out fish locations in the deep water.
ReplyDeleteYou did a great job with the pictures. Even the best kayak fish finder can be complicated to install sometimes, so this illustration will help a lot of guys and girls out. Keep it up man!
ReplyDeleteReally a nice set-up for fishing you have shared with us. I have enjoyed it a lot. Thanks.
ReplyDeletebest fish finder
portable fish finder
Woah! I'm really digging the template/theme of this site. It's simple, yet effective. A lot of times it's hard to get that "perfect balance" between usability and visual appeal. I must say you've done a great job with this. Additionally, the blog loads very quick for me on Opera. Excellent Blog! fish mount combo
ReplyDeletegood fishfinder article. thank you palmetto kayak fishing
ReplyDeleteFinding the same post last week but didn't get. I'm very pleased with you. However more post about it online, but your understanding is more and more upper with users. I want to share it with my friend who has seeking like this post.
ReplyDeleteHello again, I have a little demand from you. Could you please help me reach out a post about best kayak fish finder. I decided to buy fish finder for me. I heard about it a very lightweight and useful thing for fishing. I also find from your blog but didn't. If you mention a post with my comment I will be very happy. Waiting for your reply.
Thanks
Bikash Roy
I just want to thank you for sharing your information and your site or blog this is simple but nice Information I’ve ever seen i like it i learn something today. Fish Mount Combo
ReplyDeleteBenefits such as affordability, exercise, the excitement of close quarters fishing, and the fact that kayaks can be launched from and fished in just about any kind of water. best kayak fish finder
ReplyDeleteThanks for sharing very helpful information. Here is another Humminbird Helix vs Solix Fish Finders site, they provide very helpful services. Looking forward to more great content.
ReplyDeleteFor walleye, Justin uses a two-step approach. When fishing shallow https://wildfishingman.com/best-line-for-surf-fishing/ walleye (under 15 feet) he opts for 6lb 100% fluorocarbon line.
ReplyDeleteEverything is fine but there are a lot of different factors that go into finding the best fish finder for the money. You need to consider the type of fish you’re targeting, the size of the water body you’ll be fishing in, and your budget.
ReplyDeleteI really high quality fish finder is Lowrance Hook2
ReplyDeleteExcellent post! Thanks you so much guys for sharing on your knowledge about this field. camera pole
ReplyDelete