
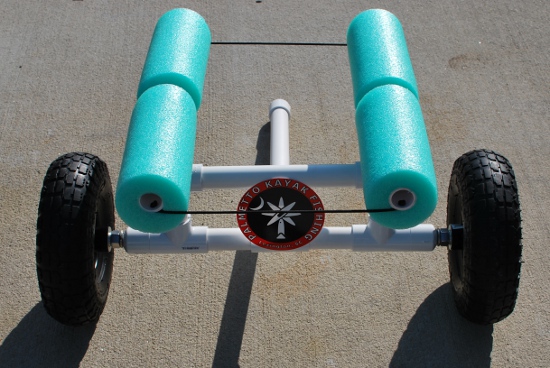
I carry quite a bit of gear when I go fishing and when one factors in the weight of my Ocean Kayak Prowler Big Game, the 12 volt Werker fish finder battery and various other gear, I’m at or above the 100 pound mark. I have been using this cart design for over 2 years and it has yet to fail me or damage my kayak. While some elements of this cart may look familiar, there are a few tweaks that I came up with that make it super strong and functional. It is at home on rough terrain and really makes transporting a heavy kayak an easy process. For the budget-minded kayak fisherman, this cart is relatively inexpensive and built to handle whatever you throw at it. Here’s how I built it.
SHOPPING LIST:
Home Depot or Lowes
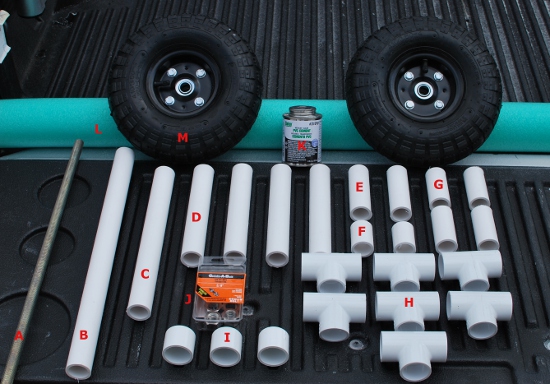
3 foot section of 5/8” threaded rod ($4 – item “A” in picture below) – NOTE: it will be cut down to 25.5”
10’ Section of 1” diameter Schedule 40 PVC pipe ($3)
PVC Glue ($3 – item “K”)
7 – 1” PVC Tee fittings ($3.50 total – items “H”)
3 – 1” PVC Caps ($1.20 total – items “I”)
5/8” “Create-A-Bolt” stainless steel nuts, washers and lock washers kit ($3.80 Home Depot Item “J”)
 |
| "5/8" Create-A-Bolt" |
Walmart
JUMBO pool noodle ($3.88 – item “L”)
Harbor Freight
2 – 10” pneumatic wheels/tires (LINK)– frequently on sale for $5.99, used a 20% off coupon always available HERE or in magazines & weekly mail fliers. (TOTAL for 2 tires $10 – Items “M”)
TOTAL COST = Around $33
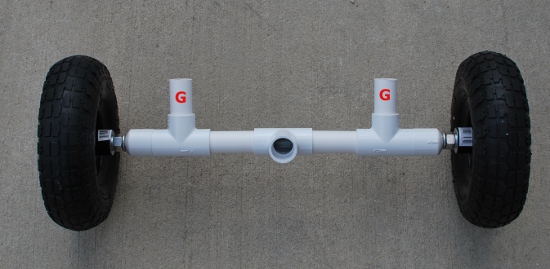
Step 1 – Cut the 10’ section of 1” PVC into the following lengths. Your LAST cut should be the piece of PVC labeled as “C” in the picture above. After the lower assembly is fitted together, double check the measurement to make sure that “C” which was 10.5” is the correct length.
(B) – 18”
(C) – 10.5”
(D) – cut four 8” pieces
(E) – cut two 4.5” pieces
(F) – cut two 1¾” pieces
(G) – cut four 3” pieces
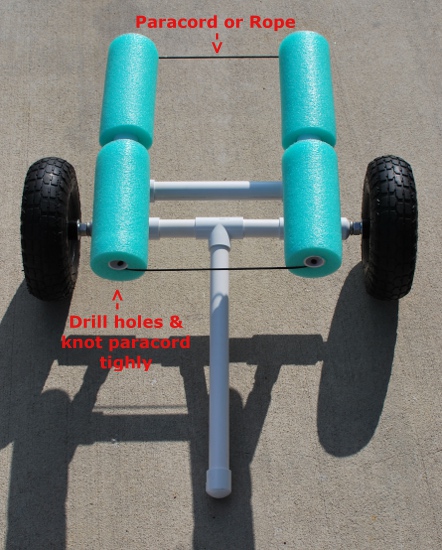
Step 2 – Drill a 5/8” hole through two of the PVC end caps.

Assemble the lower unit pieces together as pictured below. I don’t use any glue here because the way I attach the threaded rod holds the entire assembly together just fine. Just to recap, “F” is 1¾” long and “E” is 4.5”.
 |
| No Glue Needed |
 |
| Assembled |
 | ||||
| Side View |
Step 3 – slide the threaded rod through the entire lower portion. Test fit the lock washer and nuts as seen in the picture below, put the wheels on and screw the outer bolts on as well. I cut the rod at 25.5”, but make sure this works for you before you cut. Tighten the inner nuts and lock washers down and the PVC will not budge.


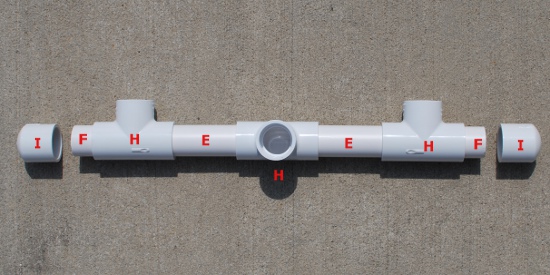
Step 4 – Assemble the following pieces as seen below and glue where noted.


Step 5 – Assemble and glue the top support sections that the pool noodles will be fitted to.


Step 6 – Glue the end cap to the handle section. Before sliding on the pool noodles that are cut to fit over the supports, drill holes in each of the 4 ends of the supports as seen below. Slide the pool noodle over the supports and then tie in the paracord or rope as pictured. This is an important step as it will keep both supports facing the same way during the loading/unloading process.

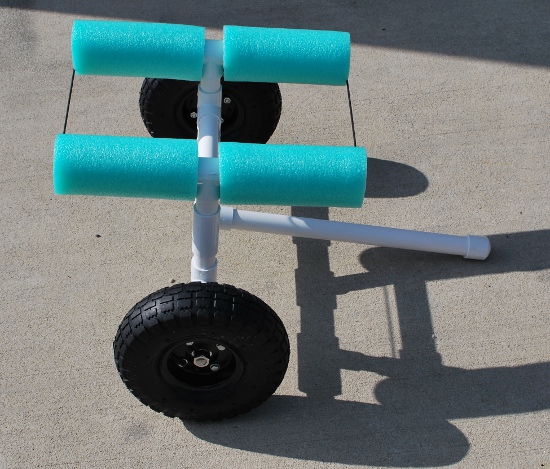
That’s pretty much it. I use the handle as a push rod to get the cart in position under the yak. I use on hand to lift the back handle of the kayak and the other to slide the cart into place. It can also be used as a “kickstand” and the yak can be placed on top of it. A 13’ strap holds it in place nicely.


The whole assembly breaks down in seconds and fits nicely inside the front hatch. I only have to remove one wheel and the pool noodle covered supports to make it fit. Save some money and build one yourself!


Thanks for reading and be sure to visit our online store at www.PalmettoKayakFishing.com
Cool idea! I think I will be building one of these real soon. I have made several things using pvc and found that as an added precaution you can drill small holes through all of the connections and put cotter pins through each one in case the glue doesn't hold up. You can actually just forget about the glue and only use the cotter pins. Then if you need to disassemble it for whatever reason, all you have to do is pull the pins out. If the pins break, they're cheap to replace. I just bought my first kayak a week ago and have been out on it twice already. I can't believe I waited this long to get one. I see many hours in the future spent sitting in that thing. My wife is gonna hate it! Ha! Ha!
ReplyDeleteWee sheet metal screws would work as well instead of cotter pins! I just glued mine together.
DeleteThank you very much for posting your wonderful kayak cart plans! I am a 46 year old woman, with a limited knowledge of tools. But I was able to build this great cart in a few hours. Everyone at the lake stopped me to check out the cart. I do not break the cart down while at the lake. I just wrap a bike chain around the frame and padlock it to a tree.
ReplyDeleteSo glad you guys enjoyed the post! The response to this type of DIY build has been exceptional, so I will publish more how-to's soon.
ReplyDeleteThis was very nice of you. People like you make this world a better place, thank you for your help.
DeleteHey... how does the design work on the new ride?
ReplyDeletedid you need to make any mods?
Nope, it was a perfect fit. I use this same design for the OK Big Game, Tarpon 140 and now the ride. It really does work great!
ReplyDeletewhat is the distance between the two top noodles pieces. Trying to see if this would work on my Wilderness commnader 120.
ReplyDeleteAwesome design and instructions
Cheers
gdub
12" from the top center of one pool noodle across to the top center of the other pool noodle. The diameter of the mounted noodles themselves is right at 3-1/4".
ReplyDeleteThank You very much I that will be perfect fit. Again thanks for your post any more creative use of PVC projects in the works ;)
ReplyDeleteCheers
gdub
What is purpose of the paracord, does it provide stability and is it needed?
ReplyDeleteThanks
gdub
Hi gdub! The paracord keeps both of the pool-noodle-covered arms going in the same direction during loading, use and unloading. If you have ever watched a kid try to water ski for the first time, you may have seen that his skis tend to kind of go in various directions. Add two rope connectors in between those skis and everything stays in line - same principal here. The paracord also adds lateral support, taking outward pushing pressure generated by the weight of the loaded kayak off of the T fitting where the removable arms plug into. The more curved the hull of your kayak is, the more this force comes into play. You could use a pin system through the uprights to keep them rigid and in the same direction, but the outward pressure still exists. I found that the paracord solves all of these issues and makes it easy to hang on a hook in my garage. The weight of the kayak keeps the arms from pivoting during transport. Hope this helps!
ReplyDeleteBuilt one Saturday it works great!
ReplyDeleteHope you can advise me - one nut comes off when the wheels turn and the nut on the other side tightens until it gets to the point where the wheel won't turn. By the time I get to the water one wheel is about to fall off and the other is just being dragged across the ground. Are the flat washers that came with the Create-A-Bolt supposed to be used? I have used the lock washers but can't tell from the pics if the flat washers are used (and if so, where). Any idea what I'm doing wrong with the wheels?
ReplyDeleteNick - don't tighten the outer nuts down on the wheel, simply put them on and give some room between the nut and the rim of the tire. I don't use the flat washers. The rim portion of the tire should be able to move horizontally on the threaded rod a little bit between the "permanently installed" inner nuts and the hand-removable outer nuts. When the nuts aren't torqued down against the rim, you won't have the issues that you are having. - Paul
ReplyDeleteThanks very much for the quick feedback - unfortunately the outer nut keeps coming off the threaded rod and the wheel falls off - and even when I have the other side's nut on loosely, as I pull the cart, the nut tightens on its own. Maybe I need to do something to the threaded rod so that the nuts aren't able travel?
ReplyDeleteNick
you could also try nylock nuts for the outer nuts. they are nuts with a nylon ring built in that acts as a lock washer but it does not have to be tight against something to work. It just grabs onto the threaded rod.
DeleteI had the same issue recently as I just built mine. after reading all the replies, i decided to take off the washers to discover the washers were rubbing against the rim of the wheels causing the issue. the suggestion to use 2 nuts with a lock washer in between allows you to leave some space for the wheels to move freely and without the nuts coming off or tightening. Unfortunately, this makes the break down for storage require that you have 2 wrenches (one to hold the inner nut in place and one to loosen the outer nut). You can also store the wheels on the back deck if you have a SOT, but that exposes the bearing to the elements and possible corrosion (a cover would work). Either way I am a whole lot happier with my new wheels to get me to new places and old ones with less effort. Great post! Now if someone knows were to get 6 foot 5/8" fiberglass rods without having to pay shipping, I can use the same technology to make my stick it pin!
DeleteIs the threaded rod itself spinning? The inner nuts with the lock washer should be torqued down tight so that the threaded rod essentially becomes a solid axle. The threaded rod shouldn't spin at all if it is tightened properly. You can always get rid of the outer nuts, drill a hole through the center of the threaded rod ends and use a cotter pin or something similar to keep the wheels on the axle. I have never had any of the issues that you describe. Good luck with it man.
ReplyDeleteBuilt this today, wheeled it around for a few minutes and the nut loosened up too. Put it back together, tight on the nut before the wheel and loosely on the nut after the wheel, then sealed it up with some clear nail polish. We will see if that helps.
DeleteThat's what I did. I drilled a centered hole through the axle, added a cotter pin & flat washer. I glued the frame together & used a 5/8" piece of aluminum rod - $3.50 - for the axle. I put flat washers on each side of the wheel to keep the spinning wheel from wearing on the pvc.
ReplyDeletecan you tell me where to purchase the aluminum rod?
DeleteThanks for the suggestions - will try drilling a hole and adding a cotter pin/washer. I was trying to use plastic wheels from fertilizer spreader but they don't seem to be up to the job so I have ordered the pneumatic tires. That may help with the problem also. Thanks again for the feedback.
ReplyDeleteI built it myself (61 year old woman) and it was easy to do and looks great!!! I used pipe insulation instead of the swim noodle, just cause this time of year it was hard to find. Also, I couldn't find the "create-a-bolt" kit where I live but bought the pieces. It cost me about $55 here in Canada to build it but it works great!!! I also spray painted it the same colour as my kayak before putting the wheels on it.
ReplyDeleteWhy is "C" 10.5 inches the last cut? Adding all parts comes to total of 85 Inches which would leave you 35 inches left over. Am I missing something?
ReplyDeleteHi James, you are correct in that you will have 35" of PVC left over from the 10' piece. I mentioned cutting "C" at the end because it is the final horizontal piece in the assembly and some folks will be using a hacksaw or other less accurate cutting tool to cut all of the PVC sections. If the cuts in the lower axle portion are a little off, the width of "C" may not be exactly 10.5". By making "C" the final cut, the horizontal distance between the "T" fittings can be measured beforehand and part "C" can be cut to the correct length which may or may not be 10.5". By measuring and then cutting this part last, you can get a perfect fit.
ReplyDeleteoops, now you tell me! I precut all the pieces so it remains to be seen if the top horizontal member is right. No biggie though, I still have enough material left over if its too short, but so far they seem fairly accurate even though I used a two way regular hand saw (almost a rip blade, but it cuts fast). Also I am not sure the axel holes are centered, but I dont think it will make that much difference. Tons of fun!
ReplyDeletenot to beat this to death but....."got er done"
ReplyDeletehad a little trouble with threads on rod after cutting, but backed the inner nut out a few times and it cleaned them up okay. The pool noodle bores were too small and working them onto the support messed them up a little. With a little care I can replace them and do a better job though. Instead of para cord, I used mini bungies. I got lucky on the top horizontal member, and it fit the first time. Thanks!
Im going to try to make this. Ive seen a few others that use a metal rod for the axle vrs the threaded on and just put a couple cotter pins on ends with washers on inside......not sure what im ganna try yet on the axle. Gread instructions though. very well detailed.
ReplyDeleteNice work! I sat down this weekend to try to design my own and ended up just building yours. I really wanted something that was permanently mounted and could be "folded up" or retracted once in the water. Far more physics and geometry than I realized or cared to deal with. Thanks for the details.
ReplyDeleteThanks! I've got another design that I'll get up on the blog soon. Here are some pics - http://palmettokayakfishing.blogspot.com/search?updated-min=2012-01-01T00:00:00-05:00&updated-max=2013-01-01T00:00:00-05:00&max-results=1
ReplyDeleteI built the cart today and could not be happier. It will fit nicely in my suitcase when I present it to my son in Hawaii. I'll make a second one for myself later. One thing I did made attaching the pool noodle a little easier. I took a one inch hole saw blade and attached it facing backwards on to a piece of metal electrical conduit. Twisting and pulling the hole saw blade through the noodle made the hole large enough to easily fit the noodle over the pvc. Thanks for designing and sharing the instructions.
ReplyDeleteJMK3 - glad it worked out for you and I hope your son enjoys it! That is a great idea using the hole saw blade to bore out the pool noodle...thanks for sharing.
ReplyDeleteYou should sell them
ReplyDeleteShould you glue the centre T so that when you insert the handle it remains at the same angle (for a kickstand)?
ReplyDelete@Steve - you don't need to glue it. The pressure from the torqued bolts on either end keep everything from slipping/moving including the kick stand/push pole "T". I recently came up with another cart design as well if you are interested - http://palmettokayakfishing.blogspot.com/2012/02/build-strong-diy-kayak-cart.html
ReplyDeleteThank you so much for not only detailed and easy to follow instructions but for the pricing and locations purchase the items needed. This is a much heavier duty cart than the commercial ones that I have seen at a much lower price. Thanks again for your time and effort and willingnesss to share.
ReplyDeleteYou are very welcome! I need to find some time to put together so more DIY posts very soon. Have a good one man.
DeleteBRAVO!!! This plan worked out perfectly for me! Even a shopping list too!!! And it made it fun to build - not a headache! Thanks so much!! And, as I'm not going to hang my boat, I'm adapting your plan to build a stand for the front end of the boat using legs instead of wheels up front.
ReplyDeleteAwesome! Glad to hear it worked out for you and you are welcome. Good luck with your stand design as well.
DeleteThank you so much for sharing. I looked all over the web and finely found your design. It was easy and your directions were perfect. I made it in less then and hour. This gal is so happy that I do not have to drag my kayak anymore. :)
ReplyDeleteSo glad that it is working for you!
DeleteYou have done an excellant job of describing how to build the kit and I will be following your instructions. What is your opinion of using small spoked bicycle wheels (re. 12") instead of the furniture dolley type wheels? In theory they would be lighter and easier to inflate I think. Thanks again.
ReplyDeleteThanks! I think your idea with the small bicycle wheel will work great as well!
DeleteThinking more about the wheels type. The wide type as used in your example would be best if there is ever a chance of using it through sand or soft decomposed granite. If you'll only truck your kayak across pavement, cement or hard pack dirt I can see bike tires as an advantage.
DeleteWouldn't it be more stable if the pool noodles were located beneath the hull grooves/channels? Seems like it would make it slightly easier to center on the cart when loading and, from your pics, would require the wheels to be further apart, which would add stability over rough surfaces. Nevertheless, a really well-done project.
ReplyDeleteTY TY TY.. Loved the Idea and went about making one. A few things that I ran into for others who are venturing out... i found 5/8 thread on grainger on clearance for around 1.50 (so actually bought a couple to make the neighbors one as well).. it was great - but..... the bolt in the box was 11and the rod i bought was find thread 18. Finding 5/8 nuts\washers at lowes or home depot was hit and miss - ex. they didnt carry lock washers that size.. so ended up having to go to Ace hardware to get a nut with the right thread size. so lesson #1 - make sure you can get the nuts, lock washers as your threaded rod before you leave :) 2nd tip - have the nuts already on the rod. That way you can back the nut off and "clean" up any thread damage from cutting or drilling if your using pins. Thanks again..
ReplyDeleteYou are welcome. Glad it worked out for you and that is a heck of a good deal on the threaded rod.
DeleteOne additional solution for the nuts falling off or tightening...
ReplyDeleteIf you put two nuts on the outside with a lock washer between them, you can tighten the two nuts together (against each other). They will never move.
Question. Instead of cutting the 3' threaded rod to 25.5" can I just use a 24" rod? Also how will this change the pipe measurements?
ReplyDeleteI'm sure it would work. You will have to cut part "C" 1.5 inches shorter and cut both part "E"'s 3/4 inches shorter.
DeleteHave you tried using the 24" rod with cutting part c and part E shorter? Does it work?
DeleteTwo things: 1. Seems that the threaded rod would not be good for the bearing surfaces in the wheels, and 2. Why restrict the length of the axle? Longer = more stability and one would only have to measure associated elements to fit...
ReplyDeleteI haven't had any issues with the threaded rod on the bearings - going on 2 years of use. You could make it wider but it works well and is quite stable as is. It's all about customizing it to make it work for your application.
DeleteBuilt it this afternoon from scraps in my garage... zero cost!!!!
ReplyDeleteSeems to be an excellent design and extremely functional... I'll find out tomorrow! Thank you... I have a Hobie scupper cart but I think this one is better because it allows better weight distribution. I'll let yo know...................................
OOOPS!!!!!!! Glued the top supports too. Well, it's an easy fix. Love the support. Easy instructions. Thanks. New to Kayaking.
ReplyDeleteFrank
Amazing design! I say that because it solves a real world problem easily, and cost effectively. One change I made: I used Nylon locking nits on the ends of the threaded rod (Nylock), and tightened them so there was a little play. No cotter pins needed, and the nuts will not come off until you take them off. If you try thios though, cut the threaded rod an extra 1/2" long, so you have something to grab with pair of vice grips when tightening them.
ReplyDeletethanks again!
That's what i'm gonna do...I left the rod a little longer as well
DeleteHas anyone ever tried to transport 2 yaks with this? Is it possible or is there a different design? I had thought about building a cart that each yak could lean inward creating a triangle but am not sure. Thanks for any thoughts...
ReplyDeleteI am trying to design one, with the kayaks on their sides & facing each other. I think I need a post in the middle, and a T at each side sticking up to frame each position. Any other ideas?
DeleteAwesome design very sturdy and easy instructions. Just tried it out this past weekend had a great morning fishing the Laguna Madre Bay.
ReplyDeleteSouth Padre Island.
Hi,
ReplyDeleteThanks for sharing such detail of your great looking cart. Does anyone know how much weight this will hold on rough portage trails?
Cheers,
Jay
I bought a flimsy kayak cart that does not work for my Vapor 10XT. This looks great. I have researched many plans and ideas. This seems the best. I have all the materials and tools I need, now I can't wait to start building it. Then I will paint mine, but haven't decided on a color or camo. Thanks for this great plan.
ReplyDeleteOh, yeah. I am using locking hex nuts for added stability.
ReplyDeleteAny suggestions for what to use when jumbo pool noodles aren't around? Can't find 'em anywhere. I suppose I could make a cut lengthwise on a regular sized noodle to fit it around the PVC, and tie paracord around it to keep it in place.
ReplyDeleteI made center to center length of the foam covered arms roughly 22" for a 30" threaded rod. My yak slips lop sided from side to side between the two noodle arms now. Sigh....
ReplyDeleteHave just used rope instead of tie down straps. Those are coming soon.
--- had the same problem & have had to glue the noodle arms.
DeleteTaking the yaks on our first trip to lake Superior looking forward to building this. Just curious how the threaded rod was cut so that the threads were not damaged nd the nuts would go on.
ReplyDeleteI just used a hacksaw and started cutting, no real technique. I did put the outer nut on first so I could use it to condition the threads if need be (didn't really need it though)
DeleteAfter you cut the threaded rod, use a bench grinder to put a steep bevel on the end of the rod. This makes getting the nuts on and off a breeze.
DeleteThank you for sharing your cart, great presentation and design...How could I modify the cart to a scupper cart for a Hobie Mirage Tandem and Hobie Adventure?
ReplyDeleteThanks again...Pablo Miami Fl
You are welcome. I'm not sure how you could modify it to make it a scupper cart, but I am sure it could be done. Personally, I stay away from scupper carts as they tend to put a lot of stress on the scupper holes and can damage the kayak - especially with the amount of gear I carry with me.
DeleteThanks for the quick response and advise... I'll do it your way..
DeleteI have a 4.2 m x-13 which weighs 30 lb unloaded ,tried one of these carts and quite frankly they are only good on the flat ,if your on a steep / slippery/uneven/rocky bank it nigh on impossible to lift your kayak onto it without it all going pear shape. I speak from bitter experience . the answer is a home made scupper trolley. Its so easy you don't lift your kayak up, put your rods one side 9the up side, every thing secured carry a small square of some rubber mat on concrete or rocks and turn the kayak on its side slide the trolley into the scupper holes and pull it back over its that easy believe me and if you want to be flash if in fairly calm water with a bit of depth at the edge you can put the trolley in while in the water with a bit of practice. peoples faces are a picture when the see you with the kayak in the water and you just walk out of the water and the kayak magically rises out behind you .I really hope this helps as this is the best way. there are plenty of vids showing how to make a scupper trolley. I used an old scissor trolley wheels which fit straight over some aluminium tube it goes through the pvc water pipe T pieces . just remembered why its so hard with the other type of cart you have to strap it down while on a wet steep slope not good I can tell you .the other way it's a piece of cake
DeleteNot all kayaks have scupper holes, I have a Dagger Delta which has no holes.
DeleteWhat about one of those nuts that have the nylon in them to keep the wheel from screwing itself off...? I think those nuts lock themselves just not sure how well...
ReplyDeleteAnybody try this on a loaded PA14?
ReplyDeleteI just built my cart and plan to take it to the beach this weekend. It worked well in the dry test holding up my Hobie Adventure Island.
ReplyDeleteI didn't use a pool noodle but 1" water pipe insulation with an added a plastic tie wrap on each arm.
Thanks for posting your solution. The shopping list was very handy and all my PVC cuts worked perfectly using your measurements. Thanks again.
Rick Moynahan Visalia CA.
Thanks for the excellent, sturdy cart -- I now have two of them! They have made my life easier, and I'm sure they will for years to come. But I have run into a few problems, and wanted to share my problems and solutions in case someone else has similar issues. I'm sure there are better solutions out there, but these are what has worked for me. A little background: I built this cart to portage between lakes and ponds in the Adirondack State Park in Upstate New York. The portage trails are often rough and sometimes hilly, range from 0.1 to 1 mile in length, with plenty of rocks, erosion, and exposed tree roots. I found that when pulling my 70-lb kayak (probably 80 lbs with gear), the cart would twist sideways (pivot) under the kayak if one wheel hit a root and not the other, and this often required me to stop, unstrap, re-position the cart, and strap down again. I was using one 16-ft lashing strap to hold the kayak on the cart, and tightening it as much as possible. But after hitting obstacles over and over again, the cart would gradually slide backward on the kayak and the straps would loosen because the kayak gets narrower, so the pivoting would then get worse. However, I believe I have solved this problem by adding two additional straps to the one shown in your photos. The first one wraps around the "handle" pipe a few times and then around the kayak to hold it tight to the bottom of the hull so it can't easily shift side-to-side -- this resists the pivoting problem with the cart. (The handle pipe must be firmly inserted or it may pop out.) The second strap goes through the main crossbar on both sides of the cart and attaches somewhere toward the bow (front) of the kayak, and this keeps the cart from sliding backwards when you hit a bump. You may need to be creative to find something in front to strap to -- in my kayak, I am able to slip the strap under the combing (like a spray skirt would). I have so far only tried this out at home, but I threw some firewood logs out in the back yard and was able to drive one wheel over them repeatedly without the cart shifting or pivoting under the kayak. One other problem I had was the same as other people have reported -- the nuts loosening on the threaded rod axle. I found that the bearings on the Harbor Freight tires are only present on the side towards the center of the cart -- on the outside, if you tighten the nut down, the wheel rotation will unscrew the nut. After trying a few things, what worked for me was to use two stainless steel nuts and a lock washer on one wheel and leave that "permanently attached", and then use two nuts plus a homemade rubber lock washer on the wheel that I wanted to tighten/remove with my fingers (i.e., no tools). For the homemade lock washer, I just cut a 1.5" square of some 3/8" thick rubber foam (an old PC mousepad, actually -- a hard/dense foam works best) and punched a 5/8" hole in it. You can then finger-tighten one nut against the other and they won't accidentally unscrew -- but to be safe, keep an eye on them as you head down the trail. Note that you will have to buy another Create-A-Bolt kit to have enough stainless steel nuts.
ReplyDeleteI hope that these comments help somebody, or spark an idea on a better solution!
Tom
Why not go with smooth rod or pipe and just put a large clip through a hole in each end. Just pop out clips to remove wheels.
ReplyDeleteHas anyone tried extending the vertical pieces using a cross rather than a tee so that a stub of pipe will stick up into the holes frequently found in plastic kayaks. This would keep the dolly from sliding and allow use without a strap on relatively smooth surfaces.
This is outstanding.
ReplyDeleteBuilt mine today. Thanks for the excellent instructions!
ReplyDeleteHello Kayakers, Warren here, I have yet to build my cart, mainly because my first Kayak won’t been delivered until sometime this month. If you are wondering what I’m getting, I have ordered the new Cuda 12 by Jackson. Can’t wait! Thus is the problem with filling all my time thinking of thing to do before I get my new Kayak. I LOVE the cart idea and will be building one soon. I have read all the posts and fine that several of you are having problems with the wheels and axle nuts. I fail to see a real description of the wheel to use on this cart. The problem of the axle nut backing off or tightening up just did not make since to me so I did some investigation. Hope this clarifies the type of wheel needed to resolve this problem and where to get them. As you search for your wheels you’re going to fine hundreds of types and with that hundreds of prices. I have bought 10 inch hand cart replacement wheels. You can get them at any Harbor Freight, Northern Tool, Tractor Supply and various auto or hardware stores. The prices run from about $6 to $20 each. I opened the newspaper up a couple of days ago and Harbor Freight had them on sale for $3 each. Needless to say I left skid marks in the drive way. The wheels you will need to use have a floating axle in the middle of the rim as shown in the picture below. I need to make a note here that the picture is not the same tires I purchased. I simply use this picture because it illustrates the floating axle the best of all the pictures I could find. When assembling your wheel simply, make sure your axle nuts and washer if used are only touching the outer part of the floating axle and not any part of the rotating parts of the wheel assembly. With this simple thought in mind you can tighten down those nuts as tight as you want and they will not rotate on the threaded axle rod. Hope this helps.
ReplyDeleteGood morning - hope you have fun building the cart and enjoy your new kayak when it arrives. A link to the tires that were used in this build has been added in the "parts" section above under the Harbor Freight heading (http://goo.gl/sAkP4) They have bearings inside the rim that allow them to work exceedingly well even with a lot of weight. The trick to avoid any tightening/loosening when traveling is to simply not tighten the nut down against the rims. Leave about a 1/4 or 1/2 inch between the outside bolts and the rims and you will have no issues whatsoever with tightening or loosening of the bolts. This allows the tires to "float" on the axle - I have pulled my fully loaded Ride 135 the better part of a 1/2 mile without any issue. Hope this helps and have a great weekend.
DeleteSorry Kayakers I seem to be having trouble with that wheel picture.
ReplyDeleteThis comment has been removed by a blog administrator.
ReplyDeleteIs there a trick to drilling the 5/8" hole in the end caps? When I try to do it, the caps shatter.
ReplyDeleteI put the cap in a vice to hold it (support hte cap near the closed end) then used a 5/8 hole drill (Home Depot Cheap 2.95)
DeleteGoogle 5/8 Flat Boring Bit
How about using a plug rather than a cap. It has a flatter surface to drill on.
DeleteI had to figure out how to do my drilling on the cap too. On the rounded outside, there was no mark and I figured I'd have trouble centering it. On the inside, there is a little nubbin in the center from the mold. I put it in a vise, inner side up, and drilled a few very small pilot holes at an angle near the center. Then I took a slightly larger bit and drilled out the center. Then, since I didn't have a 5/8' hole saw but I had a 5/8" spade bit, I used that, sticking the sharp tip through the pilot hole. I drilled most of the way through, then stopped and turned it around in the vise so that the outside was sticking up. Then, I used the spade bit to finish the job. This is what worked well for me!
DeleteI may have stumbled over a better way to produce the hole. Use a 1" coupling and a 1" to 1/2" bushing. Insert a small piece of 1/2" schedule 40 to be flush with the top of the bushing.The ID of the 1/2" is slightly smaller than the 5/8 threaded rod. A quick pass with a 5/8" hole saw makes a perfect fit. No worry about centering the hole.
DeleteBuilt mine this week.... Maybe three hours in it... Test drive this afternoon if the wind stays calm.
ReplyDeleteReal goal is to so fishing.... Thanks
I just built a cart with my 5 and 3 year old girls. It was wicked easy to build and a fun project with the kids. Now to get my first yak and get on the water fishing as soon as it stops snowing.
ReplyDeleteThanks for the plans and money savings.
Built this cart yesterday, works great! Took me about 1 hour to cut, layout, and assemble all the pieces. Biggest pain was simply finding everything, as Home Depot didn't have the wheels but Lowe's did, Lowe's didn't have the create-a-bolt pieces but Home Depot did, Walmart didn't have pool noodles but Meijer did...sheesh! Haha.
ReplyDeleteOne word of advice; the pool noodle doesn't need "boring out" to make it fit. Spray a shot of WD-40 or Silicone based lubricant on the INSIDE of the noodle, and it will slide right on that 1" PVC no sweat.
Anyone try stacking 2 kayaks on 1 cart? Only have 8 footers. I have to use an elevator to move them out of my building and if I could stack them would make it easier.
ReplyDeleteI bought 10" pneumatic wheels at Harbor Freight. Instead of using the 5/8" threaded rod, I bought a 1/2" conduit galvanized tubing at Lowe's. I did this because the sales rep. said the outside diameter was 5/8". Unfortunately the tubing did not fit into the wheel. I assumed that if a 5/8 threaded rod worked that the 5/8" conduit tubing would work also. I mainly did this to avoid having to use the nuts and washers and use large cotter pins or clips instead. I am a bit confused because I read another reader's comments that the 5/8" Alum. tubing worked just great??
ReplyDeleteHas anyone built this cart from smaller diameter pvc pipe? I am building one from 3/4 inch pvc( because I already had that on hand). Now I'm beginning to wonder if it will be strong enough? I have a 15' fiberglass canoe, not much gear other than a trolling motor w/battery, and a couple of lightweight aluminum paddles...comments?
ReplyDeleteJust a trolling motor and 50 pound battery? lol
DeleteI have built this cart using 3/4 inch pvc John and it does work fine for my 12' Perception Pescador. The only exception to this being perfect (as someone anon talked about) that I have experienced was with it getting knocked around and basically coming out of alignment with my yak. I see what that person suggested and am going to consider it as a solution but am also trying to think of any other options. If anyone could offer suggestions I would love to hear them. Great cart though and I am confident that this is a minor detail waiting to be solved.
ReplyDeleteMichael, did you have any problem drilling the 5/8" hole in the 3/4" cap or plug for the threaded rod axle? I noticed that it will take up almost all of the surface area of the plug or cap.
DeleteOh - I'm sorry, I totally forgot that that is the one difference. I have a smaller diameter rod that I use for the axle. It does allow the tires to wiggle a bit however I haven't has any issue with that.
DeleteJust Built this!! Thank you VERY much! Very happy. Great sturdy cart. Wished I could have found a 5/8" axle instead of the threaded rod, but still a fantastic job because the the excellent instructions! If anyone has a problem with the nut coming loose, a simple wrap of wire or tape on the end of the rod will stop the one wheel from spinning the nut off. Or bur that one end of the rod where the wheel spins the nut off and simply disassemble the other wheel to store in the hatch.
ReplyDeleteI can only get 8" pneumatic wheels with 1/2" bore-will this work as well?
ReplyDeleteThe load weight(including the 50 lbs. for 9.5' kayak) will be less than 75 lbs.
Hello, the 8" wheels will probably work, but you will need to adjust the size of the rod to fit the new wheel size. Good luck and let us know how it turns out with your modifications.
DeleteI used plastic bearings (Mcmaster-Carr) that have 1/2" ID vs 5/8" bore in end caps. This would work perfect for your wheels. 1/2" rd stock, two washers, two lynch pins. Set it and forget it. Pull pin and throw...
DeleteGreat idea as I've been looking at carts on sale and thought "I could do that...!!!" My only question is, I plan to tow the kayak on my bike. Do you recommend this cart or does it need 'beefing' up?
ReplyDeleteThanks, Derek
Many thanks for the plans. $60 worth of parts at the local hardware store, 2 hours and we now have a trolley to move our 2 kayaks. I widened the trolley to fit the step in the hull of our kayaks 17" instead of 10.5" for Part C and 7 and 3/4" each for parts E. looking forward to using it on our up and coming camping trip.
ReplyDeleteThe design looks great, but does anyone have an idea of the weight capacity of this baby? I would like to stack my son's 54# kayak on top of my 69# kayak, if possible. That would be a total weight of maybe 140 lbs with not much gear. Thoughts?
ReplyDeleteOK, all finished! $31.18 worth of parts and your plans worked great. I did use stop nuts on the ends of the axle to mitigate the tightening/loosening issues that some people mentioned. I also took someone else's suggestion and sprayed WD-40 into to the pool noodle pieces. They slid on without having to bore them out at all. I think we're going to Paddle Fest tomorrow, so I'll get a chance to try it out. Thanks again for the detailed instructions!
ReplyDeleteI just wanted to thank you for engineering this cart. I made some changes only because of the junk I had laying around. 1/2" rd stock, 5/8" OD brass bushings for the wheel set that I now dual purpose with my hand truck. I also used 1" plastic bearings for the axle rod (McMaster-Carr), instead of drilling the caps. To reply to a question above; whilst yak on cart, I put my 200lb ass in the seat, no flex, no slippage. I don't see any problem with another yak on top. Your design is flawless. Again, Thank You!
ReplyDeleteAnyone used this cart for towing behind a bike?
ReplyDeleteGreat design and really helped me plan out my cart.
ReplyDeleteI used the base but wanted a scupper style mount so I used 2 90 degree bends with one going down to 3/4" male adapters. The first 90 is not glued so I can twist them in and out to change the width of the scupper plugs. Added a removable kick stand to keep it upright while I put the kayak on the cart. Now this will be able to fit the 3 different kayaks I've got with very minor adjustments: https://www.facebook.com/photo.php?fbid=10151515711059232
Thank you ! I built one last night. I went and used 1/4" cotter pins at the ends of the threaded rod.
ReplyDeleteMade this for my wife... question is... what adhesive is best used to keep "swim noodle" in place ?
ReplyDeleteThe paracord tied through both ends of the supports should keep the swim noodles from sliding off.
DeleteTo keep the outer wheel nut for spiinnig off us lock nuts. They will stay on.
ReplyDeleteJust made this and modified the width to use with a fold-a-bote. Used lock tight for the outer nut so it does not back off. Works just great.
ReplyDeleteThank you for this! Made this the other day with a couple minor modifications, but it was easy and came out great. Only took about an hour too. A few of my friends and neighbors are going to make it too after seeing mine. Thanks again.
ReplyDeleteKyle from NJ
I am making this soon. I'm a 65 yr old nana and I've saved two tires from our old pressurewasher before we headed to Florida for the winter. Now that we're back at our cottage I'm ready. All reviews look to me like I could actually do this!. I will post again when I'm done. NANA
ReplyDeleteThanks - I made two of them for my kayaks. You can see my pics here.
ReplyDeletehttps://plus.google.com/photos/109403519060451644666/albums/5872437877182418753
Hi
ReplyDeletethis looks great! Will it work for my 16'canoe?
James
Thanks for the GREAT cart plan. Works beautifully. Couldn't find 5/8 locking nuts so I just double nutted the ends of the axle. Couldn't be more pleased.
ReplyDeleteGlad it worked out for you!
DeleteThank you so much! Directions were very clear. Works great, even without the handle--somehow one of the T's I purchased was threaded and I didn't notice until I went to put the handle piece into it at the very end. I am going to work on that, but in the meantime this will make transporting my kayak to water's edge so much easier!
ReplyDeleteYou are welcome - Glad it worked out for you!
DeleteWould the straps hold a 16ft canoe? If the straps are done up tightly, doesn't it pull the pvc pipe apart?
ReplyDeletePretty sure the design will work for a canoe as well. If you run the strap in the same manner as the pics, it will not pull the PVC pipe apart or outward. since it is between the axle and the other horizontal upright, it is very secure. Good luck with the build.
DeleteI built one of these but subsituted the threaded rod & nuts with a 2 foot length of 1/2" copper pipe. The 1/2" pipe is 5/8" OD so it fits just right into the wheel hub. Drilled holes in the end on the pipe and used axle pins to hold on the wheels. Another friend built the cart as described and was able to stack 2 14' Necky yaks on the cart. Said he had to portage about 2/10 of a mile and it worked great.
ReplyDeleteForgot to add - with using the copper pipe, I had to glue the bottom assembly together.
DeleteThis comment has been removed by a blog administrator.
ReplyDeleteHello - this cart design will work for just about any kayak. You may (or may not)have to adjust the width of the cart so that the pool noodle "arms" fit where you want them under your specific kayak. Happy building!
DeleteMade mine today, thanks for posting the plans! Cost have gone up a bit since you posted. I have about $37 in it but well worth it.
ReplyDeleteFor some reason, I cannot find end caps in any of the hardware stores. Is there anything I can substitute for that or just leave them out completely?
ReplyDeleteI need a cart for my Stealth 14 and found these plans which look great. I do have to wonder why make it with the two rest bars and have to play around with straps when two PVC lengths could be used to secure the kayak using the scupper holes. Are there disadvantages to using the scuppers, will the stress create cracks?
ReplyDeleteI built this cart and used the scupper holes as you suggest. It works okay, but you have to be very precise to make the risers fit the holes just right. One inch pvc is too wide for most scupper holes, so you have to go down to 3/4, which makes it a little weaker. Also, you tailor your cart to only one kayak, so if you want to use it for another kayak/canoe/whatever, it probably wont work.Its also a little tricky to place on the risers--had to get down on my butt, under the kayak to place them in the scupper holes.
DeleteThanks so much for these instructions! Mine worked great. Unfortunately, the wheels at the place I went to cost $20 each, but all in it was still cheaper than buying a kayak cart. My kayak's front hatch fits both wheels so I don't have to disassemble them! Thanks again, will definitely recommend your site!
ReplyDeleteMy boyfriend just bought a Tarpon 120 and was looking at carts to purchase. His birthday is on tuesday and I wanted to buy one of the carts he had seen. I checked the price and knew I couldn't afford a $150+ cart. So I did some research and found this design on Pinterest. I picked up all the supplies and completed the build in a few hours (and this was my first time ever building something like this) I cannot wait for him to open it!! I painted the cart black and it looks awesome! He is going to be so surprised. Since I was way under my budget for his gift, I was able to make a milk crate fishing rod holder and buy a folding net and other goodies to put in the crate. Thank you so much for sharing this with us! You helped me to make a really great gift that he is sure to brag about to all of his buddies!
ReplyDeleteOnly change, well addition, is that I used primer before the cement for extra durability!
DeleteI cannot find the end caps so I have simply fitted the pipe around the area of the wheel - it looks to fit well but it rotates inside the plastic. Will some grease get this moving ok (grease inside pipe and the wheel)?
ReplyDeletehttp://imageshack.us/a/img836/420/z3qy.jpg
http://imageshack.us/a/img38/2586/cjg.JPG
http://imageshack.us/a/img23/5506/sxpx.jpg
Just made mine yesterday.
ReplyDeletecost around $40 and assembled in 2 hours!
THANK!
I've very nearly completed my cart, and I'm so proud! Now there's just a final step: cut the noodle and slide them onto their supports. What is the best tool to cut through the noodle? Can I just use the same hacksaw I used for the pvc pipe and axle?
ReplyDelete(Now I'm about to paint my oh-so-cool cart jet black and hope I get a suggestion for cutting the noodle by the time the paint is dry!)
Catherine
One thing to know using PVC - I does NOT take sunlight. In a year or so of exposure it becomes brittle and will shatter. I found this out with a lawn sprinkler system.
ReplyDeleteA layer of paint will stop the break down. I used PVC pipe, painted brown, and eight years when I removed the system the pipe was still flexible and had to be cut out with standard pvc cutters.
Morale: Paint your cart and it should last for a long time. since the cart is not exposed to sunlight every day, it will do better than my sprinkler system, but it will break down from sunlight.
Having said that, I'm gonna make one...a red one.
Just finished my yak carrier, easy to do, looks great and works great!!
ReplyDeleteThank You for the plans.
Dan L.
Built two for my Tarpon 140s. Fantastic to build a project where someone else had done the hard work...the planning. Work like a dream! Thank you!
ReplyDeleteIan
Built two today. Used NyLok nuts on the inner part of the axle and drilled the outer part to take a spring clip. Attached the spring clip to the washer and painted them flourescent pink to keep it easy to see. Will paint the rest yellow to match the yak ;-). Thanks for a great article
ReplyDeleteFinished one for my wife's kayak today. Isn't perfect, for I'm no expert, but definitely pleased and so is she!
ReplyDeleteI have been looking at plans to build (2) kayak carts for Ocean Malibu Two XL's for awhile. I came across your plans and really like them, also the instructions, pictures and where to buy items are awesome. I could not find the "build a bolt" but its just the 2 sets of 5/8 nuts, washers and lock washers. I also added 1 1/2 inches on the threaded rod to make it 27 inches just incase I decide to put a pin after the nut to secure it (just as a safety.) I just finished 1 cart but have to glue the pvc and pad (and paracord.) It looks really good, thank you so much for plans and detailed instructions. I can not wait to test them out.
ReplyDeleteI forgot to mention used a mitter box to get nice striaght cuts and for the hole in the pvc cap I drilled a small pilot hole and them drilled it out with a 5/8 flat wood bit. Hope the trick with the WD40 with the pad works. Thanks again and if anyone wants a great cart, this is the one.
DeleteSimple design, easy to build, still only about $30, works great. Thanks!
ReplyDeleteFound your design on line and built it last night. About 2 hours. I substituted stainless all thread at 2 foot instead of the 25.5 inch zinc plated . I'm in salt water and wanted it to survive submersion in the ocean. Located big noodles at Sports Authority.
ReplyDeletethanks so much for the user friendly plans and shopping list..
Great design, and was simple to build. Thanks so much for putting this all together, i haven't test it yet but i built this in about an hour and for about $35...i had no idea there was a Harbor Freight near my house....but there was, score on the wheels ; )
ReplyDeleteBuilt this last weekend...easy simple build. Love it! Works like a charm. I have the wheels held on with loose fitting nuts that have a hole drilled through that and the all thread with a codder pin to hold it in place. Knotched the end of the nut and all thread to match mark where the holes line up. Works great and makes breaking it down and assembling it easy. Thanks for this tutorial
ReplyDeleteVery appreciative of your effort and great thinking.And in no way is my intention to bring any of it down. But just a suggestion, more as to help other fellow kayakers out there, Amazon.com has one for around $ 45.99 with free shipping. I'm just giving everybody another alternative and let them make the decision. But, once again thank you for taking the time and posting your great job.
ReplyDeleteto widen the space between the noodles to accommodate wider hulls I added 2x90 degree elbows on each of the top of the stationary parts which normally the noodle Ts would go in. Added another small piece in the T and they ride just fine. can be moved in and out to extend the width or bring back to the original designed width. Hope this makes sense?
ReplyDeletejust tripped accross this blog while searching for a utilitly trailer / cart for my mobility scooter. i plan to adapt the basic design. the base / wheel setup appears to be the perfect starting point. i will be adding a small platform and tow handle. end result will be simialr to a fishing / pier cart. the latest kayak cart design (metal framed) in your newer blog could also be be used. i need to be able to breakdown the trailer quickley with out tools. i will glue where required and use pins to secure the rest. i will be sure to send pictures when i finish building. thanks
ReplyDeleteAnyone have thoughts on using 1/2" solid rod, drilling 4 holes and using hairclip pins to secure the wheels? That would allow for quick assembly/disassembly without fear of the wheel backing off a nut.
ReplyDeleteI made two of them this Sunday. Will check the issue to the outer nuts on the axle, maybe add some lock tight. Thanks for the design
ReplyDeleteGreat build ,Really like the way you lay it out and identify the parts. I do have one suggestion, now no I have not read all of the 145 responses before mine, so if this is a repeat I am sorry. The suggestion is , you should consider painting the PVC, the sun s uv ray will do a number on it.
ReplyDeleteI made a similar cart and it lasted about a year before it became very brittle and failed.
Thanks for the post
Just built the cart. Great design. I used Insulted pipe covering used to slide over exposed pipes to keep from freezing up. They are pre cut down one side so I just cut them to length, slit them open and slid them on the support rail pvc. They seemed seccure, but had to use some duct tape around them to give it a red neck flair. I don't think it is really necessary, but good use of camo duct tape. Have a good one
ReplyDeleteGreat design. A breeze to build. Of course, being imminently propinquitous to a Harbor Freight brick and mortar was a BONUS for me. I will probably locktite the axle bolts as I really don't plan on "portaging" the dolly. Hmmm... actually, if I carefully drill the axles... I could just cotter use a pin I suppose... but I want them "snug"... Thanks much and warm regards from SE Cape Coral FL!!!!!
ReplyDeleteGreat build ,Really like the way you lay it out and identify the parts. Lighting For Artwork
ReplyDeleteThanks for the instructions! I am using this to build a trailer for my bicycle!!
ReplyDeleteJust finished up and am going to go test it out....
Hello, you did really well in your blog. The post is full of information .
ReplyDeleteIt is really awesome thanks for sharing this...
4 Post Car Hoists
Nice cart! I found another really nice design here too: http://www.howtobuildakayakcart.com/
ReplyDeleteThanks...Do you have 2 that you want to sell?
ReplyDeleteJust what I needed to transport my nearly 100# fishing yak around the house and beach!
ReplyDeleteTNX for the idea~~easy to build and cheap!
Has anyone built one with a scupper hole design? If so, did it work well and do you have list of parts you used? Thanks, Bruce
ReplyDeleteAmazing idea and Bill Of Materials, I just finished mine. Thanks for sharing
ReplyDeleteThanks for the plans, great cart.had to make some mods as all the parts are not available in the UK so easily. Used larger bore pipe, filled it with expanding foam for extra rigidity. I overcame wheel probs by using threaded bar then used lock nuts to secure axle then wheels, no tightening or loosening of wheels, just hope my son doesn't miss the front wheels off his toy tractor. Thanks again.
ReplyDeleteThanks so much for the plans. Works great. Since I kayak in salt water, I used a 5/8" copper pipe instead of the threaded rod. To keep the wheels on I just drilled holes sideways through the pipe and used stainless bolts and locking nuts.
ReplyDeleteI recently picked up a perception swing, would this trailer fit that?
ReplyDeleteSound design. Can be simplified, though. The PVC Axle Holder (bottom horiz assembly) does hold together very well on its own. Inner nuts are really unnecessary. A Washer can provide the contact surface for the wheel. The outer nut can be replaced by a washer and hitch pin, which is more easily removed than a nut an cannot come unscrewed. With no washers, a solid 5/8" rod could be used but the threaded rod may be more available. The hitch pins make removal of both wheels possible in a jiffy. Overall works well. Thanks for the source tips, too. This trailer could also be used for a canoe or stand-up board.- very versatile.
ReplyDeleteBeautiful design. Is it become simple from any way. The PVC Axle Holder hold all the conditions of very well on its own.
ReplyDeleteThe nuts can be replaced by using washer and pin. I think it can be easily removed.
Workshop Equipment
Wonderful design. I built this today and it works great. Thank you for sharing in such detail so many can benefit and enjoy.
ReplyDeleteThanks for the plans and parts list. I built the cart in 2 hours. Canadian price (2014) came out to about $65.
ReplyDelete--Robert
How does it work on a cuda 12
ReplyDeleteThank you so much for posting this. I saw a woman using this at the last kayak meet-up and she was kind enough to give me your site. At 70 I don't want to carry my yak very far. It was easy to make.
ReplyDeleteEasy fix for the outer nuts either tightening or falling off (if you have that issue): Make the threaded rod (axle) about 1 inch longer than specified in the plan and double-nut at each outer end. Tighten these two nuts against each other and they will not move no matter what. Love the plans!
ReplyDeleteThank you for the instructions!! I just built this and it wasn't too difficult! I'm a mid-40's female who isn't a regular builder of things. I used the exact parts listed in the instructions and had no trouble finding them in the stores listed, it was really helpful to have the exact list. You might want to also add the rope/paracord to the parts list. I found the hardest part to be drilling the hole in the end caps. I tightened the vice as tight as I could and the drill would still just rip them out of the vice. I finally had to drill the hole starting with a very small drill bit, and gradually using larger drill bits until I worked my way up to the 5/8" (which I had to borrow, doesn't come in the standard set of drill bits.) I haven't tried this out with my kayak yet, but just wheeling it around the garage with nothing on it, I'm having the same problem with the nut coming off. I'll try one of the suggestions mentioned in the comments and see what works. Thanks again!
ReplyDeleteAs a followup, I replaced the outermost nuts with "jam nuts"; each nut was replaced with 2 "Jam nuts", which are half the width, so still fit fine, and they jam against each other. I used this to wheel my kayak from car to boat launch, down ramp, and later back up ramp, to washing station, then back to car, and the jam nuts were still holding tight!
DeleteThanks for posting these plans.....excellent instructions. I just finished my cart with one caveate..... used 1.25" PVC. It's OVERKILL!!!! I think I could move my bass boat with it! LOL!! I remembered all the parts list while at Home Depot....but messed up the size. Didn't feel like going back to exchange the materials. Oh well..... Next step is paint the cart to protect the PVC from UV exposure since it will most likely live outdoors.
ReplyDeleteBuilt two carts from your excellent plans. One mod that I made to simplify wheel removal was to substitute 1/2 ID copper pipe for the threaded rod. The OD is 5/8 so the wheels fit perfectly. I drilled holes about 1/4" from each end to accept a washer and hitch pin rather than deal with nuts and lock washers. To keep the copper pipe from spinning inside the PVC, I drilled through the PVC and pipe at one fitting and inserted a nut and bolt. Works great.
ReplyDeleteVery clever! Thank you for posting articles like this. A really big help for most of us who loves doing our own stuff at home.
ReplyDeleteBuilt two of these today for our Malibu Kayaks. We modified them slightly so that the pool noodles fit right into the grooves on the bottom of our yaks. Perfect!! Can't wait to use them soon.
ReplyDeleteNice and Interesting. Thanks for sharing this. Folding Beach Wagon
ReplyDeleteThis comment has been removed by the author.
ReplyDeleteVery well said. These tips are really amazing. I appreciate it for sharing them. Pvc Pipe
ReplyDeletePankaj International is committed to developing, manufacturing, delivering and servicing quality products. Our goal is to continuously improve our products and services in order to satisfy the needs of our customers before, during and after sales.
ReplyDeleteIn each of our product Category our quality is amongst the best in the world. We use the best quality of raw materials that are tested and subjected to stringent standards as per required specifications. Process capability studies & other statistical tools are employed to check all critical parameters during production. Every batch of finished product undergoes strict down the line process control monitoring which guarantees superior quality products. As a result, Pankaj International is synonymous with technology, quality and service.
Fasteners exporter India
Hello Friends ... Nice Blog!! Like your Blog and your ideas and i think its beneficial for us and i keep to visit your blog regularly because i got lot of information through you blog.
ReplyDeletePVC Pipe
Can the "handle" (sec. B) be made longer? It looks too short. You have to reach under the kayak in order to use the handle? We'd also like to hook this to our trailer hitch for very short haul to the water. Any ideas on what could we use for something to attach to our hitch ball?
ReplyDeleteGreat looking plans! I'm gonna make it this weekend. Although I'll make it a little wider to fit a little jonboat as well as my kayak. I'll probably just use one length of paracord ran through both supports, only needing one knot and no holes to drill. Looks like either way would work.
ReplyDeletedid this project and only suggestion or tweak i made was using jambnuts to lock the nuts in place
ReplyDeleteWill this cart design work with the Lifetime Manta, 10'x3', two seat tri hull design?
ReplyDeleteAnybody have a DIY for a kayak loader for one person loading onto car rack?
ReplyDeleteBuild this cart in such a way that you can turn it upside down and strap it to the trunk or hood of your car and use it to load by putting the kayak on the wheels and guiding it to the roof.
ReplyDeleteBuild this cart in such a way that you can turn it upside down and strap it to the trunk or hood of your car and use it to load by putting the kayak on the wheels and guiding it to the roof.
ReplyDeleteBuilt this for my yak,painted pvc black and camo taped ,looks awesome thanks for directions
ReplyDeleteThere's now one in Australia. Built a modified narrower version (same height) to strap to the tail end of a 5.2 meter Stealth fishing kayak to protect the rudder when loading and unloading the kayak onto my 4WD. The modified version works like a charm. Thanks.
ReplyDeleteGreat stuff ..
ReplyDeletePlumbing Pipe
Pvc tube
I am a 59 year old widow of 2 and a half years who is very active and independent. One of my sons found this and showed it to me. I went and picked the parts up and made 2 of them in an afternoon. One for me and one for my best friend who has just started kayaking. Very good directions and easy to follow. Thank you so much for posting the cart. It will make transporting from truck or camper to the water so much easier.
ReplyDelete