

Whether you prefer the store bought variation or some other form of anchor, having the ability to quickly disconnect from it is crucial when kayak fishing. Although not recommended, I often anchor in river current to get close to the fish I am targeting. Using this simple setup in conjunction with an anchor trolley, I can deploy as well as release my anchor in seconds.

The blaze orange dog training dummy from Remington is a cost effective, durable float that makes anchor retrieval a cinch. Nite Ize’s stainless steel “S-Biner AHHH…” carabineer serves as a sturdy anchor line holder and doubles as a bottle opener back at camp. If experience has taught me anything, it is that you can never have enough bottle openers.


Key Components:


Velcro Strip – I recommend and use Velcro’s “One Wrap” 7/8”X 23” straps as they work well even when soaked. A 3 Pack is around $4 at HardwareandTools.com and they are also available at select hardware stores and Walmart.
10’-14' section of cord, preferably a different color than the anchor line. Home Depot and Lowe’s sell 75’ length packs of 5/32” diameter cord for less than $3.
Length of anchor line and anchor of your choice.
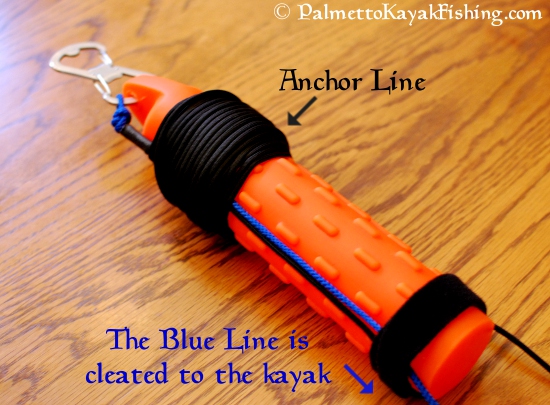
Start off by securing the “S-Biner AHHH…” to the vinyl dummy as pictured.

Take the 10’ - 14' length of cord and make a small loop in one end that will fit over the “S-Biner AHHH…” Attach and position the cord against the dummy as pictured and secure it with one of the Velcro straps at the top. This setup allows the pressure exerted from the anchor line to pass around the vinyl dummy instead of through it.


Tie the end of the anchor line to the 10’ length of cord as pictured and tuck the knot under the Velcro.

Wind the anchor line around the dummy to take up the slack. Use one of the extra strips of Velcro to keep the wrapped anchor line secure on the dummy.
Lastly, clip the “Figure 9 Carabiner” to the side handle of the kayak or similar location that is out of the way yet easy to reach. On the setup on my 2012 Ride 135, I use this carabineer to control the anchor trolley line and keep it from riding up. It can be easily removed in seconds for full front-to-back operation of the anchor trolley if desired. 95% of the time I have the anchor trolley in the forward position anyway.

To use this setup, slide the blue cord through the ring of the anchor trolley.

Leave a foot or so of excess line free on the tag end and secure it to the “Figure 9 Carabiner” as noted in the manufacturer’s instructions. This allows the anchor trolley to be placed in the desired position before the anchor is deployed.
Leave a foot or so of excess line free on the tag end and secure it to the “Figure 9 Carabiner” as noted in the manufacturer’s instructions. This allows the anchor trolley to be placed in the desired position before the anchor is deployed.
Unwind the anchor line from the dummy and drop the anchor over the side. When the desired length of line has been let out, simply wrap the anchor line around the “S-Biner AHHH…” carabineer 4 times - two wraps between each opening as pictured.


It only takes a couple of seconds to accomplish and creates a non-slip, yet easy to remove connection. Toss the dummy into the water and get ready to fish. The location of vinyl dummy in can be adjusted by simply taking up or letting the slack out of the “Figure 9 Carabiner” line.


It only takes a couple of seconds to accomplish and creates a non-slip, yet easy to remove connection. Toss the dummy into the water and get ready to fish. The location of vinyl dummy in can be adjusted by simply taking up or letting the slack out of the “Figure 9 Carabiner” line.
To come off the anchor, simply yank the tag end of the line connected to the “Figure 9 Carabiner”. The line will slide right out of the entire assembly. The blaze orange Remington float will be easy to spot when you return to retrieve your anchor. Tight lines - Paul
Note: If you need a beefier setup, upgrade to Remington's 3" x 12" training dummy that runs $6.99. Switch out the small “Figure 9 Carabiner” for the larger sized one that costs around $6. These substitutions will allow for much larger diameter ropes and a heavy duty setup if needed.
Cool idea, but not sure I "get" it. If you want a no-drill anchor cleat, the figure 9 carabiner is a great idea. But, since you have no way to control anchor depth after you send it away, this kinda seems a bit impractical. Let's say you're fishing in 15' of water, and you just want to move 50' up the bank. Since your anchor depth is set on the dummy, it doesn't seem like you can simply draw your anchor up to the bow, paddle to the next spot and then drop your anchor again. Looks like you have to bring you anchor in, reel it back over via the trolley, grab the dummy and wind the rope back in to get the anchor up.
ReplyDeleteI wanted to accomplish 2 main things with this setup. 1 - I wanted a quick release anchor without having to drill any additional holes and 2 - I wanted to be able to easily retrieve it if I release from it. A lot of times on the rivers, I find that if I hook a big enough fish, I need to release from the anchor so I'm not working against both the fish as well as the current. I tend to put out 20-25 feet of line and "set it and forget it". If I want to move to a different spot, I simply paddle upstream a little bit, pull my anchor up (w/o wrapping it around the dummy) and throw in in the footwell area of the yak. I hardly ever have to change the depth of the anchor, but it I do, it takes only seconds. There are definitely advantages and disadvantages to this setup, but it really works well in some of the areas I fish.
ReplyDeleteI've been in both situations where sometimes I need a quick release, and others I just want to pull up anchor to reposition. Palmetto, I really like your setup, and it definately works for stationary fishing (I'm even going to put one together myself).
ReplyDeleteOne other consideration that I have done is to run the rope through the eye of the float and tie a knot on the end of the rope big enough that the float won't come off. I still run the rope through the trolly and Fig 9 like you did but just keep the slack in a position that I can toss the whole line if I want to move quickly (float moves freely along the anchor line between the anchor and trolly). I generally use one of those real light velcro straps (like you use on power cords) to keep my excess secured to the Fig 9. The light strap pulls away pretty easy.
This set up works well if you keep a fairly short anchor line (20'-25').
Good post. Thanks for throwing it out to us.
Love your various kayak systems and ideas, they are all very well done, in particular the depth finder mount w/ rear transducer arm. I considered using the liberator transducer mount/arm but your set-up is much cleaner and preserves the track space for other items.
ReplyDeleteSeeing I just bought a new 2012 Ride 135, will be implementing a few of your systems.
Was curious what type of anchor line you recommend for the QRAS you use? The anchor line in the photos is much thinner than I normally use, but somewhat mandatory for this set-up.
Thanks!
Great Information!! Kayak is a wonderful and Amazing sport in the world. Love kayak photos..
ReplyDeleteI've never tried anchoring in my kayak before, so I always wondered about a system that would allow me to release anchor without trollying it back broadside... dangerous. Sweet set-up!
ReplyDeleteVery Nice Thanks for Sharing ! This is what I need for some areas that I fish in.
ReplyDeleteVery nice. I will use this as a guide for doing this myself. At the moment I'm using a 5# barbell weight run through a pulley on the front handle strap. I have 3 issues: 1) want a quick release, with way to pick up later. 2) Want to select front or back anchor point. 3) Want to be able to grab anchor weight to store inside kayak.
ReplyDeleteI think this design will do all 3 for me at a low price point.
And little more about Kayak anchors and AnchorWizard you can read here http://www.craigmarine.info/accessories/anchoring_docking/KayakandCanoe-Anchors-and-anchor-types.htm
ReplyDeleteAnchor Wizard do have a very unique pontoon anchoring system. If you didn't find the video link on their website, just click on the "Watch Our Videos" button on the main FB page(facebook.com/AnchorWizard) and the first video that is listed is the pontoon video that they shot this summer.
The video shows how to install the unit, with the "nose piece" actually mounting under the deck.
This is the right blog for anyone who wants to find out about this topic. You realize so much its almost hard to argue with you (not that I actually would want…HaHa). You definitely put a new spin on a topic thats been written about for years. Great stuff, just great!
ReplyDeleteFantastic post! Many thanks with regard to placing this particular collectively! This really is certainly 1 excellent publish. Many thanks for that useful info as well as experience you've therefore supplied right here. Right now click here Check Cashing Many thanks a great deal for the publish.
ReplyDeleteMany thanks for that good weblog. It had been very helpful personally. I am pleased I discovered this web site. Thanks with regard to discussing around. Right now click here check cashing We as well usually discover something brand new out of your publish.
ReplyDeleteRecord would love that you should many thanks with regard to make use of in your initiatives a person obtain created info. Regarding exact same best get the job done due to a person in the future additionally. This time around simply click as well as follow-up cash advance carson Along with many thanks with regard to make use of in your superb web page.
ReplyDeleteMany thanks for the period lots of created for composing. When I is completely considering by using this region. Appealing ideas, useful as well as fantastic design, due to the fact possesses nutrition via suggestions as well as innovative ideas, numerous excellent ideas as well as dedication. At the moment follow-up website backup Bless a person within the excellent ideas. As well as bless a person created for composing.
ReplyDeleteWPC Fluted Wall Panels are an environmentally friendly option for wall cladding. Composed of recycled materials like wood and plastic, these panels offer exceptional durability, resistance to moisture, and a distinct fluted design that adds texture to any space.
ReplyDeleteA DIY quick-release kayak anchor system with a built-in bottle opener? Now that’s a smart and efficient setup! Just like how precision matters in anchoring your kayak, accuracy is crucial in roofing takeoff to ensure the right materials and cost estimates. Whether you're securing a kayak or estimating a roofing project, having the right tools and methods in place saves time and effort. Proper planning makes all the difference, whether on the water or on the roof. Great innovation!
ReplyDeleteEstimating Services provide accurate cost evaluations for materials, labor, and equipment across residential, commercial, and industrial projects. By delivering detailed takeoffs and cost breakdowns, these services help contractors prepare competitive bids, manage budgets effectively, reduce risks, and ensure timely project delivery. With expert analysis and advanced estimating tools, professional estimating services improve efficiency and support successful project outcomes.
ReplyDeleteThis is a really clever setup — I like how you’ve made the system both functional and affordable using easily available tools. The quick-release idea makes a lot of sense for safety, especially when fishing in current. It reminds me how having the right system in place saves time and effort, whether it’s on the water or on a job site.
ReplyDeleteIn my field, we handle construction estimating services, and the same principle applies — having reliable, efficient tools makes all the difference in managing projects smoothly. Thanks for sharing the detailed breakdown of the materials and process here; I might even try this anchor system myself on my next trip.
Universe Estimating provides precise and reliable Rebar Estimating Services for contractors and construction professionals. We deliver detailed rebar quantity takeoffs, bar bending schedules, and accurate material and labor cost estimates to help you submit competitive bids, minimize waste, and ensure efficient reinforcement planning for your projects.
ReplyDelete